Showing posts with label vegetables. Show all posts

05 October, 2014

Help Me Identify This Edible Root


I bought these roots at Price Chopper the other day. They were right next to the parsnips, and no one in the produce department could tell me what they were (and the cashier rang them up as "parsnips" so she was just as clueless as everyone else.). I bought them because they're so cool-looking - kind of square in cross-section, with little root nubbins along the "corners" which give it a distinctively grub-like look.

I haven't done anything with them as of yet, because...well, because I'm not sure what to do. I did take a slice off on one to taste it. It has a wet, refreshingly crispy texture very similar to a water chestnut, but without the water-chestnut bitterness. The flavor was pretty neutral, but with a gentle nutty undertone.

So...WHAT ARE THEY?  Help a brother out here - I think they might be jerusalem artichokes or sunchokes, but I'm not familiar enough with them to tell for sure.  If you have any ideas, put 'em in the comments.

01 October, 2011

Because You Don't Poop Correctly


"Digestive Health" products are everywhere.  The most famous, I guess, is Dannon's Activia brand yogurt, with ads starring Jamie Lee Curtis as The Poop Lady.  And now the Jolly Green Giant jumps in the shit with DIGESTIVE HEALTH VEGETABLES.  

"I'm so proud of that last one that
I left it in the bowl for you to admire."
Yeah, that's definitely the smile of someone who takes regularly-scheduled dumps. I bet when he pinches one off, it's the size of a redwood.

23 August, 2011

Seasoned Lima Beans

When I was a kid, I hated lima beans. I had only ever had them out of a can, and they were always horrible: starchy, squishy, with a skin that would pop off and gag me when I was trying desperately to choke them down, and to top it all off they tasted as metallic as the can they were packed in.  Truly, I can totally understand why someone would say they hate lima beans.

These days, I like lima beans just fine as long as they are either fresh or frozen and cooked so that they haven't been rendered by overcooking into something the consistency of a grasshopper's gutbag.  But I still loathe canned lima beans.

When I saw a can of Margaret Holmes Seasoned Medium Green Lima Beans at Big Lots I inexplicably decided to give them a try.  Maybe it was the awkwardly-worded label. "Medium Green Lima Beans." Did that mean they were medium-sized lima beans which were green in color? Or maybe it meant that they were colored "medium green?" I seem to remember my dad having a Country Squire station wagon with wood grain sides which came from the factory a pretty horrible shade of "medium green" (Ford called it "Lime Gold." Whatever.)

Anyway, I checked the ingredients on the can and it looked kind of promising: onions, spices, salt, a little sugar, some smoke flavoring, some chicken fat...  Chicken fat? Really?  Okay, I was on board.

So this is your fair warning:  If you already hate canned lima beans, don't bother with these. They're still starchy, squishy, and the skins pop off when you're chewing (though I'm a lot better at controlling my gag reflex than I was when I was five years old.) And they still have that nasty metallic flavor.  The best I can say about them is the broth they were in tasted pretty good. I bet if I cooked some fresh or frozen lima beans in a duplicate of that pot likker, they'd be mighty fine.

24 May, 2011

A Tale of Two Giardiniere

Here's a head-to-head comparison of Guiliano "Mild Garden Mix" and Mezzetta "Italian Mix Giardiniera."  I happened to have both of them in the pantry and decided to compare the two.  Guiliano's giardiniera is usually found at Ocean State Job Lot, so it's fairly inexpensive.  I buy Mezzetta's product at either Stop & Shop or Coronna's Market (my neighborhood corner store and butcher shop.)

Like many other Italian-Americans, I grew up eating giardiniera. It always has a place at family gatherings, and Maryanne and I put a jar of it on the table whenever we're serving a standard tossed salad, because there's nothing like a good giardiniera to wake up a boring bowl of leaves. And I hear that they use it as a sandwich topping in Chicago which really shouldn't surprise me given all the crap they pile onto hot dogs there, right?

My favorite part of the giardiniera is cauliflower. I don't have much use for cooked cauliflower as a veggie, but if it's pickled and still crunchy, I could nom the hell out of it all day. Both Giuliano and Mezzetta are mostly cauliflower. But Giuliano seems to cook the hell out of theirs while somehow, the Mezzetta cauliflower is crunchy and awesome.  Actually, these qualities come up so often I'm not even going to mention it again beyond saying that the veggies in the Giuliano version are universally cooked and soft, while those in the Mezzetta are crunchy and don't taste overprocessed.

Giuliano is also a hell of a lot sharper than Mezzetta. They use a stronger vinegar solution and it shows. Usually, I have to give the Giuliano "garden mix" a quick rinse under cold water to get rid of some of the highly acidic flavor.  Mezzetta giardiniera is a more tolerable strength, with a pleasant bite that doesn't threaten to kill your mouth.

I guess where you can see where this is leading. A good giardiniera is crispy pickled heaven, and a bad giardiniera is just face-collapsing vinegary pucker. Mezzetta is very good indeed.  Guiliano is not quite bad, but it is sub-optimal. Given the choice of the two, it's Mezzetta all the way.

10 May, 2011

Green Giant Chipotle White Corn

I'm not a big fan of canned veggies.  Canned green beans are okay, I guess.  And some brands of canned corn are good too.  Green Giant, for example: their canned corn is always decent. Crisp and flavorful, like it was just cut from the cob a few minutes before it was put on the table.

And therefore, when I found this Green Giant Chipotle White Corn at the supermarket last week, I picked up a couple of cans knowing that even if I was disappointed in the overall product and it's chipotleness, the actual corn involved would still be pretty good.

So I opened up the can and found crispy delicious white corn studded with little bits of sweet red bell pepper, and clinging to it all was dark mahogany-colored chipotle powder.  It smelled rich and roasty and smoky, with the familiar aroma of chipotle in the background.  Everything seemed to be in the right place and I thought that I might at last have found a "chipotle" product that actually lived up to its label.

Unfortunately, that was not to be.  Green Giant made sure to play it safe for this product, and the chipotle is just another faint flavor note that added nothing to the side dish. - a shame because chipotle pepper and corn are a natural and delicious combo. Lynnafred and I kicked it up a notch by hitting our servings with an extra dose of chipotle powder from the spice cabinet.  Mmmm.  Heat and flavor, even if it was a do-it-yourself seasoning job.

Seriously, though, I really wish that companies would stop slapping the word "chipotle" on everything they churn out of their factories. This ingredient has thoroughly jumped the shark.

14 April, 2011

What's Up With This Carrot?

This carrot looked completely normal in the fridge and as I peeled it.  But when I sliced it, I noticed it had these hollow "veins" running through it.

It didn't taste any different than any other carrot, but Lynnafred was a little skeeved out by it and wouldn't let me put the hollow slices in the stew.

06 March, 2011

Spinach: Ideal for Cooking


When I got to the store, the "Ideal for Target Practice" and "Ideal For Stuffing Up Pooper" spinach was sold out.  So I had to settle for the "Ideal for cooking" variety.

10 January, 2011

Brussels Sprouts

Poor Brussels sprouts - they've had such a bad reputation for so long - fueled, no doubt, by the tendency of inexperienced cooks to boil the hell out of them before serving - that many people refuse to touch them almost no matter what the preparation.  I've been eating them since I was a kid.  My mother, bless her, never believed in cooking the living hell out of veggies, so even though she cooked sprouts the only way she knew how - in boiling water or  over steam - we never had mushy overcooked sprouts.  They were always bright-green from the steam and tender but not squishy.  That's likely the reason I've never had to approach Brussels sprouts as a problem, aka "How do I make these nasty shrunken monkey heads edible??"  (Protip:  Calling them "shrunken monkey heads" can actually help you get your kids to at least try them.  For some reason, kids are far more likely to bite into what they think is a shrunken head than they are to sample some never-before-experienced vegetable.)

Anyway, boiling Brussels sprouts - or even steaming them - is a pretty harsh way to treat what is a deceptively delicate veggie.  That kind of cooking brings out the sulphurous cabbagey elements of the sprout's flavor and turns the tender little leaves mushy and kind of fibrous.  Not even a big chunk of butter can save Brussels sprouts so cruelly tortured.

A far better way to bring out the best in Brussels sprouts is to try a preparation that caramelizes the outside of the little buds while letting their own moisture steam them in the pan.  Tossing them in a flavorsome oil and oven-roasting is a popular method, but I usually just heat some butter and olive oil in a skillet and sautee the sprouts until they take on a golden-brown hue and soften just to an al dente tenderness.  That's the basic technique I used when I came up with this Brussels sprouts recipe recently:

Brussels Sprouts with Shredded Leek
Servings dependent on quantity of ingredients

Brussels sprouts
Butter
Olive oil
1 or 2 leeks
2 or 3 garlic cloves, roughly broken and sliced
Salt & Freshly ground pepper to taste

Choose sprouts that are fairly uniform in size.  Sometimes this isn't possible because of the way the sprouts are packaged by the grocery store - in this case, when you're trimming and paring the sprouts, cut the largest ones in half (through the base so the halves don't fall apart to loose leaves) so they all cook evenly.

Clean the sand from the leeks and trim away the really tough green leaves.  Cut the barrels of the leeks into 2- or 3-inch lengths, then julienne the cylindrical cuts into narrow strips about 1/8-inch wide.  Set them aside.

Melt a couple of tablespoons of butter in a heavy skillet and add about an equal measure of olive oil.  Heat until the butter is foamy over a medium fire, then tip in the sprouts.  Cook and stir the sprouts, coating them with the butter and oil as you sautee them, until they begin to caramelize.  Before they get too brown, add the shredded leeks and the garlic.  Continue to sautee as the sprouts brown and the shredded leek wilts and softens.  When the leeks are soft and tender and the sprouts are caramelized and can be pierced with a fork, they're done - serve 'em up.

The earthy leafiness of the sprouts are complimented nicely by the shredded leek, which gives a subtle oniony sweetness to the dish.  To keep the leeks and garlic from burning during the time it takes the sprouts to cook, be sure to add them at least halfway through the cooking process.

Sorry for the lack of quantities in this recipe, but it's one of those recipes that is very flexible, and the quantities you use are governed more by the number of people you're feeding than any strict recipenarian guidelines.

For another favorable take on Brussels sprouts, check out this post at Leeanne Griffin's Fun With Carbs.  Coincidentally, Leeanne wrote about sprouts this weekend too.

27 October, 2010

Poland's Finest Pickled Vegetables

Poland's Finest All Natural Pickled Mixed Vegetables Assortment is a kind of pickled salad which are fairly common in Eastern Europe but still a little unusual here in the US.  The "Poland's Finest" brand name is new to me, but the concept isn't - I shop regularly at a couple of local Russian markets and you'd be amazed at the variety of different pickled salads on the shelves.

Anyway, this assortment caught my eye for a couple of reasons: the veggies were whole rather than the more common sliced or shredded, and the jar was topped of with two big red ripe tomatoes.  Pickled ripe tomatoes was a new one on me.  I bought the jar, brought it home, and stuck it in the fridge to chill.

We enjoyed the salad a couple of days later as a side dish with kielbasa.  As we unpacked the jar we found:
  • cucumber
  • tomato
  • carrot
  • celery
  • cabbage
  • large hot red paprika pepper
    The salad was awesome.  Sometimes I find that European picklers use too much sugar in their brine, but this was not the case here.  Everything was crispy, fresh, and delicious (except for the tomatoes which were not "crispy" by their very nature.  But they weren't mushy, either - they were firm and flavorful, like they had been cold-pack pickled right out of the garden.)  And, thanks to that bigass paprika pepper in there, the salad was spicy hot.  I really liked it, though Maryanne found the heat factor a little much for her (she is not a chilehead.)

    Now I just gotta get back to Ocean State before they sell out of this stuff...

    08 October, 2010

    Pumpkin Seeds!


    In my last post, I explained how to prepare pumpkin for use in recipes.  But I totally forgot about the best part of the pumpkin:  the seeds.

    Roasted pumpkin seeds are as much a tradition in New England cuisine as lobster, salt cod, and maple syrup.  In convenience stores and truck stops up here, you're as likely to find packages of prepared pumpkin seeds as you are sunflower seeds.  

    When we were kids, we didn't often cook pumpkin down for the pulp.  As I mentioned in the earlier post, my mom and my grandmother before her always bought One Pie canned pumpkin, just like I do now.  But we always carved pumpkins into jack-o-lanterns, and that means scooping out the strings and seeds.  While my brother and sisters and I would carve faces into the hollow gourds, Mom would roast the seeds in the oven.  The smell of roasting pumpkin seeds would drive us crazy, and when they were ready we would barely let them get cool enough to handle before we'd be crunching them.

    Here's how to prepare homemade pumpkin seeds:
    1. Lay out some newspaper to work on.
    2. Scoop the strings and seeds from the center of the pumpkin onto the newspaper.
    3. Pinch the seeds between your fingers to separate them from the strings.  As you pinch the seeds free, drop them into a strainer.
    4. When all the seeds have been removed from the goopy strings, you can just roll up the newspaper and compost the whole thing, or otherwise discard it.  A few years ago when I had chickens, I would give the strings to the chickens for a treat.  They loved that stuff so bad.
    5. Turn your attention to the seeds.  Under cool running water, wash the slimy feeling off the seeds.  Just rub them around with your fingertips as the water runs over them.  It will take five minutes or so; the object is to clean off any remaining strings or bits of pulp.
    6. The seeds should be dried before roasting them.  If you have lots of time, you can spread them out on a clean cloth and leave them out in the air overnight.  Otherwise, you can kind of towel them mostly dry with a clean towel.  No matter how you choose to dry them, don't use paper towels or newspaper.  When the seeds get dry, the paper will stick to them, and paper tastes kind of gross even when cooked.
    7. Preheat the oven to 350 F.
    8. Get a big shallow baking sheet or jelly roll pan and pour in a couple of tablespoons of vegetable oil.  Then dump in the dried seeds and swirl them around until all the seeds are coated lightly with oil.  Spread the seeds out until they're in a single layer in the pan.  Salt them generously.  You know what's even better than regular salt for these?  Celery salt.
    9. Slide the tray into the preheated oven and roast them for about 15 minutes.  Take them out and stir them around every 5 minutes.  They will start lightly browning in about 10 minutes or so, but you want them to be a little darker than golden brown.  Go more than 15 minutes if you have to.  The outside hulls will be deliciously toasted and crispy and quite nice to eat as long as you don't try to fill your mouth with them all at once.
    10. Taste a couple of them and add salt or seasonings to fit your taste.
    11. Dump the seeds onto absorbent paper to take off excess oil if necessary.
    12. Enjoy your delicious snackery.
    Commercially-prepared pumpkin seeds are toasted and thickly coated with salt.  The hulls are inedible - only the kernels inside are good - and so, they are eaten like sunflower seeds, with lots of biting and spitting.  But home-roasted pumpkin seeds are different.  The hulls kind of oven-fry and get crunchylicious - as long as you don't try to eat too many of them at one time.  Being a glutton will cause the excess of hulls to get pulped into an indigestible bolus by your molars and you'll get grossed out.  Enjoy the seeds one or two at a time and you'll be amazed at how excellent they are.

    How to Prepare Pumpkin

    Now that it's October, you can't drive down a road in New England without passing a roadside stand selling pumpkins.  Even some people who don't run farm stand in the summer raise a field a pumpkins for sale in the fall, piling up the big gourds on their front lawns for sale to passers-by.

    From a gardening perspective, pumpkins aren't a lot of work, but they do take up a fair amount of space to grow.  I've never had much luck with them because my garden isn't big enough for the number of plants I'd need and the square footage they'd need to cover.  So I buy them as needed, just like everyone else, on the side of the road from the local growers.

    I'd venture to say that 90% of the pumpkins that folks buy are for seasonally decorative use.  It's hard to find a neighborhood around here where there aren't pumpkins on the front steps or standing in a display with a couple of pots of mums.  But if you're in the other 10% and want to actually eat the pumpkins you buy, here's how to do it.

    Preheat the oven to 350 F.

    Cut your pumpkin into manageable chunks.  For eating, you'll probably want a smaller one because the pulp is sweeter and less stringy.  I'm using a relatively small "sugar pumpkin" for the demo here, which I simply cut in half but if you're doing up a wicked huge one cut it into pieces that will fit in your roaster pans.  Scoop out the seeds and stringy pulp and put the pumpkin into a roasting pan, skin side up if you can, and roast at 350 F for about an hour and a half.  Don't bother to cover the pumpkin with foil or a lid on your roaster or anything like that.  Pumpkins start out with way too much water locked up in them and if some of it wants to evaporate during cooking, it should be encouraged to do so.

    When you take the pumpkin out of the oven, the skins might be browned.  That's OK.  Inside, the pumpkin meat will be tender and orange.  It tends to pull away from the skin as it cooks.

    Scoop out the tender pulp.  You can simply mash it with a fork, but that makes a coarse and stringy pulp that isn't very pleasant when it's used.  It's better to put the pulp into a strainer or a food mill and run it through to make it smoother.  This is especially important for making pies.  Seriously, pumpkin pie made with coarsely mashed pumpkin is really disgusting.  I know this from personal experience because I skipped the "fine puree" step the very first time I made pumpkin pie starting with raw pumpkin.  The pies smelled delicious, but looked and tasted lousy.
    .
    Notice how much water is coming through the sieve with the pumpkin.  The amount of water left in the pulp will really surprise you because when you're scooping it from the baked skin, it will seem dry.  Do not believe your lyin' eyes; as you puree the pumpkin it will be very wet

    As a final step, line a strainer with a double layer of cheesecloth, add the pumpkin puree, and let it sit and drain overnight.   Feel free to speed the process along by giving it a squeeze now and again.

    All told, you are going to start with an average, soccerball-sized sugar pumpkin and finish with about four cups of pumpkin puree...after running your oven, cranking the food mill, and waiting for the stuff to drain.

    This is one of those kitchen projects where the amount of work and time required is vastly disproportionate to the reward.  It's just pumpkin, f'cryinoutloud, and the homemade shit's virtually identical to the canned pumpkin you get at the supermarket. 


    And that's why I almost never make my own pumpkin puree.  I'll just go to the store and buy a can of One-Pie Pumpkin, just like I always have - and just like my mother and grandmother always did, too.  Grown and canned in Maine, so I can get the convenience of ready-to-use pumpkin puree and still support local New England farms.


    05 August, 2010

    The One Thing I Like About Summer.

    Out of all the seasons, I dislike summer the most. I hate feeling hot and sticky, and that's the one thing that summer's really, really good at. During the summer, I spend more time than usual indoors, trying desperately to hide out from the hot heat outside. On the other hand, my favorite non-weather-related season happens during the summer: fresh fruit and veggie season. It turns me into some sort of "seasonal vegan"; I can happily eat nothing but fresh fruits and vegetables as long as things in the back yard are producing fruit and we can get other things from farmer's markets and local farmstands.

    Fresh wild blueberries, golden cherries, small peaches, and fresh sliced cucumbers.
    And lucky for me, Dave's garden is booming with fresh veggies. As long as summer's upon us, I'll be able to eat a lot of fresh foods that I really long for in the winter, when we can't grow anything at all. We also get to sourse things we can't or don't grow from local sources, like getting wild blueberries from Sussman's Blueberries in Granville, Massachusetts and fresh peaches from Johnny Appleseed's Orchard in Ellington, Connecticut. Like Dave, I prefer to get fruits and veggies fresh from local farmstands than to get them from the supermarket, where the quality is signifigantly less than a local farm or orchard, even if it costs me a little bit extra.
    .

    29 June, 2010

    Iced Pickle Chips

    Check it out: the first batch of cucumbers are in from the garden.  We grow Kirby (pickling) cukes and we harvest them somewhat on the small side.  The seeds are tiny, the skin is still thin but has a good snap to it, and they're the perfect size for making our bread-and-butter pickles.

    We also enjoy them fresh, cut into spears or sliced into salads.  But when the weather is really hot and oppressive like it's been the past few days, we also make an easy and refreshing snack we call "Iced Pickle Chips" (though they really aren't pickled per se.)

    Iced Pickle Chips

    4 or 5 cucumbers
    Kosher or Pickling salt
    1 tray of ice cubes

    Slice the cucumbers thinly - about 1/8-inch is good - and place them in a bowl.  Sprinkle them liberally with salt and don't be afraid to have a heavy hand with it because most of the salt will be drained off later anyway.  Cover the cucumber slices with an ice cube tray's worth of crushed ice and toss everything well to combine.

    Place the bowl in the refrigerator and allow to stand for an hour or two.  When ready to serve, drain off the water and ice and bring them to the table on a small salad plate  or in another bowl.  Keeping the cukes on "salted ice" for a couple of hours develops an amazing crispness because of the colder-than-freezing temperature acheived by salt and ice mixed together.  And just enough of the salt stays behind when the ice and water is drained off to season the cukes without making them too salty.
    Salting and icing cucumber slices is the first step in making bread-and-butter pickles.  We simply adapted that step into a snack in its own right.

    .


    04 June, 2010

    The Veggie Garden, One Week Later

    Between the warm sunny weather and the totally badass compost/peat moss soil mixture in the raised beds, the garden is going crazy.  Last week, after I was done setting the plants in the bed, I took a bunch of pics and posted them.  Last night I wandered through and took some more photos for comparison because it seemed like everything is realy taking off fast.  Check these out:

    The Tumbling Tom tomato was filled
    with blossoms last week.
    Today, it's loaded with greenies. This
    is probably the earliest I've ever had
    tomatoes setting fruit.
    Last week, the tomatoes were
    so cute and little, they were just
    adorable!
    This week, they're growing up
    through the bottom wire rack. The
    Celebrity hybrid and the Black Prince
    Russian heirloom plants are flowering.


    Here's the zucchini last week...

    ...and here's what it looks like now,
    completely covering the tire.
    Here's a representative cucumber
    plant.
    The cucumbers are getting bigger,
    but of all the plants they're
    growing the slowest. Still, they're
    doing pretty well.
    Last week, the long bed had lettuce
    in the center, but nothing aboveground
    to the left or right. We put onions on one
    side, carrots and beans on the other.

    Later, we added a border of
    marigolds to keep the local rabbits out
    of the lettuce.  In the picture at right,
    you can see the onions are up in the
    background, and the carrots are
    sprouting like grass in the foreground.
    We'll be doing some serious thinning
    of that bed soon.
    Lettuce!


    27 May, 2010

    Check Out the Veggie Garden

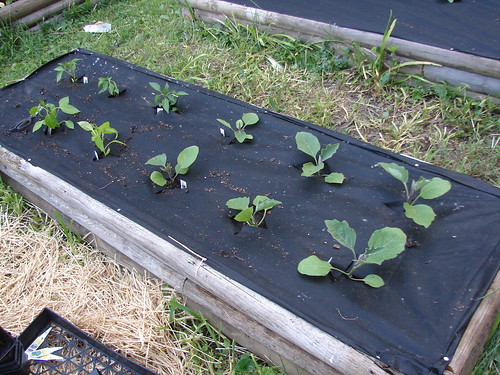
    C'mon and take a look at this year's veggie garden.  I built raised beds using a bunch of recycled landscape timbers, and I'm using some discarded low-sidewall tires as planters, too.  The soil is a mixture of locally-produced compost from a nearby dairy farm, Canadian peat moss (a renewable resource that nature produces faster than it can be harvested,) and a bit topsoil cadged from a local construction site.  (My own compost pile doesn't produce nearly enough material fast enough for a project this size.)

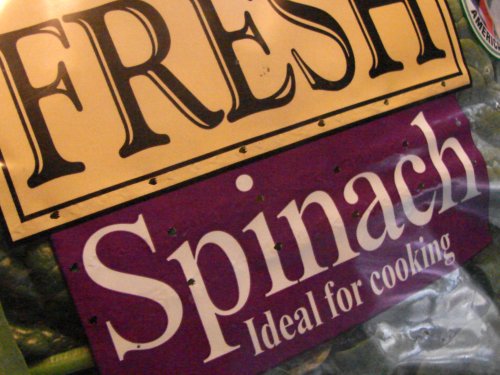
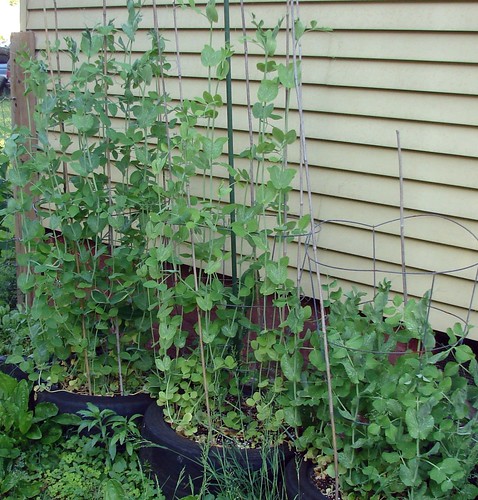
    Along the back of the house, we've got three varieties of peas.  From left to right: standard "English" peas, sugar snap peas ("mangetouts",) and snow peas.  On the far left, hidden by the pea vines, is a fourth planter growing spinach.  We've been enjoying fresh spinach sproutlings in our salads for a few weeks now, as I thin the bed.

    All of these plants are growing in planters made by laying discarded tires on their side and filling them with our soil blend.  I originally was training the pea vines on old tomato cages, but they've long since gotten too big for that, and they're on their way up some bamboo poles - they're nearly six feet tall now!

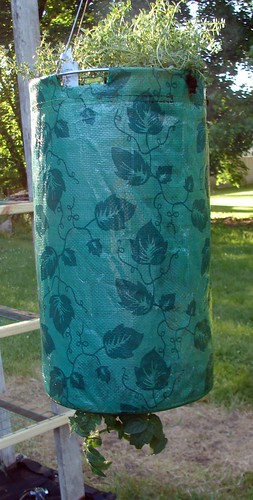
    This is one of two ridiculous "Topsy Turvy" tomato planters I have hanging from a pole in the sunniest part of the yard.  You've seen the TV ads where someone is growing a thousand pounds of tomatoes on a vine out the bottom.  I bought the planters on sale at Walgreens in the middle of winter, and now I have regular cherry tomatoes growing out of one and yellow cherry tomatoes in the other.  Not wanting to waste any planting space, I have creeping thyme growing out of the top of one, and oregano covering the top of the other.  Having ground-cover herbs in the tops of the pots will cut down on moisture evaporation and provide the kitchen with some fresh flavor through the summer.  Because thyme is pretty hardy, when fall comes around I plan to take it out from the planter and put it in the ground near the back door of the house, where I'm hoping it will establish itself as an edible ground cover.

    On the same pole as the Topsy Turvys, we've got a hanging basket of Tumbling Tom cherry tomatoes.  These will cascade over the sides of the pot to hang about two feet and will be filled with clusters of small tomatoes.  I got it at the farmer's market last weekend, and it's already covered with blossoms.  With any luck, we'll have some tomatoes early from this one.

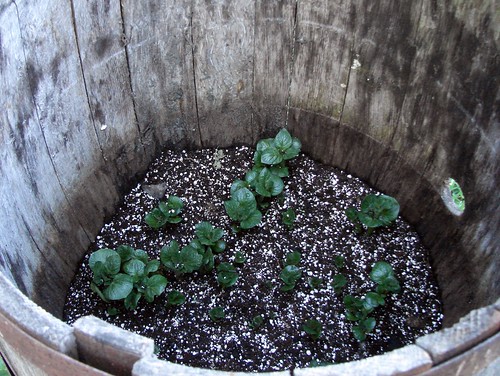
    Here's a peek inside the potato barrel.  After drilling drainage holes in the bottom of an old oak barrel, we lined the bottom with rocks and about 6 inches of rich composted soil, then placed our seed potatoes and covered them with soil.  As the potato plants grow, we will keep adding soil and burying them until the barrel is filled.  The plants will grow out the top of the barrel, while the long roots we've developed below will develop new spuds all along the length.  This is the first year we're trying this - if it works out well, we'll do several barrels next year instead of just one.

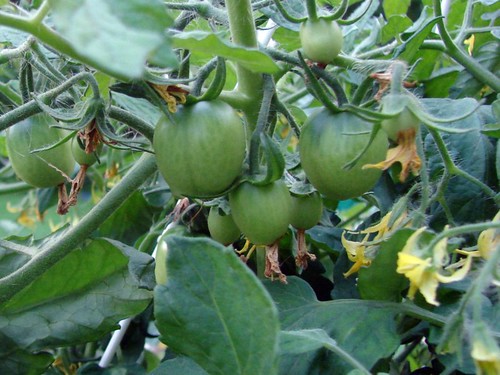
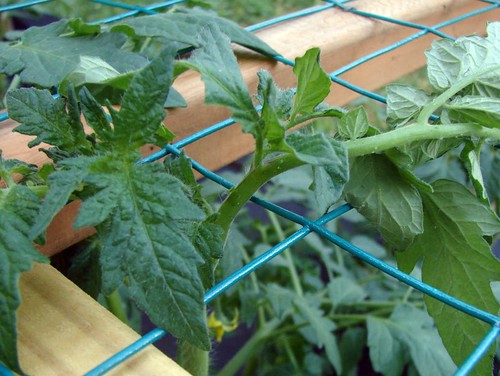
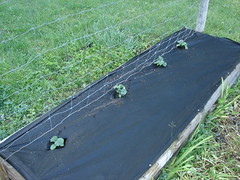
    More tomatoes in the tomato bed.  That's wire fencing in racks above the plants. As they grow, they'll grow through the racks and support themselves - I won't have to tie them or try to train them.

    Varieties we're growing:  Beefsteak, early girl, Mr. Stripey (orange with red stripes - an heirloom variety), Black Prince (a deep red/brown Russian heirloom,) big boy, lemon yellow, Roma, and Celebrity.

    There are a lot of plants, and they'll produce a huge amount of tomatoes. But we keep the canning kettle going all through the growing season, putting up salsa, sauce, whole tomatoes, and stewed tomatoes as well as providing fresh toms to our extended family, so nothing goes to waste.

    In the next bed, we have bell and cubanelle peppers along with two varieties of eggplant (Japanese and European.)  I'm only growing sweet peppers this year - in the past, I've always raised a few hot pepper varieties as well, but that was mostly back when hot peppers were hard to find in the grocery store.  Now that they're readily available, it makes less sense for me to harvest a big load of them that I can't use up before they spoil. 

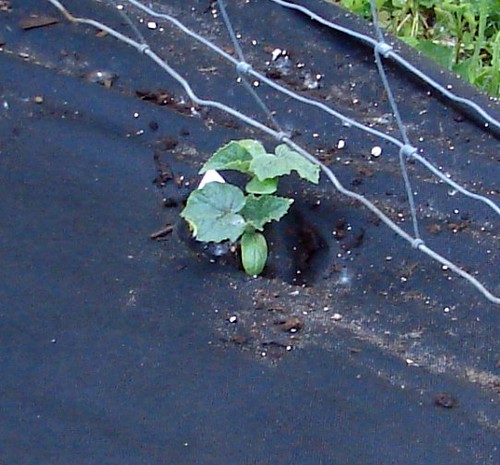
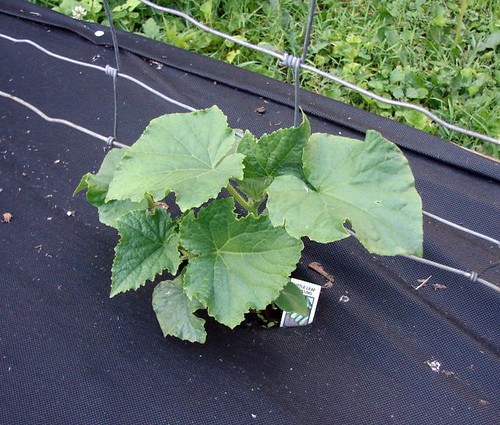
    This bed has four pickling cucumber hills.  There's plenty of room for them to grow on the bed and up the trellis made from an old piece of cattle fence.  We use a lot of cucumbers for our bread-and-butter pickles, half-sours, relish, piccalilli, and of course just eating.

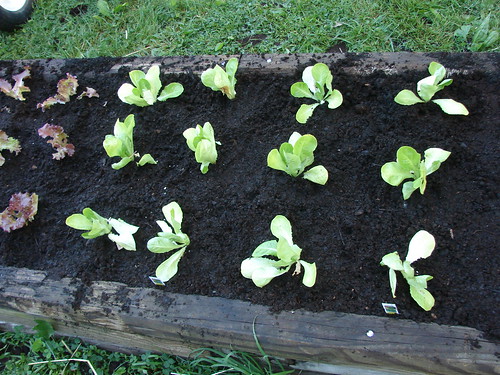
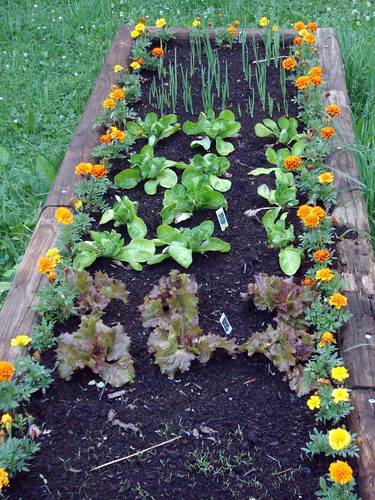
    This last bed has Boston lettuce and red leaf lettuce, along with onions, carrots, and Italian broad beans.  It runs perpendicular with the others, and is about twice as long as the other three.

    Hey look, another tire.  This one is home to a hill of zucchini.  We like zucchini, but it's really prolific, and this one small hill will produce almost more than we can use.  i guarantee at least one of the damned things will get forgotten on the vine and grow up to be the size of a watermelon.  When they get that big, my mom grabs them and makes them into zucchini bread and squash patties.


    There's Zim, lounging around in the grass while I do all the work.  He likes nothing better than to hang around outside, snoozing in the sun, especially if someone is out there with him.  He's not really part of the garden, but he spends as much time out there as I do.

    .

    30 April, 2010

    Krakus Vegetable Salad No. 4

    My family has been a fan of Krakus products for a while now - the local supermarkets have been carrying their canned products for at least a few years now to cater to our growing Eastern European community, and local delis have sold imported Krakus ham for as long as I can remember - and so far, we haven't been disappointed.  The other day, with hot dogs scheduled for supper, I was looking for something that would be along the lines of sauerkraut to serve with them, but at the same time, different.  Vegetatble Salad "No. 4." caught my eye and seemed to fit the bill.

    It was no easy choice, actually.  Krakus puts up quite an extensive line of Vegetable Salads, each of them different than the next.  "No. 4"  has cabbage, pickled cucumbers, onion, and shredded carrot in a brine well-balanced between tangy vinegar and mildly sweet sugar.  I piled a bunch of it on top of my hot dog and liked it better than sauerkraut.  Quite tasty.

    Other Krakus vegetable salads include one with red pepper (sweet red bell pepper I suspect),  Hungarian Style (lots of shredded carrot and mustard seed with a good dose of paprika), a standard vegetable salad (no cucumbers, I think), and one variety made of shredded beets and apples (very good when served with pork.  I haven't gotten around to writing that one up yet.)

    Strangely enough, Krakus' website doesn't mention any of their vegetable salads, concentrating instead upon the product which is the most famous in the American marketplace, their excellent hams.  Too bad, because I think Americans could develop a taste for the salads if they were given a chance and slapped in the eyeballs with a few advertisements.

    Link:

    16 February, 2010

    Parsley in a Tube

    So I'm at Shaw's the other day and I see this stuff called Gourmet Garden Parsley Herb Blend, and it's parsley in a tube, I kid you not.  Like finely-chopped leaf-filled toothpaste.  It was marked down to 60 cents, so how the hell could I resist?

    When I got it home, I squeezed some out and tasted it.  It tasted like - suprise! - parsley.  Really salty parsley.  The front label calls it "Parsley Herb Blend," but the ingredients panel gives the real scoop on just what the blend consists of:

    Parsley, Dextrose, Whey (milk), Canola Oil, Sodium Lactate, Salt, Glycerine, Sodium Ascorbate to help protect flavor, Citric Acid to promote color retention, Xanthan Gum, Ascorbic Acid to promote color retention.

    Ah.  Salt plus two sodium compounds - that certainly explains the salty taste.

    I made stuffed peppers that evening, and thought it would be the ideal time to try it out.  I mixed the rice, ground beef, and minced onion for the filling and added the seasoning, which included a big squeeze of the parsley.  It looks like goose shit.

    It worked into the mix fairly evenly, and the saltiness got absorbed and distributed throughout the batch without any problems.  With the exception of the really fine cut (much tinier than I ever cut fresh herbs myself) and, of course, the huge list of non-parsley ingredients, there really wasn't a big difference between Tube Parsley and natural leaf parsley.

    And that right there is why I probably won't ever buy this stuff when it isn't at a clearance price.  Fresh parsley is pretty easy to handle, and is already fairly inexpensive.  There is no percieved value for me in having parsley mixed with oil, sugar, and salt ready to squeeze into food, expecially because I'm not so lazy that I can't take a minute or two to chop it myself.

    Link:


    .

    12 November, 2009

    Breadfruit Seeds

    My friend Fred visited family in Puerto Rico, and brought me back a package of breadfruit seeds. He told me that they're called pepitas in Puerto Rico.

    They're similar to chestnuts; they have a thin hard shell on the outside, and inside a somewhat sweet, creamy-when-cooked inner nutmeat covered with a brown membrane. Preparing them is fairly easy. Bring a pot of water to a full boil, and dump in the pepitas. Boil them rapidly for at least 30 minutes - until they can be pierced easily with a fork - and then allow to cool until they can be handled. Then, the outer shell and the inner membrane are peeled away, and the seeds are eaten.

    We had them with dinner the other night, and I must say these little morsels sure are labor intensive. The outer shell shucks easily but the inner membranes were tougher to remove. But they were pretty good, mild and nutty and just slightly sweet. They were even better after I briefly sauteed them in a bit of foamy melted butter in a skillet - that really brought out the nutty flavors and made them much more delicious.

    There's one other thing I should mention about breadfruit seeds: they're championship-grade whistleberries. Eating them, even just a couple of them, makes you fart. A lot. Loudly and hilariously. I wish I'd had a handful of them when I was 12 because I would have been The Comedy God of Junior High. (Fred told me that the seeds are nicknaed rompe matrimonios - "marriage breakers" - in Puerto Rico.)

    .

    11 September, 2009

    Heirloom Tomatoes


    I'm beginning to think that when a supermarket is selling "heirloom tomatoes" the word "heirloom" is marketing code for "shaped like someone's ass."
    .