Showing posts with label canning. Show all posts

17 October, 2010

Vintage Sunday: Food Choppers - And a Relish Recipe

This is a food chopper:


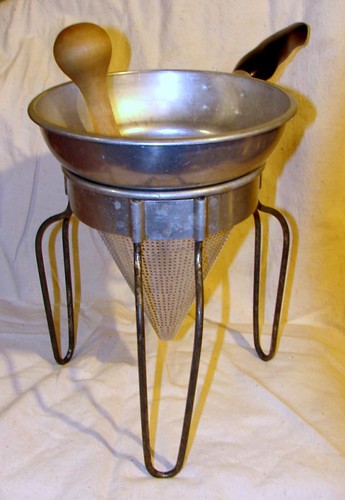
It's a versatile kitchen tool.  In days gone by, almost every kitchen had one.  There were dozens of different models and designs, made by a large number of companies around the country - so many, in fact, that the variety available supports an active collectibles market.  Regardless of the model, size, shape of the hopper or curve of the handle, though, they all do pretty much the same thing the same way:  Stuff goes into the hopper, the handle is turned, and a screw drives the stuff out the front where it is cut into bits by a rotating knife with many blades.

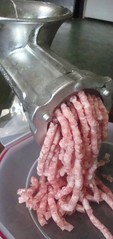
You can use it to grind meat, but it's not the same as a meat grinder (pictured at left.)  With a meat grinder, the cutting action is done inside the barrel of the grinder as the meat is forced out through holes in a steel plate.  A food chopper forces the product out of the barrel where it is cut off on the outside.  The chopper was a labor-saving device used to mince meat, vegetables, and other ingredients without having to spend a lot of time with a knife.  It was the fastest way to get that kind of mincing done in the days before electric food processors.

These days, not as many people actually use food choppers any more.  Cooks who want to save time on chopping chores turn to their food processors.  My food processor gets plenty of use, but there are times when I still turn to my great-grandmother's Universal Food Chopper.  It does an awesome job of cutting up cooked leftover beef roasts to turn them into hash. And it does an equally awesome job of cutting up vegetable ingredients for relish.

How's that for a segue?

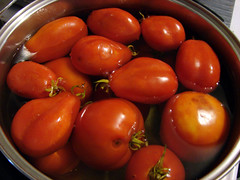
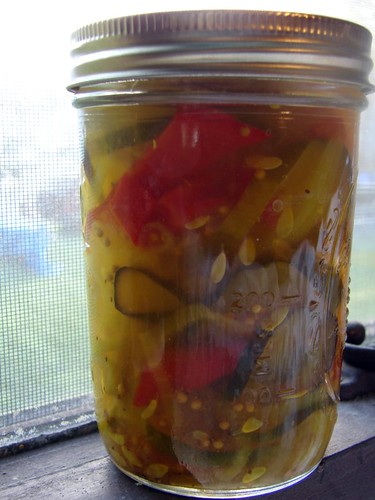
Two consecurive frosts have raised hell with my vegetable garden.  The tomato vines have pretty much died back, and now I'm picking the green tomatoes that are still clinging to the vines.  I've got piles of green tomatoes.  Luckily, I have plenty of recipes that call for greenies.  Green tomato relishes are another one of those old-style products that have largely been forgotten as cheap and homogenous commercial products became widespread. I call this particular version "Golden Relish" because the use of some turmeric and yellow peppers in the veggie mix give it a golden tinge.  This isn't a spicy relish, but rather a good, solid, sweet relish for use on hot dogs, in salads, or on its own with sliced ham.

Golden Relish
Makes about 8 pints

8 cups finely chopped green tomatoes (6 - 8 pounds)
4 cups finely chopped onion
3 yellow bell peppers, seeded and finely chopped
6 red bell peppers, seeded and finely chopped
3 large green bell peppers, seeded and finely chopped
1/2 cup kosher salt
1 tablespoon celery seed
1½ teaspoons turmeric
¼ cup mustard seed
4 cups sugar
3 cups cider vinegar

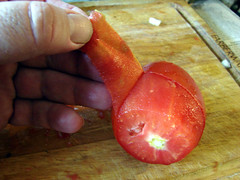
Cut each tomato in half across the center and use a small spoon to scoop out the seeds.  Run the tomatoees, onions, and peppers through the food chopper and then mix them well together in a large bowl.  Sprinkle the canning salt over the mixture and let it stand overnight in the refrigerator.  In the morning, rinse the mixture lightly and let it drain well in a strainer or colander.

In a large pot, combine the celery seed, turmeric, sugar, vinegar, and chopped vegetables.  Bring to a simmer and cook for about 2 hours.  The tomatoes will release a lot of liquid during the cooking time.

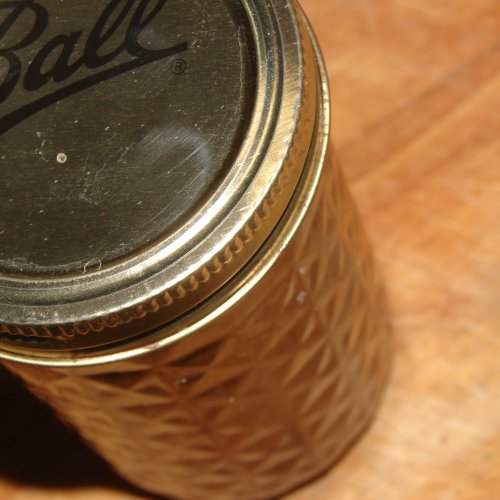
Use a slotted spoon to put the relish into pint jars without adding too much of the liquid.  Cap the jars and process for 10 minutes in a boiling water bath.


29 September, 2010

Mixed Fruit Jam

One of the best things about my local Stop & Shop is their "markdown bin" where fruits and vegetables on the verge of being pitched into the dumpster are sold at deeply-cut prices.  I never shop there without checking the markdowns.  Sometimes I don't find anything that inspires me, but other times it's like a gold mine of delicious possibility.

Last week, I made quite a score.  Peaches, plums, kiwifruit, a few lemons, a couple of apples, and two pounds of strawberries, all mine for less than five dollars total.  It was amazing, and because it was a cool day, just right for making a batch of jam, the family and I sat down, peeled some fruit, and made five pints of delicious jam.

Mixed Fruit Jam
About 5 pints

6 fresh peaches
3 large kiwifruit
3 plums
1 apple
1 pound strawberries
Juice and zest from 1 lemon
Sugar

Blanch the peaches, kiwifruit, and plums in boiling water and slip off the skins.  Chop fruit coarsely into a bowl.   Pare and core the apple, and chop that into the bowl as well.  Cap the strawberries, cut them up and add them to the bowl, too.  Stir in the juice and zest of the lemon.

Measure the fruit into a stainless steel stockpot, and add sugar equal to 3/4 the volume of the fruit.  For example, I had nine cups of fruit, so I added 7 cup of sugar.  Stir the sugar in well, over medium-high heat, until the sugar is completely liquified.  Turn the heat to medium and bring to a fast simmer.  Continue to cook the mixture, stirring occasionally.  Use a tablespoon or large serving spoon to remove scum from the surface of the jam a it cooks.

As the jam cooks, monitor its temperature with a candy thermometer or digital probe.  When the temperature reaches 220 F and doesn't cool way down when stirred, the jam has reached the "gelling" point and is ready to can.

Ladle the jam carefully into 1-pint jelly jars.  Cap and process in a boiling-water bath for 10 minutes.  Remove jars from the water-bath canner at the end of the processing time and store until needed.

.

18 October, 2009

Vintage Sunday: Wearever Aluminum Sieve

Sorry this post is so late...it was a rainy, miserable day today and I wound up spending the day in the kitchen instead of in front of the computer. That actually worked out pretty well, because my KP duty today directly inspired today's Vintage Sunday post.

Pictured at left: A beautiful old Wearever Aluminum Sieve. It has a wide funnel-like opening, and it tapers off into a perforated cone. this cone fits into a wide aluminum ring fitted with heavy wire legs, and with the sieve snuggled into the cone and steadied by gripping the comfortable, ergonomically-designed Bakelite handle, the sieve makes quick work of whatever soft material you're forcing through it.

I made braised short ribs and gravy for supper tonight, and that's just one of the uses to which I put my sieve. You see, I make pot roasts and short ribs and stuff like that the old-fashioned way: I roast the aromatics and the meat in the oven first, then add liquid and braise the meat. When the meat is just about done, all the roasted and simmered veggies go into the sieve and I use the conical wooden pestle to force the veggies through the fine mesh - allowing delicious braised veggies to improve the flavor and body of the gravy while leaving stringy bits, tomato skins and so forth in the sieve to be taken out and composted. The sieve is also great for making applesauce: cook the apples pips, skins, and all, then run the pulp through the sieve. The seeds and skins get left behind, and the marvelously smooth apple puree is ready to eat or can.

It's one of my very favorite kitchen tools, and it's one of the first things I unpacked when we moved to our new place a few years ago. If you do any food processing or canning, you'll find that one of these makes your life a lot easier. Check locally before you start searching online shops or eBay, though - online these go for upwards of $30 or more, but I picked mine up at a church rummage sale for 50 cents.
.

09 September, 2008

Canning Stewed Tomatoes

Every year, Maryanne and I put in a garden. This year, we've had a lot of cloudy, rainy weather and the plants have been suffering for it. None of our pepper plants produced anything, for example, and our eggplants were overrun by some kind of grub that burrowed into the fruit and ruined most of them.

Our tomatoes struggled this year, too. We've had a great many tomatoes rot on the vines before being anywhere close to ripe, and now the plants are dying off almost a month early with greenies still clinging to them (conditions that are duplicated even on the commercial farms here in the Valley.)

Even with the less-than-ideal conditions, though, we're still loaded with a huge crop of tomatoes, because we always set enough plants to supply us with enough fruit to eat, can, and give away to our families. And as usual, almost all of the tomatoes have come ripe at the same time. When that happens, it's time to break out the jars and the canning kettles and get to work.

Throughout the fall and winter, our favorite meals are stews and soups that are often improved by a bit of tomato in the gravy or broth. We could simply buy cans of processed tomatoes, but homemade is much better and after all, we have a surplus right now that can be put up for later. Over the years, we've decided that stewed tomatoes fit our needs best of all.

Stewed Tomatoes

1 gallon tomatoes - peeled, cored, and chopped
1 cup chopped onion
1 cup chopped celery (including leaves if desired)
1 tablespoon salt
1/4 cup sugar

Place all ingredients in a heavy, non-reactive stockpot and bring to a simmer. Simmer 10 minutes, stirring occasionally.

Pack hot jars with prepared tomato mixture, leaving ½-inch headspace. Remove air bubbles from jars by slipping a knife along the inside of the jar. Wipe jar rims with a damp cloth or paper towel before capping. Process in a pressure canner: 15 minutes for pints, 20 minutes for quarts, at 10 pounds pressure.

Notes:
  1. You can vary the flavor of these tomatoes by adding herbs - for example, putting a few fresh basil leaves at the bottom of a jar before filling them gives the finished product a delicious flavor.
  2. Add a cup of chopped red or green peppers to the batch for more variety.
  3. To make spicy stewed tomatoes, drop a couple hot peppers into the bottom of each jar before filling.
  4. You may leave out the sugar if you like, but the small amount in this recipe enhances the natural flavor of the tomatoes and is not noticeable as a "sweet" flavor in the overall batch.


08 September, 2008

How to Peel Tomatoes

Tomatoes are delicious, but I really hate tomato peels. In soups and stews, chopped tomatoes shed their little bits of skin, which roll up tight and make irritating twigs. They get in the way of smooth sauces, and they separate annoyingly in canned tomatoes.

That's why I take the skins off of tomatoes before I cook with them and before I can them. It only takes a few minutes, and it's really easy:


Fill a saucepan or Dutch oven halfway with water, and bring the water to a full rolling boil. When the water is boiling, dump in some tomatoes. Stir them genly for a few seconds - you only need to have them in the water for about 15 seconds or so. Then, use a large slotted spoon to remove them from the hot water and put them in a colander.


Run cold water over the tomatoes for a moment to stop residual heat from cooking the tomatoes.


The skins will easily peel off the tomatoes.


This method will work for removing the skin of almost any soft fruit (peaches, plums, nectarines, kiwi, peppers, tomatoes, and more.) Compost the skins or feed them to your chickens.

Tomorrow: Canning Stewed Tomatoes

.

11 August, 2008

Bread and Butter Pickles

With fresh garden cucumbers in full swing, now is the time to make bread and butter pickles! These sweet lovelies have long been a favorite of everyone in our family, and Maryanne and I make several batches every summer so we have plenty to give as gifts over the holidays.


I first posted the following recipe on the Fidonet National Cooking Echo back in 1997. Since then, it's been scraped and reposted on a number of recipe archive sites on the internet - sometimes leaving my name in the credits, sometimes not. Whether or not the credit line is in the recipe instructions, though, wherever you see this recipe on the 'net, it originated in our kitchen.


Maryanne's Bread And Butter Pickles
Yield: 1 Batch

Ingredients

4 qt medium cucumbers; sliced
-but unpared
6 md onions; sliced
2 lg green peppers; sliced in
-rings
3 cl garlic
1/3 c pickling salt; or kosher
-salt
5 c sugar
3 c cider vinegar
1 1/2 ts turmeric
1 1/2 ts celery seed
2 tb mustard seed

Instructions

Toss together cucumber, onion, green pepper, and garlic. Add salt; cover with cracked ice and mix thoroughly. Allow to stand for at least three hours.

Drain vegetable mixture well and set aside. In a large kettle, combine the remaining ingredients. Stir in the vegetables and bring them to a boil in the brine.

Fill hot jars to within half an inch from the top; adjust lids. Process in boiling water bath for five minutes (begin timing when the water returns to boiling) Makes about 8 pints.

Notes: This is Maryanne's original recipe. We usually add another pepper or two, both for flavor and because the onions, peppers, and garlic are almost as popular as the cucumbers once they've been pickled.

If you have the tool and the time, consider slicing the cucumbers with a zig-zag knife, to make "ridged" pickle chips. It's the soak in the supercooled ice that makes these pickles crispier even after they're cooked, and the increased surface area that the crinkle-cutter makes gives them an extra snap.

Recipe by Maryanne Sacerdote MM format by Dave Sacerdote

We usually set aside an afternoon for making a batch of pickles. Once we get everything sliced and iced, we wash some canning jars and get our "work station" in order, then kick back with some cold drinks and some TV until it's Canning Time.

19 July, 2008

Mixed Summer Fruit Jam

I have this love/hate relationship with canning.

On the one hand, I love it. I love making pickles, jams, jellies, and more all through the growing season - my wife and I start putting up jars of stuff with the very first rhubarb stalks in the spring, and we don't stop until the last of the tomatoes are harvested in October. I make double and triple batches of baked beans just to be able to can off eight or ten pints for days when we want beans but don't want to spend a day waiting for them. My canning kettle stays handy on the bottom shelf of my rollaway cart year-round so it's at my fingertips when needed, and my pressure canners are atop the fridge, ready at a moment's notice to put something by.

On the other hand, my kitchen isn't air-conditioned and we're in the midst of a mid-July heat wave. And yet, here I am, fruit cooking on the stove, the canning kettle boiling away, and the temperature in the kitchen coming up close to 90F even with fans in the window and it being 8:00 at night. There's nothing I can do about it; the fruit is ripe and has to be processed, and I can't let it stand around until the heat breaks. So I wait until after dark when it's a little cooler outside and sip iced tea as the preserves simmer, and retreat every now and then for short breaks in the haven of my air-conditioned living room.


One of the supermarkets in my town marks down produce as it starts to get less than perfect. I always check the markdown bin when I go there because I regularly get some great deals, especially on fruit destined for jellys, jams, or juicing. Cosmetic flaws, bruises, and overripe spots don't bother me that much when all I'm going to do is cut the stuff up into the kettle anyway.

And so, today I came home with some slightly underripe strawberries (high in pectin) and an assortment of nectarines, yellow peaches, white peaches, and limes, all for about 39 cents a pound.

Mixed Summer Fruit Jam

Strawberries
Peaches
Nectarines
1 lime
Sugar

Hull and slice strawberries; scald peaches and nectarines and then plunge into cool water to loosen their skins; skin and stone the fruit and cut into chunks. Prepare a total of 8 cups of fruit. Place cut fruit into a large heavy Dutch oven. Add the juice, pulp, and zest from the lime.

Bring to a simmer over medium low heat, then gradually stir in 6 generous cups of sugar. Continue cooking and stirring until sugar dissolves. Allow to cook, uncovered, over medium low heat, stirring occasionally. Simmering jam will foam up - keep an eye on it and stir down the foam if it looks like the pot will boil over.

Continue cooking until temperature reaches the jelly point, 220F. Test the jam by dropping a little bit onto a cold plate and chilling for a few minutes in the fridge; if the jam on the plate wrinkles when pushed with your finger, it's ready.

Turn off heat and allow the foam to settle. Skim off the foam with a spoon, then ladle the jam into jars, cap, and process in a boiling water bath 10 minutes to seal.

Makes about 9 half-pints.


18 June, 2008

Cherry Jam

We're getting to the tail end of the California cherry season, and the stores here have been loaded with bags of delicious cherries. At least two of the blogs I read regularly - Fritter and Caviar and Codfish - have featured impromptu small-batch cherry jams.

Both recipes called for one pound of cherries, the juice and peel of one lime or lemon, a bit of almond extract, 2/3 cup of sugar, and half a cup of water as needed. Since I didn't have any limes on hand, I used a lemon.

The jam turned out pretty good. A pound of cherries only makes about 12 ounces of jam, which isn't enough for my needs (we give baskets of homemade jams, jellies, and pickles as holiday gifts) and although the lemon juice helps make the jam a little more tart and brightens the cherry flavor quite well, I'm less happy with the zest. Getting a bite of zest causes a tiny lemony burst which is okay, I guess, but not really what I'm after in a cherry jam.

I still have an eight-pound flat of strawberries in the fridge that needs attention tonight so cherries will have to wait, however. The produce store in town has been selling them at the gorgeous price of $1.99 a pound and if they still have some tomorrow I'll get six pounds and make enough jam for gifts as well as family eating.

Small Batch Cherry Jam

1 pound cherries, pitted and halved
juice of 1/2 lemon
1 tsp almond extract
2/3 cup sugar
1/2 cup water if needed

Place cherries, lemon juice, and almond extract in a saucepan over medium heat and simmer just until cherries are soft, about 20 minutes. Stir in some water (up to 1/2 a cup) only if needed, then add sugar and continue to cook over medium heat, stirring frequently to prevent scorching, until hot jam is thickened and bubbly.

Cherry jam sets up readily, so you need not bring the temperature to the full 220 F normally needed for jelly. When your stirring paddle comes out from the pan coated with a thick sheet of jelling liquid, test a few drops of jam on a chilled plate. If it's ready, it will set up on the plate after a moment of cooling; if not, cook a few minutes longer and test again.

Makes 12 ounces of jam - enough to fill three small 4-ounce jars.

Recipe adapted from Robin's at caviarandcodfish.com and Sarah's at fritterblog.blogspot.com.