31 May, 2008

James Hook and Company Destroyed In Fire


James Hook and Company, a Boston landmark since 1925 and one of New England's largest wholesale/retail seafood suppliers, was destroyed by fire yesterday in a blaze that leveled their three buildings. The seven-alarm fire caused over $5 million dollars in damages, according to a spokesman for the Boston Fire Department.

It took 135 firefighters about seven hours to bring the fire under control. their job was made more difficult because the wooden building where the fire started was filled with corrugated cardboard shipping cartons, and was built over the Fort Point Channel on timbers soaked in creosote to prevent rotting.

No one was injured in the fire, and the Hook family has said that they will rebuild and reopen as soon as possible. Meanwhile, the city of Boston and the Mayor's office are working with the family to ensure that this important piece of Boston's history, economy, and culinary scene will survive the fire.

Tragically, about 60,000 pounds of lobster - worth a little over half a million dollars - perished in the blaze.


28 May, 2008

Whiskey Cured Bacon

I'm always searching for new and exciting ways to prepare my homemade bacon. It occurred to me that marinating the pork in liquor before starting the actual cure would add an extra dimension to the flavor, and one that would be deeper than simply soaking the wood chips in whiskey.

I decided to cure six separate 2-pound slabs of pork: five slabs each with a different liquor and a sixth slab cured without liquor in my standard bacon brine as a control. (The brine recipe can be found at the bottom of this blog entry.)

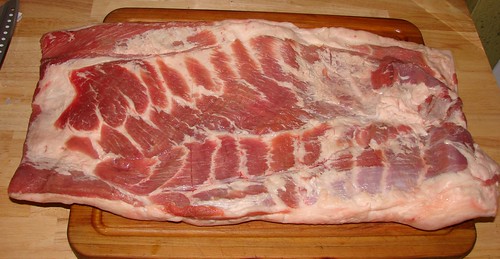
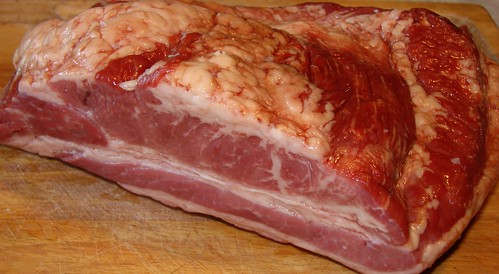
I started off with a beautiful 13-or-so pound pork belly from the local wholesale butcher. I cut it into thirds, and then cut each third in half, winding up with six approximately equal square slabs.

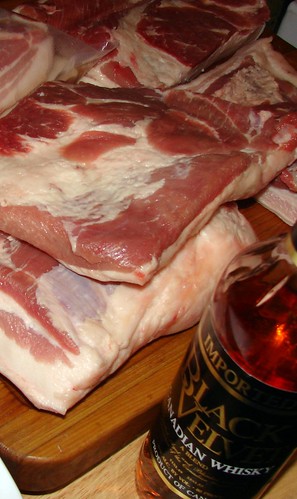
Here we see the slabs of pork, cut and ready for the marinade, along with one of the whiskeys used. Although I didn't feel that it was important to use top-shelf premium liquors for the bacon, I also didn't want to use the very cheapest store-brand swill, either. So I selected relatively inexpensive yet reputable national brands:
  • Black Velvet Canadian Whiskey
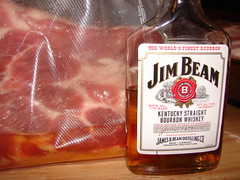
  • Jim Beam Bourbon
  • Bacardi White Rum
  • Southern Comfort
Each of the liquors was added to one slab of pork, except for the Black Velvet; two slabs of pork marinated in that, but the cures were different - one slab cured in brine made with brown sugar (standard) and the other cured in brine made with maple sugar.


I made pouches for my vacuum sealer large enough to accomodate the meat and a couple of cups of liquor. I placed each slab into a pouch, poured in the liquor, then pulled as much of the air out of each pouch as possible before sealing it, so the pork was immersed as much as possible in the liquor.

Each pouch was labeled after sealing.

I put the pouches into the refrigerator, and turned them every so often to ensure an even marinade. They stayed in the fridge for two days.

At the end of the two-day marinade I opened the pouches, poured off most of the liquor (leaving some behind for flavor) and added enough standard brine to completely submerge the slab. Then I resealed them and refrigerated the pork again to cure.

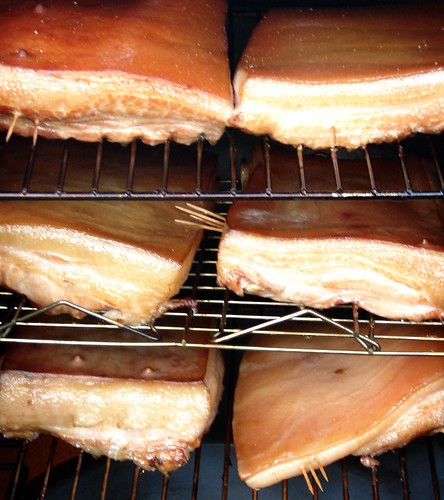
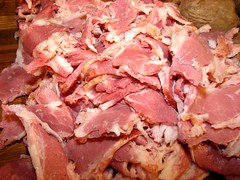
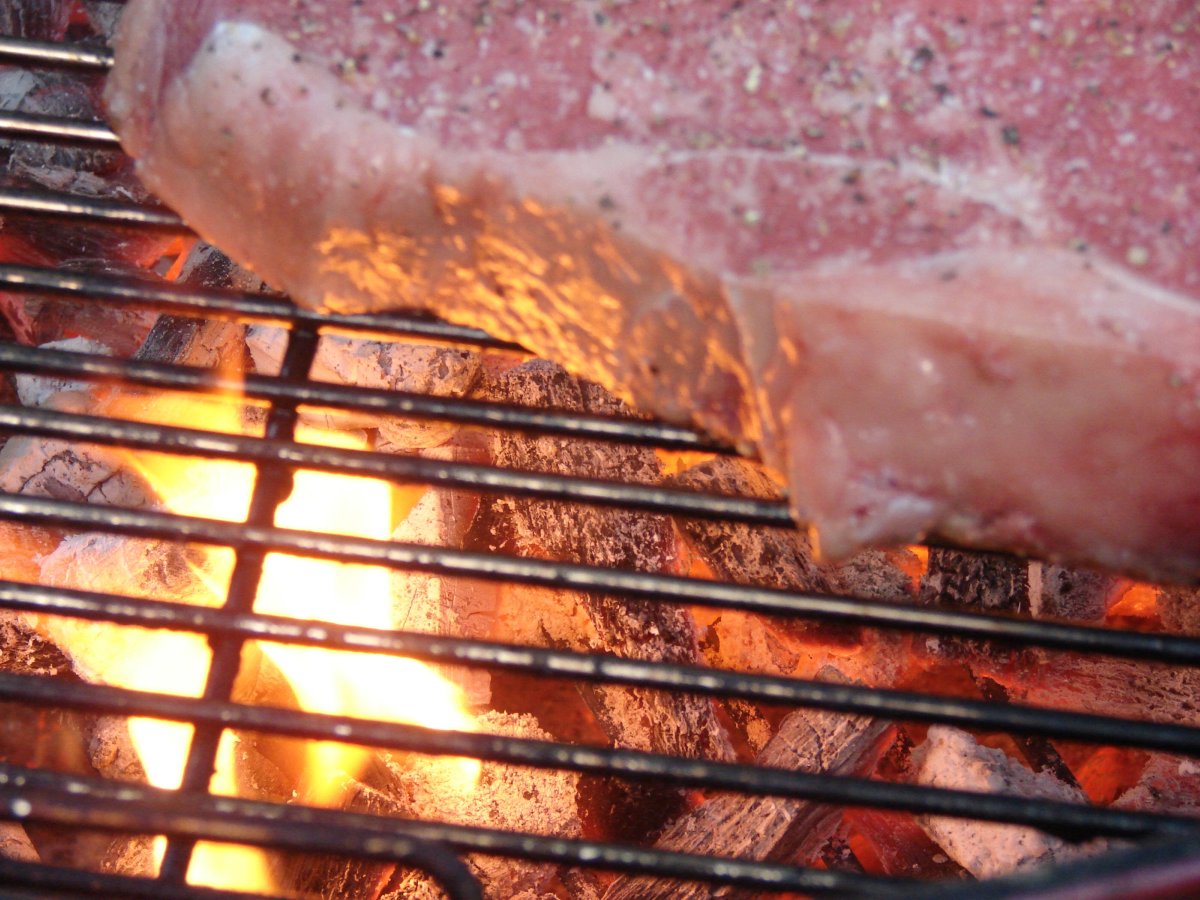
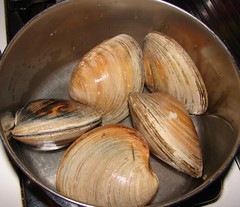
Seven days later, I drained and dried each of the slabs, and stuck them with toothpicks so I could tell them apart. In the picture on the left, they're all loaded into the smoker and have just started to smoke. You can see the toothpicks sticking out of the meat.

I held them over the smoke for a little more than two hours at 250 degrees F and they turned out fantastic! After allowing the bacons to cool somewhat, my wife and daughter joined me for a tasting. The results:
  • The Canadian Whiskey with standard cure has a hint of whiskey and caramel, but there isn't a lot of difference between this one and the control - certainly not enough of a difference to justify the added expense.
  • The Canadian Whiskey with the maple sugar cure is a lot nicer. A bit sweet, but pleasantly so; the caramel overtones in the whiskey complimented and accented the maple and made this cure much more worthwhile than the plain Canadian.
  • The Rum-cured bacon is delicious, one of the best bacons I have ever had. The rum flavor held up beautifully to the cure and the smoke; one of our favorites.
  • The Bourbon also stood up well to the smoke and the cure, and delivered a rich, full bourbon flavor with delicious hints of vanilla and caramel. Another favorite, and another cure I will happily use again.
  • Southern Comfort gave me the most surprising results, because I really don't like the stuff to drink. None of the faintly citrus notes survived the cure or the smoke, but the bacon has a wonderful whiskey flavor accented with toasted cane sugar reminiscent of cotton candy. It's quite good, and as a result I'd be happy to make this variety of bacon again. Good thing, too, because somehow I've managed to acquire two bottles of Southern Comfort, and I have no intention ever to drink the nasty stuff.


A note about the smoke:

Most of the time, I smoke bacon over hickory or apple chips, sometimes adding a bit of mesquite for the touch of "spiciness" it lends. This time, though, I used chips packaged by "Charmglow" which were labeled as being "oak whiskey barrel chips." Although there might be some old oak whiskey barrel chips in the bag, they were thoroughly adulterated with hickory and mesquite. I was disappointed because my intention was to make whiskey-cured bacon smoked over whiskey-barrel chips, but at least the smoke was flavorful and the final results were good.

If you've been grilling for a long time, you might remember Charmglow as the manufacturers of rugged gas grills that lasted seemingly forever. Well, you can lose that notion right now. Home Depot has owned the name since 2004, and the grills are now shoddy low-end things made in China by the lowest bidder.


I like to use brine to cure my homemade bacon because I hot-smoke it, turning out a Russian-style bacon that can be eaten chilled as is, or sliced and further cooked. Brine-cured bacon retains more moisture and holds up to the hot smoking process better than dry rubbed cures, which draw moisture out of the pork.

It's also a convenient way to cure bacon during the summer. In the winter, I can hang meats to cure in my attic - it stays cold up there, and the humidity is fairly constant. In the summer, that's not an option, so brine cures in the fridge are the only way to go for me.

Dave's Standard Bacon Brine

1 gallon water
1 cup kosher salt
1/2 cup brown sugar
1 tsp Morton TenderQuick

Mix thoroughly until everything is dissolved; submerge pork in solution for 4 to 8 days.

One of the nicest things about this brine is its versatility. Experiment with it by adding mustard seed, cracked black peppers, bay leaves, sprigs of fresh thyme, or sliced garlic. The flavors will surprise you, and the bacon you make will be sought-after by family and friends.


.

Great Cooks Blogroll

A quick peek at my sidebar will show you that I've joined another blogroll. This one is the Great Cooks Blogroll. I encourage you to check it out and click on a few of the the links, and to stop by at the host site, Simple Daily Recipes.

Cooking, like all creative endeavors, benefits from the free exchange of ideas - even if it means that I have to work harder to find something original to write about! =)

.

25 May, 2008

Best's Smoked Beef Bacon

I was at the wholesale butcher yesterday and found a bunch of cured and smoked beef plate ends, in cryovac and labeled Best's Smoked Beef Bacon. I've had "beef bacon" before (though always in standard consumer packaging, sliced and labeled in the same way regular bacon is sold) and enjoy it as a change in routine from regular bacon, so I picked one up.

The labels says that the plate is cured with "water, salt, sodium phosphate, sodium erothorbate, sodium nitrite" and notifies that buyer that the product contains "20% water" so I'm guessing that they use a wet brine cure injected into the meat, rather than a dry salt rub. Once outside of the packaging, there is a distinctly mild beefy aroma with a hint of smoke. Not nearly as "bacony" as some other beef bacons, and nothing at all like regular bacon. In fact, it was quite reminiscent of a good pastrami (but without the black pepper) - and even more like Montreal smoked meat as famously served at Schwartz's.

So I cut a few thin slices from the flat cut of the plate, and put them in a skillet to fry them up. Unfortunately, there's so much water in the stuff that it doesn't really fry, it just kind of steams and gurgles in it's own boiling juices. As bacon, it was a real disappointment.

However, as smoked meat, shaved off into extra-thin slices and steamed hot and juicy, piled high on good rye bread with mustard and a half-sour pickle on the side, it was aces. So good, in fact, that the next time I stop at that butcher, I'll be picking up another couple of packages.


Link: Best Provision Company

23 May, 2008

Grillin'.

That right there is one of the things that makes being a carnivore worthwhile: an inch-and-a-half-thick USDA Choice porterhouse steak grilling over a natural hardwood charcoal fire.

.

20 May, 2008

Giovanni Rana Fresh Pasta and AMAZING LASAGNE!

I don't usually make lasagne with "no boil" noodles because I had never found a "no boil" lasagne noodle that I really liked. Mostly, they've been just standard dried pasta in slightly larger sheets, and I don't generally care for the results.

But all that has changed, thanks to this amazing fresh pasta by Giovanni Rana which has recently hit the shelves in my local Costco and in several area supermarkets.

Each 250g package of Rana's No Boil Lasagne contains six sheets - perfect for a deep, six-layer lasagne in a standard small pan. Two packages are just right for a large roasting-pan-sized batch, and gaps between sheets as they are layered are easily filled because the noodles cut with scissors to fit.

Besides being easy to work with, they have the most delicate egg-noodle flavor and tender texture - perfect all around. I can't wait to find other Rana products and give them a try.


Amazing Lasagne starts, of course, with amazing ingredients. Some of you might look at this photo and ask what is so amazing about some of this stuff (especially the Ragu brand pasta sauce.) Bear with me - all will be explained.

Clockwise from the top:

Giovanni Rana fresh pasta - I've gushed enough about this stuff already. Suffice it to say that it's the best fresh pasta I've ever had.

Ragu Traditional pasta sauce - Before you scoff at this choice, read the labels. No high-fructose corn syrup. No fillers. A minimum of salt. There isn't anything in most varieties of Ragu that I wouldn't put in homemade sauce, and that is more than I can say for the majority of other national brands.

Ricotta Cheese - I use a store brand (Stop & Shop to be precise - a local Northeast US chain.) Stop & Shop ricotta cheese contains only three ingredients: Milk, starter culture, and salt. That's it. next time you're in the store, check out some of the big national brands and see what's in your ricotta cheese: Guar gum. Xanthan gum. Modified food starch.

Shredded mozzarella cheese. Here again, I buy my cheese from a local company that uses all-natural ingredients. No additives or preservatives, and - most importantly to me - no antibiotics added as "mold inhibitors."

Fresh eggs from a local farm.

Fresh parsley.

Italian sausage, made locally at an Italian market/deli, cooked and finely diced.


Start by combining the ricotta, eggs, and parsley in a large bowl. If you want some extra flavor, add about half a cup of finely grated Parmesan or Romano cheese (or a mixture of both.) Season with a bit of salt and a very generous grind of black pepper. Beat with a wooden spoon until the ingredients are well-combined and light and fluffy. Set it aside, but keep it handy.


Spread some tomato sauce on the bottom of the roasting pan. On top of this, place two sheets of the pasta side by side, covering the sauce. Follow the pasta with a generous spread of the ricotta cheese mixture, carefully spreading it in a layer about half an inch thick from edge to edge. Add a light sprinkling of the shredded mozzarella. Top this with a liberal layer of the chopped sausage.


Spread some tomato sauce over the sausage. Follow the sauce with another layer of lasagne noodles, then another layer of ricotta, another sprinkling of mozzarella, and yet another spread of tomato sauce.

Continue layering ingredients like that until the final layer of noodles are about 3/4 of an inch from the top of the pan. Spread the noodles with some more sauce, and add a very generous sprinkling of mozzarella over the top.

You should have a little bit of tomato sauce left in the jar. Pour about 5 ounces of water into the jar and swish it around, picking up all the remaining tomato sauce in the jar. Now pour that tomato water evenly over that top of the cheese. The extra water is necessary to give the lasagne noodles something to cook in. Even though your lasagne may look too "wet" at this point, it will be fine after it bakes.

Cover the roasting pan loosely with foil and bake the lasagne for about an hour or so in a 350 F oven. When you take it out of the oven, you'll notice that the lasagne comes right up to the top of the pan! The noodles swell up as they cook and absorb liquid from the cheeses and sauce.

Remove the lasagne from the oven and allow it to sit for half an hour or so before you cut it - This helps give it time to "set" so it won't be so drooly when it's served. Of course, you can still cut right into it right away if you like drooly lasagne, or if the delicious smell has been driving you insane and you simply MUST HAVE AMAZING LASAGNE RIGHT NOW.


Did you know you can bake lasagne on your grill? Use indirect heat by placing charcoal to the left and the right of the grill, leaving the center empty. Place the lasagne in the center, cover the grill, and walk away for about an hour , just as though you were using the oven. It works great, and if you loosen the foil on the top of the pan for the last ten minutes of cooking, you'll gain a subtle smoky flavor to the top layer of cheese.

.

Stuffies!! (Stuffed Clams)

Stuffies! Gorgeous, rich, delicious stuffed clams: Made with huge quahogs (hard-shelled clams) these are a longtime Southern New England favorite. If you've only ever had store-bought or restaurant stuffies, you owe it to yourself to try the real thing.

Here's what you'll need:

5 or 6 very large quahogs (four inches wide or larger - get 'em huge!)
1 stick of butter (1/2 cup)
1/2 cup finely minced onion
5 cloves of garlic, crushed
8 ounces Ritz or Keebler Townhouse crackers
1/3 cup finely chopped parsely
1/2 tsp paprika
1 rounded tsp Old Bay Seasoning
Salt and pepper to taste

Buy the largest hardshell clams you can find. Hardshell clams have different names depending on what size they are. The smallest ones are called "littlenecks," and the biggest are called "quahogs" or "chowders." In between, they're usually sold as "cherrystones."

Scrub the clams well to remove mud and grit from the outside shells. Don't worry about inside; they should be tightly closed anyway, and there won't be much (if any) grit inside. Put them into a pot with an inch or so of water.

To give you an idea of how big the clams I used were, the picture on the left shows five quahogs in a 6-quart Revere Dutch oven (about 12 inches in diameter.)

Try to set the clams with the hinge side down. They won't steam any faster or more efficiently, but it ensures that the shells have room to open because they won't be wedged up against one another.


Turn on the heat and cover the pan. Keep an eye on it as the water starts to boil. The clams will begin to open up and you want to stop steaming them as soon as they start to open. Steam them too long and they'll be tough and rubbery.

They don't have to be open very far - as little as an eighth of an inch is fine - as long as you can slip a knife in, sever the adductor muscles, and remove the meat from the shell.


Remove the meat from the shells and set them aside until they are cool enough to handle. Pour the broth from the pan over the meat to keep it from drying out.

Don't throw away the clamshells! You'll need them later to hold the stuffing. Select six of the halfshells, scrub them inside and out, and set them aside for later.


With the clam meat set aside to cool, it's time to prepare the stuffing. In a skillet over medium heat, melt the butter. When the butter heats up, add the garlic and onion. Sautee them gently and don't let anything brown (including the butter!) The idea is to soften the garlic and onion while transferring their wonderful flavors to the butter.

While this is cooking, whirl the crackers in your food processor to make fine crumbs.


Pour the cracker crumbs into the butter-garlic mixture as it is frying; stir and toss it well as you mix. Add the paprika and the Old Bay Seasoning as you mix in the crumbs.

Turn off the heat under the stuffing mixture when the crumbs are all mixed in and the stuffing is clumpy.


Continue to stir and toss as you add the parsley and season the stuffing liberally with freshly ground black pepper.

Chop the clams coarsely and add them to the stuffing along with any clam juices that run out as you are cutting them up. Mix well to distribute the meat evenly throughout the mixture.


The stuffing is ready to use when the clams and seasonings are all tossed in. Give it a taste to be sure the seasonings are correct - you may have to add a bit of salt, but don't do that before tasting; the butter, the clams, and the Old Bay all have some salt in them to begin with.

When the seasonings taste right, pack mounds of stuffing into the six clamshells you saved earlier. Arrange them on a platter and pop them under the broiler or into a toaster oven for a few minutes, just to lightly brown the crumbs. Serve them hot.

Makes six stuffies. (Appetizers for six, lunch for three. Or two, if you really like 'em.)


Want more information about quahogs? Check out this Rhode Island Sea Grant fact sheet about them.


15 May, 2008

Where's My Spicy Baconator, Damn It?

Hey Wendy, you got a minute? We need to talk.

You're really letting yourself go to hell lately, you know? I mean, the quality slide after Dave died - well, that kind of thing happens but everyone expected that you'd pick yourself up and soldier on. Instead, it's been just one low point after another.

I still remember the day we met. That Double with cheese was the cat's ass. Thick, juicy square burgers - so different from anything I'd ever had at a fast-food place! Do you know what the last burger you made me looked like? Greasy flat little sad-assed thing. If it hadn't been square, I'd have sworn I was over Ronald's place. Is that what you want, Wendy? To imitate a clown?

And your chili. I know, I know...you've always taken a lot of grief for your chili - too many beans, they say. Not spicy enough, they say. But I kind of liked it just the way it was. Not any more. That isn't chili, it's tomato soup with beans and a couple of pieces of hamburger in it. You're not fooling anyone with that crap.

Look, Wendy, I know we're not as close as we used to be, but deep down inside I'm still carrying a little torch for you. You have no idea how much it hurt me when you moved in with that dirtbag Arby. Eeugh. Pressed and formed "roast beef." How can you stand that? His "beef" has bubbles in it. It's disgusting.

And now...now, you've booted the Spicy Baconator. How could you do that to me, Wendy? The pickled jalapeños. The smoky chipotle sauce. The Pepper Jack cheese. You know I loved that sandwich, and you took it away. I'm sorry, but that's the last straw. I'm done. Maybe I'll go over and see what Red Robin's up to.

Hey, call me sometime, okay? You know, if you're making Spicy Baconators again.

.


14 May, 2008

Refried Mashed Potatoes

We use leftover mashed potatoes in a number of different ways - potato pancakes, Duchess potatoes, fishcakes - but this simple preparation is one of our favorites. It's quick and easy to do, and once you have it started over the burner, it really doesn't need a lot of attention while other things get cooked. All you need to do is give the pan a flip now and again until you're ready to serve.

Start with a 14-inch nonstick pan. Put it over medium heat and add 2 tablespoons of butter and some olive oil. Melt the two together until the butter is foamy.


Add two thinly-sliced scallions and two minced cloves of garlic. If the potatoes you are using are underseasoned, you can take this opportunity to add salt, pepper, and perhaps some paprika or other seasonings. Keep the pan over medium heat and sautee until the onions and garlic are softened and becoming translucent, but not browned.


Add leftover mashed potatoes to the pan. Turn the heat up to high and press the spuds down over the scallions and garlic. Allow the potatoes to brown on one side, then shake the pan a few times and flip the spuds over to brown on the other side.


Continue to periodically shake the pan and flip the potatoes for as long as you like, incorporating the lacy browned bits into the body of the mashed potatoes, until the spuds are heated all the way through and reach the degree of brownness you desire. You can turn the heat down to medium and give the pan a little attention now and again while you prepare the other components of your meal - the potatoes only get better as you brown sections and flip the pan to bring more potatoes into contact with the heat.

Part of what makes this side dish so delicious is the wonderful contrast in textures offered by the browned sections and the creamy mash.

.

13 May, 2008

Baked Doritos

I'm not really sure whether or not I like Baked Doritos. They taste kind of like real Doritos, but there's some kind of weird cardboardy texture, as if Nacho Flavor Powder was sprayed onto a dried slurry of cornflour and cardboard.

08 May, 2008

Palm Liver Spread

I'm a big fan of liver spreads and patés, so when I saw this interesting-looking half-pound tin at the Asian market for a little over a dollar, I couldn't resist.

There is, of course, a reason why a reasonably decent tin of paté weighing one-fourth as much as this can sells for more than twice as much, and it's not because Palm is a bargain.

Made with beef liver and some assorted fillers, the texture is coarse and granular - almost gritty - and the flavor is overwhelming and a bit urinous (perhaps some kidney got mixed in there somewhere?) A few smears on a neutral cracker was all I could take of this nastiness.

My dog, however, had no such misgivings. From the instant I opened the can, he was at my side, sniffing the air and scouting out an opportunity to have a taste. I gave him a little bit of the spread, and it immediately became his favorite food.

Two ounces of the liver spread, mixed with a cup of his dry kibble twice a day, ensured that the dog belonged to The Clean Plate Club for two days running. I've rarely seen him so fond of anything from a can.

06 May, 2008

Ramen Review 6: Nissin Tokyo Shoyu Flavor (Imported)

Ease of Preparation: 8/10
Place noodles, soup base, and veggies into the bowl; add boiling water and allow to stand 5 minutes, covered. Uncover, stir in seasoning packet, and enjoy.

Vegetable Packet: 5/10
Shredded nori. Although quite delicious, it would have been better with a sprinkling of minced scallion.

Seasoning Packets: 10/10
The soup base - chicken, seafood, and pork flavors in a well-balanced and delicious blend - is excellent. A second packet contained a bit of soy sauce and some chicken-flavored vegetable oil. There was just enough seasoning to give a rich, deep flavor to the soup that was very satisfying.

Taste: 10/10
Marvelous. The soy sauce was not at all overwhelming.

Spiciness: 0/10 - This is not marketed as a spicy ramen.

Overall: 9/10 - Recommended.