Showing posts with label side dishes. Show all posts

29 September, 2012

Shopping For Ready-to-Use Stuffing

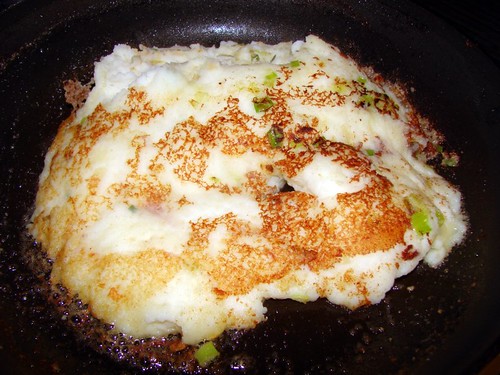
A good majority of the time, I make stuffing from scratch. It only takes 20 minutes or so, and most of that time is waiting for the onions to start caramelizing. But there are times, I admit, when stuffing out of a box (like Stove Top) is mighty appealing - maybe I don't have enough bread on hand, or even the short 20 minutes it takes to make stuffing feels like a squeeze - so I usually have an Emergency Box Of Stuffing in the pantry. (Seasoned stuffing is good for croutons too, by the way.)

There are minor differences in the tastes of the prepared boxed stuffings, but to me they all pretty much taste the same.  So I make my decision based on a criterion I use for some other food purchases: Do any of them contain high-fructose corn syrup?

(Yeah, I know, "sugar is sugar," just like the corn industry keeps telling us, and we can believe them because they have no vested interest in selling as many corn products as possible. And even if you're okay with HFCS, are you okay with it in every goddamn thing you eat, even if you can't think of a single reason why something should contain - and in some cases, be based upon - corn syrup?)

Okay, so here's a couple of snapshots of the stuffing display at a typical local supermarket (Stop & Shop, in this case.)


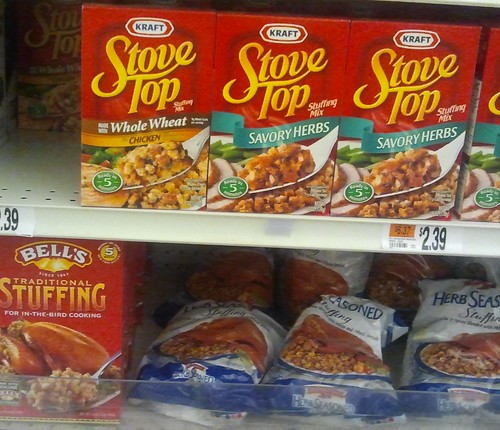
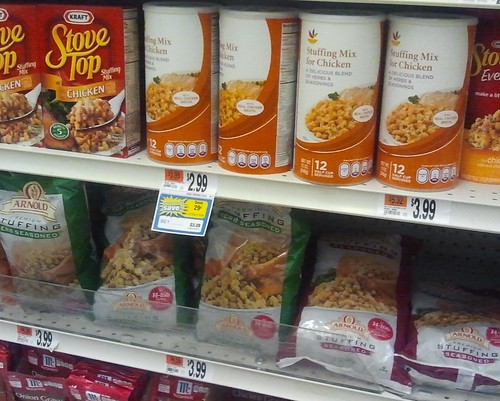
A fairly typical assortment. There are a million different varieties of Kraft's Stove Top (the category leader) and a narrower selection of flavors by Arnold and Pepperidge Farm. You'll also find Stop & Shop's store brand, and Bell's, which is made by the same company that brings you New England's beloved Bell's Poultry Seasoning.

Which brands are HFCS free?

Bell's.  It's the only one with no high fructose corn syrup hidden inside.


.

05 September, 2012

Stewed Heirloom Tomatoes

Late August / early September is primetime for home garden tomatoes. Every year at this time,  it seems like every tomato vine in my garden bursts forth with ripe fruit, and what was a steady supply of a couple of toms a day from about July or so becomes a flood of plump ripe tomatoes that need to be eaten or canned or else. Luckily, there are plenty of ways my family enjoys tomatoes both raw and cooked.  Last night, for example, I made a batch of stewed tomatoes as a supper side dish using a few heirlooms freshly snagged off the vines.

Stewed tomatoes are an easy thing to make - the ingredients are common, amounts are flexible, and you can pretty much toss it together and leave it to simmer on a back burner with minimal attention while you go about the rest of your meal prep. And as good as store-bought canned stewed tomatoes are, you just can't beat the fresher taste of homemade.

Start with three or four (or more) ripe tomatoes. Peel them by scalding them in boiling water, then cut them into big chunks and put them in a saucepan. (For this batch, I used all heirlooms: a Yellow Valencia, a White Beauty, a huge Cherokee Black, and a lovely red San Marzano.)

Chop half a medium onion, a green pepper, and a tender rib of celery (leaves and all.) Add these to the pot and put it over low heat.

Stir in a tablespoon or so of sugar, a good sprinkle of salt, and some chopped basil. Keep the pot over low heat and allow it to simmer for ten to fifteen minutes, until the onions are tender, giving it a stir now and then to keep it from scorching.  Taste it before serving - you'll probably want to adjust the salt before bringing it to the table.

Remember what I said about flexibility? You can play with this recipe a lot to get the flavors you desire. Add a clove of garlic if you like. I didn't use a green bell pepper last night, because I had a few (unfortunately mild) Anaheims from the garden ready to use. It's just that kind of recipe. There's the final result. It was awesome.


.


03 April, 2012

Review: Priano Eggplant Parmesana by ALDI

Sometimes when I'm in the mood for eggplant parmigiana, I don't have any eggplant handy. That's not a problem in the summer, when my eggplant vines in the garden are practically falling over with fruit. But in the winter and spring, good eggplant is hard to find, and local eggplant is just not available. And that's when frozen eggplant parm comes in.

Most of the time, I've bought Celentano eggplant parmigiana. It's decent, and Celentano's tomato sauce is very good. But recently, I found that ALDI was carrying their house brand parmigana, Priano. I bought a few to give it a try. 

And no surprise, it's as good as I've come to expect from ALDI products. The slices of eggplant are lightly breaded, with tangy tomato sauce and mozzarella cheese between the slices (though not as much as the box photo shows.) The product is microwaveable, but when I'm cooking it at home I put it in the oven so I can melt a little mozzarella on the top for the last five minutes of heating time. Half a package is perfectly adequate for a serving along side the pasta of your choice (my choice for the photo at left was rigatoni.) Delicious. 

Like many ALDI products, you may have trouble finding it at your local ALDI, since they have a habit of rotating the availability of many of their specialty items. If you can't find it at your ALDI, don't be afraid to ask the manager about it - they may be able to bring it in for you.

29 June, 2010

Iced Pickle Chips

Check it out: the first batch of cucumbers are in from the garden.  We grow Kirby (pickling) cukes and we harvest them somewhat on the small side.  The seeds are tiny, the skin is still thin but has a good snap to it, and they're the perfect size for making our bread-and-butter pickles.

We also enjoy them fresh, cut into spears or sliced into salads.  But when the weather is really hot and oppressive like it's been the past few days, we also make an easy and refreshing snack we call "Iced Pickle Chips" (though they really aren't pickled per se.)

Iced Pickle Chips

4 or 5 cucumbers
Kosher or Pickling salt
1 tray of ice cubes

Slice the cucumbers thinly - about 1/8-inch is good - and place them in a bowl.  Sprinkle them liberally with salt and don't be afraid to have a heavy hand with it because most of the salt will be drained off later anyway.  Cover the cucumber slices with an ice cube tray's worth of crushed ice and toss everything well to combine.

Place the bowl in the refrigerator and allow to stand for an hour or two.  When ready to serve, drain off the water and ice and bring them to the table on a small salad plate  or in another bowl.  Keeping the cukes on "salted ice" for a couple of hours develops an amazing crispness because of the colder-than-freezing temperature acheived by salt and ice mixed together.  And just enough of the salt stays behind when the ice and water is drained off to season the cukes without making them too salty.
Salting and icing cucumber slices is the first step in making bread-and-butter pickles.  We simply adapted that step into a snack in its own right.

.


04 September, 2008

Tender Delicious Dumplings

I love dumplings. Tender little pillowy clouds of dough floating on simmering gravy...what's not to like?

There seems to be two kinds of dumplings in American cooking - rolled dumplings, and drop dumplings. My mom always made the drop kind, so I do, too. Some people think that drop dumplings are heavier and denser than rolled dumplings, but if they can be light and fluffy if you don't mix the batter too much and if you give it time to rest before you drop the batter into the gravy. Here's the recipe I've been using for 30 years:

Fluffy Dumplings

1 cup all-purpose flour
1 tablespoon baking powder
1 teaspoon salt
½ cup milk
2 tablespoons light salad oil

Stir dry ingredients together well with a fork or a whisk. Combine milk and oil, and pour all at once into the flour mixture. Stir briskly with a fork until the mixture is evenly moistened, but don't overmix it. The batter should be sticky, slightly wet, and almost as thick as dough.

Set the dumpling mix aside for ten minutes. Then, scoop out spoon-sized lumps and drop them atop simmering stew. Cover the pot and allow to slowly simmer for 15 minutes. Don't lift the lid and peek at all or the dumplings won't rise! (I cover my pot with a glass lid so I won't be tempted to peek. Lifting the lid really does ruin the dumplings.) makes 8 to 10 dumplings, depending on the size of your scoops.

Some tips:
  1. If the batter is too thick, sprinkle in a little more milk or some water to make it very soft and sticky.
  2. Letting the dumpling mix sit for ten minutes is the secret to extra-fluffy dumplings. During that ten minutes, the baking powder starts to work and makes the dumpling mix start to rise. When you scoop out the batter to drop into the stew, you'll see all the air holes where the baking powder has been working. In the heat of the stew, the baking powder goes into overdrive and really makes the dumplings rise into fluffy, floury puffs.
  3. My recipe is based on the one given in the 1967 edition of the Better Homes and Gardens Cookbook (the Chicken and Dumplings recipe is where you'll find it.) The original is horribly bland. This version is still kind of bland, too. If you're not watching your sodium intake, you can add about half a teaspoon of your favorite seasoning salt in addition to the teaspoon of salt included to make them taste better. When I make these for chicken, I like to add half a teaspoon or so of Bell's Seasoning (my favorite brand of poultry seasoning.)
  4. Don't peek when they're cooking! It's the steam and the simmer from the stew that makes them turn out so wonderful. That's why I use a glass cover on the pot - so I don't even get tempted to look.


14 May, 2008

Refried Mashed Potatoes

We use leftover mashed potatoes in a number of different ways - potato pancakes, Duchess potatoes, fishcakes - but this simple preparation is one of our favorites. It's quick and easy to do, and once you have it started over the burner, it really doesn't need a lot of attention while other things get cooked. All you need to do is give the pan a flip now and again until you're ready to serve.

Start with a 14-inch nonstick pan. Put it over medium heat and add 2 tablespoons of butter and some olive oil. Melt the two together until the butter is foamy.


Add two thinly-sliced scallions and two minced cloves of garlic. If the potatoes you are using are underseasoned, you can take this opportunity to add salt, pepper, and perhaps some paprika or other seasonings. Keep the pan over medium heat and sautee until the onions and garlic are softened and becoming translucent, but not browned.


Add leftover mashed potatoes to the pan. Turn the heat up to high and press the spuds down over the scallions and garlic. Allow the potatoes to brown on one side, then shake the pan a few times and flip the spuds over to brown on the other side.


Continue to periodically shake the pan and flip the potatoes for as long as you like, incorporating the lacy browned bits into the body of the mashed potatoes, until the spuds are heated all the way through and reach the degree of brownness you desire. You can turn the heat down to medium and give the pan a little attention now and again while you prepare the other components of your meal - the potatoes only get better as you brown sections and flip the pan to bring more potatoes into contact with the heat.

Part of what makes this side dish so delicious is the wonderful contrast in textures offered by the browned sections and the creamy mash.

.