Showing posts with label pickles. Show all posts

03 October, 2012

Review: Farmer's Pride Pickled Bologna

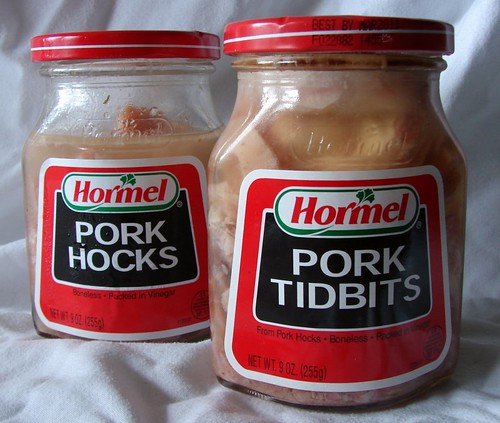
Late last week, I got a heads-up from Steve Wood, who writes Connecticut Museum Quest, a top-notch Connecticut blog that is about so much more than just museums. He alerted me to a new product at Ocean State Job Lot: Farmer's Pride Snack Bologna (which just so happened to be featured in OSJL's "internet coupon" selection.)

Holy shit, pickled bologna! How could I resist?

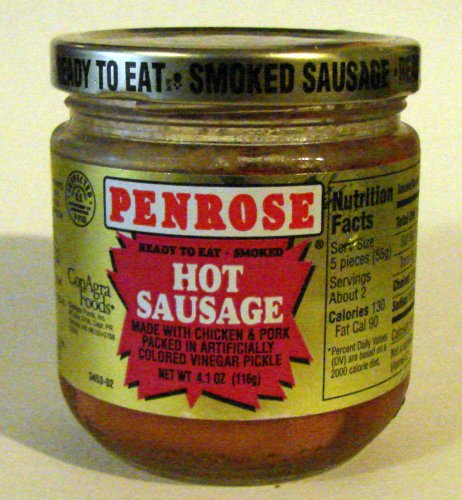
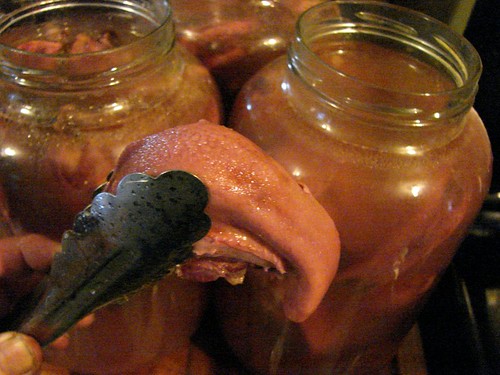
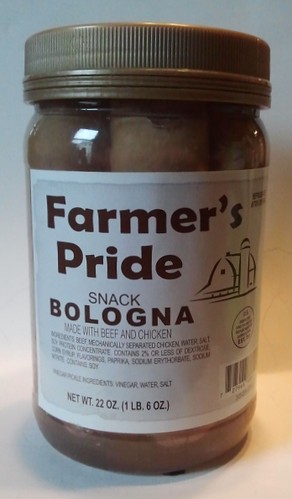
Lynnafred found the jars at our local Ocean State. She picked one up - it was the size of a largish peanut butter jar - and peered at the "bologna" within: they were in the form of huge, fat Vienna sausages (and according to the ingredient panel, they're composed of pretty much the same stuff.) The jars were plastic and sealed with soft plastic lids, and as Lynnafred looked through the brine at the bologna she said, "Eww. These are grey. Are they supposed to look like that?" After looking at a dozen other jars, and finding all of them containing somewhat greyish weiners sealed within, we concluded that the answer was probably Yes, they are supposed to look like that. The coupon said that there was a limit of 12 jars per family, but we curbed our enthusiasm and held ourselves to the purchase of a single jar which, at $1.20, seemed to be a fair price.

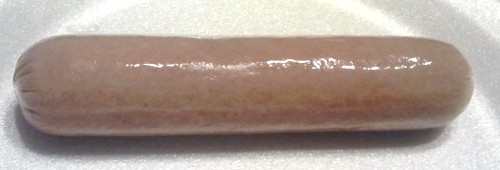
Let me start the actual review by saying that I can not believe that Farmer's Pride pickled bologna is a regularly-produced consumer good. Every single component of this product screams "DISPOSE OF CHEAP SHIT!!"  The jars are flimsy plastic, the lids seem to be made of the same quality plastic as imported dollar-store toys from China, the labels look like they were run off on a laser printer. Most of the jars at the store had sticky label residue clinging to the non-labeled areas, telling me that these snacks were probably rejected by the company which originally contracted them, leading the manufacturer to hastily peel the original label and rebrand them for the "remainder market" (i.e. dollar stores and job lot joints like OSJL.) And then, of course, there is the actual bologna itself:

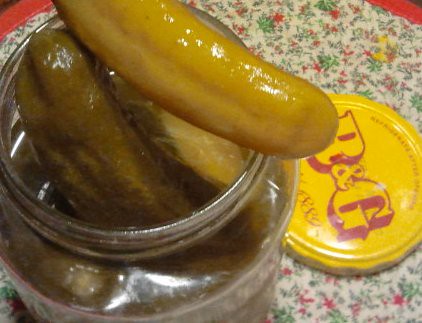
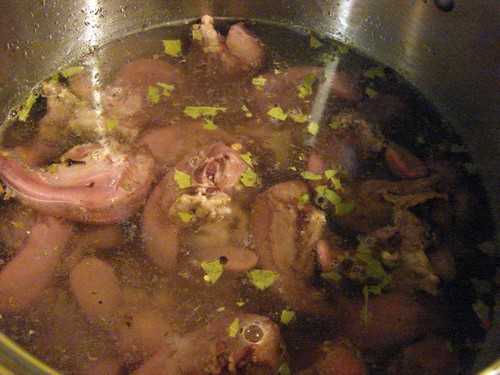
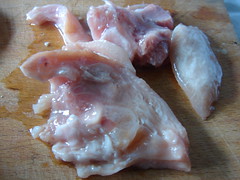
That is one nasty-ass piece of tubesteak right there. Check out the gradations of coloring, from a kind of brownish-grey at the ends to rather pinkish in the middle. I swear I used no filtering or image manipulation to change those colors - that is exactly how they come out of the jar. Unfortunately, I wasn't able to capture the true beauty of the grey lines that run from tip to tip on the wieners, especially where the meat was in contact with the sides of the jar. These things are truly ghastly to look at.

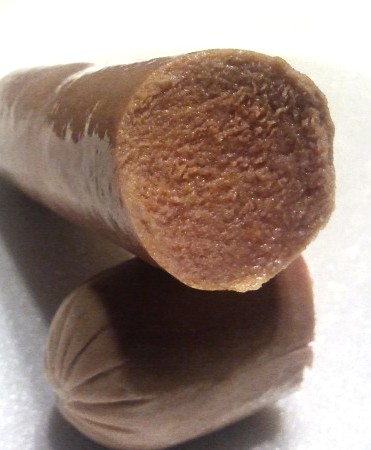
At least when we cut into the wiener we found that the grey color doesn't go all the way through - once you get a little way into the surface, everything kind of turns pink again. I guess that means that they're okay to eat. Honestly, eyeballs are all we have to go by for safety, because there are absolutely no olfactory cues here. No scent of spices, no aroma of meat - nothing at all except the pungency of strong vinegar stabbing at our nostrils like fleets of aromatic daggers. The manufacturer (Monogram Meat Snacks LLC, USDA EST 795) could not possibly have made the brine any more unpleasantly sharp.

And the wieners are just as unpleasant to eat as they are to look at. The texture is firm and smooth, but there is little flavor beyond the powerful vinegar brine, which is so acidic that it actually produces a burning sensation in the mouth and throat. And - worst of all to me - the meat leaves a disgusting tallowy film coating the mouth and tongue. These things are grossly misnamed - they should be called "Farmer's Shame."

As with so many other oddball snacks we've tried over the years, Farmer's Pride Snack Bologna proved to be pretty popular with the dogs, though I didn't dare give them all they wanted due to the acidity of the pickle (the last thing I want to do is spend an afternoon scrubbing dog puke out of the dining room rug.)

So there you have it. Cheap, shitty, only marginally edible, and obviously close to the end of its shelf life - Look for 'em at a dollar store near you - and pass them up in favor of almost anything else you find.


.

24 February, 2012

B&G Pickles

B&G used to be my favorite brand of pickles, but lately they seem to be letting quality slip. Like the jar I got at the supermarket the other day - filled with limp and soggy pale-green or even yellowy cukes, with some of them cut or crushed to fit into the jar. This is not what I expect from a good jar of pickles.  B&G needs to step up and return to the excellence they once displayed.

04 September, 2011

Stuffed Cherry Pepper Appetizers

Looking for a something a little different to serve at your Labor Day end-of-summer party?  How about a traditional Italian antipasto treat: stuffed cherry peppers?  You can make them with either sweet or hot cherry peppers and they're easy to put together.

Here's what you'll need:

  • A jar or two of cherry peppers, sweet or hot or both as you prefer
  • A block of mild cheese: I prefer fontina for stuffing peppers, but provolone is traditional and monterey jack is good, too.
  • Thinly-sliced prosciutto
And the method:
  • With the point of a sharp knife, cut around the stem of the pepper to remove it. Pull the stem out so the seed cluster comes out with it. Use the rounded end of a butter knife to scoop out any remaining seeds.
  • Take a chunk of cheese small enough to fit inside the cavity of the pepper and wrap it in a strip of prosciutto (not a whole slice of prosciutto, just a strip torn from the slice.)
  • Stuff the wrapped cheese into the pepper, tucking any loose ends of prosciutto inside the edge of the pepper.
  • Repeat until you have made the desired number of stuffed peppers (or until you run out of one of the ingredients!)

I make stuffed cherry peppers a few times a year - whenever we're having a big family get together - as part of a veggie dip platter, but you can put a bowl of them out all by themselves. Keep the jar of pickle juice from the peppers, because if you have leftovers, the stuffed peppers can be dropped back into the jar and, in the pickle juice and kept in the fridge, they'll stay edible for a few more weeks.

02 July, 2011

Vlasic Homestyle Relish


None of my recipes for sweet pickle relish call for Splenda/sucralose, so obviously Vlasic is using a different definition of "homestyle" than the one found in the dictionary.

Once upon a time, sweet relish was made with plain honest sugar, but I can't remember the last time I found a national brand of relish produced that way.  Either it's cucumber bits swimming in high-fructose corn syrup goo, or it's some bullshit "homestyle" crap with artificial sweeteners. It's pretty shameful that I have to go to Dollar Tree and buy jars of sweet pickle relish imported from India to find all-natural, sugar-sweetened relish.

24 May, 2011

A Tale of Two Giardiniere

Here's a head-to-head comparison of Guiliano "Mild Garden Mix" and Mezzetta "Italian Mix Giardiniera."  I happened to have both of them in the pantry and decided to compare the two.  Guiliano's giardiniera is usually found at Ocean State Job Lot, so it's fairly inexpensive.  I buy Mezzetta's product at either Stop & Shop or Coronna's Market (my neighborhood corner store and butcher shop.)

Like many other Italian-Americans, I grew up eating giardiniera. It always has a place at family gatherings, and Maryanne and I put a jar of it on the table whenever we're serving a standard tossed salad, because there's nothing like a good giardiniera to wake up a boring bowl of leaves. And I hear that they use it as a sandwich topping in Chicago which really shouldn't surprise me given all the crap they pile onto hot dogs there, right?

My favorite part of the giardiniera is cauliflower. I don't have much use for cooked cauliflower as a veggie, but if it's pickled and still crunchy, I could nom the hell out of it all day. Both Giuliano and Mezzetta are mostly cauliflower. But Giuliano seems to cook the hell out of theirs while somehow, the Mezzetta cauliflower is crunchy and awesome.  Actually, these qualities come up so often I'm not even going to mention it again beyond saying that the veggies in the Giuliano version are universally cooked and soft, while those in the Mezzetta are crunchy and don't taste overprocessed.

Giuliano is also a hell of a lot sharper than Mezzetta. They use a stronger vinegar solution and it shows. Usually, I have to give the Giuliano "garden mix" a quick rinse under cold water to get rid of some of the highly acidic flavor.  Mezzetta giardiniera is a more tolerable strength, with a pleasant bite that doesn't threaten to kill your mouth.

I guess where you can see where this is leading. A good giardiniera is crispy pickled heaven, and a bad giardiniera is just face-collapsing vinegary pucker. Mezzetta is very good indeed.  Guiliano is not quite bad, but it is sub-optimal. Given the choice of the two, it's Mezzetta all the way.

27 October, 2010

Poland's Finest Pickled Vegetables

Poland's Finest All Natural Pickled Mixed Vegetables Assortment is a kind of pickled salad which are fairly common in Eastern Europe but still a little unusual here in the US.  The "Poland's Finest" brand name is new to me, but the concept isn't - I shop regularly at a couple of local Russian markets and you'd be amazed at the variety of different pickled salads on the shelves.

Anyway, this assortment caught my eye for a couple of reasons: the veggies were whole rather than the more common sliced or shredded, and the jar was topped of with two big red ripe tomatoes.  Pickled ripe tomatoes was a new one on me.  I bought the jar, brought it home, and stuck it in the fridge to chill.

We enjoyed the salad a couple of days later as a side dish with kielbasa.  As we unpacked the jar we found:
  • cucumber
  • tomato
  • carrot
  • celery
  • cabbage
  • large hot red paprika pepper
    The salad was awesome.  Sometimes I find that European picklers use too much sugar in their brine, but this was not the case here.  Everything was crispy, fresh, and delicious (except for the tomatoes which were not "crispy" by their very nature.  But they weren't mushy, either - they were firm and flavorful, like they had been cold-pack pickled right out of the garden.)  And, thanks to that bigass paprika pepper in there, the salad was spicy hot.  I really liked it, though Maryanne found the heat factor a little much for her (she is not a chilehead.)

    Now I just gotta get back to Ocean State before they sell out of this stuff...

    17 October, 2010

    Vintage Sunday: Food Choppers - And a Relish Recipe

    This is a food chopper:


    It's a versatile kitchen tool.  In days gone by, almost every kitchen had one.  There were dozens of different models and designs, made by a large number of companies around the country - so many, in fact, that the variety available supports an active collectibles market.  Regardless of the model, size, shape of the hopper or curve of the handle, though, they all do pretty much the same thing the same way:  Stuff goes into the hopper, the handle is turned, and a screw drives the stuff out the front where it is cut into bits by a rotating knife with many blades.

    You can use it to grind meat, but it's not the same as a meat grinder (pictured at left.)  With a meat grinder, the cutting action is done inside the barrel of the grinder as the meat is forced out through holes in a steel plate.  A food chopper forces the product out of the barrel where it is cut off on the outside.  The chopper was a labor-saving device used to mince meat, vegetables, and other ingredients without having to spend a lot of time with a knife.  It was the fastest way to get that kind of mincing done in the days before electric food processors.

    These days, not as many people actually use food choppers any more.  Cooks who want to save time on chopping chores turn to their food processors.  My food processor gets plenty of use, but there are times when I still turn to my great-grandmother's Universal Food Chopper.  It does an awesome job of cutting up cooked leftover beef roasts to turn them into hash. And it does an equally awesome job of cutting up vegetable ingredients for relish.

    How's that for a segue?

    Two consecurive frosts have raised hell with my vegetable garden.  The tomato vines have pretty much died back, and now I'm picking the green tomatoes that are still clinging to the vines.  I've got piles of green tomatoes.  Luckily, I have plenty of recipes that call for greenies.  Green tomato relishes are another one of those old-style products that have largely been forgotten as cheap and homogenous commercial products became widespread. I call this particular version "Golden Relish" because the use of some turmeric and yellow peppers in the veggie mix give it a golden tinge.  This isn't a spicy relish, but rather a good, solid, sweet relish for use on hot dogs, in salads, or on its own with sliced ham.

    Golden Relish
    Makes about 8 pints

    8 cups finely chopped green tomatoes (6 - 8 pounds)
    4 cups finely chopped onion
    3 yellow bell peppers, seeded and finely chopped
    6 red bell peppers, seeded and finely chopped
    3 large green bell peppers, seeded and finely chopped
    1/2 cup kosher salt
    1 tablespoon celery seed
    1½ teaspoons turmeric
    ¼ cup mustard seed
    4 cups sugar
    3 cups cider vinegar

    Cut each tomato in half across the center and use a small spoon to scoop out the seeds.  Run the tomatoees, onions, and peppers through the food chopper and then mix them well together in a large bowl.  Sprinkle the canning salt over the mixture and let it stand overnight in the refrigerator.  In the morning, rinse the mixture lightly and let it drain well in a strainer or colander.

    In a large pot, combine the celery seed, turmeric, sugar, vinegar, and chopped vegetables.  Bring to a simmer and cook for about 2 hours.  The tomatoes will release a lot of liquid during the cooking time.

    Use a slotted spoon to put the relish into pint jars without adding too much of the liquid.  Cap the jars and process for 10 minutes in a boiling water bath.


    10 August, 2010

    Quick Cold-Pack Pickles

    Right now, I am just about up to my ass in cucumbers.  Although my vines are dying back because of bacterial wilt carried by cucumber beetles (damn them) Over the past few weeks we've been harvesting far more pickling cukes than we can possibly eat fresh.  We've already made a couple of batches of Maryanne's Bread and Butter pickles, and now we are starting to make cold-packed Polish Dill pickles.

    These are really easy.  All you need to do is put some aromatics like dill, garlic, and mustard seed on the bottom of a big jar, fill the jar up with freshly pickeld and cut cucumbers, and pour the jar to the top with a prepared brine.  Then cap the jar off and stash it in the back of the fridge for a week or so to mature.  It's simple, and delicious,

    The recipe I'm going to share here, like many of the other recipes I've developed over the years, has been swiped and copied into recipe databases all over the internet, often without attribution.  But you can be sure that wherever you find this recipe, it originated in my kitchen regardless of whether or not I'm credited.

    As written, the recipe will make a gallon of dill spears.  Feel free to adjust it as necessary and tweak the seasonings if you like.  (Some people like to reduce the amount of mustard seed, for example - my recipe makes a traditional New England-style mustard-flavored dill pickle.

    Dave's Cold Packed Polish Dills
    1 gallon
    4 pounds Pickling cucumbers
    8  Dill heads
    6  Cloves of garlic (or possibly more)
    8 cups Water
    2 cups White vinegar
    1/2 cup Pickling salt (or 3.5 oz by weight)
    1 teaspoon Crushed Red Pepper
    4 teaspoon Whole mustard seed


    Wash and dry the cucumbers; prick a few holes in each with a fork, or possibly quarter them lengthwise. Peel and break the garlic cloves.

    Place half of the dill heads in the bottom of a clean 1-gallon jar. Add in the garlic, crushed red pepper, and mustard seed. Pack loosely with cucumbers and top with the remaining dill. Chill while preparing brine.

    Combine water, vinegar, and salt in a saucepan. Heat to boiling, then cool to room temperature. Pour the cooled brine over the cucumbers, making sure they are covered. Screw a lid on the jar and store in the fridge for about 4 weeks before serving. If you've quartered the cucumbers instead of leaving them whole, they will be ready somewhat sooner (two weeks instead).

    Ingredients can also be divided between four 1-qt widemouth jars. It is it more convenient to make a gallon jar batch (takes less of a footprint in the refrigerator) and then divide up the pickles later into separate jars when they're ready to eat. (Which frees up the jar for the next batch, too) 

    05 March, 2010

    ConAgra Discontinues Penrose Sausage In Jars

    Back in October 2009, I wrote a short review of Penrose Hot Sausage, a pickled sausage product made by ConAgra.  I didn't like them very much, but several readers disagreed with me and left comments about how much they enjoyed them.

    One of the comments mentioned that the sausages had been discontinued, and I decided to do some Googling.  The first thing that I noticed was that every online source that I found listed all sizes of Penrose Hot Sausage as "sold out."  When I looked up the product at ConAgra's website, I found that it was no longer listed in the drop-down menu of Penrose items offered by the company.

    Finally, I called ConAgra's Penrose consumer help line at 1.800.382.4994 and spoke to a pleasant young lady who identified herself as "Bree."  She confirmed to me that Penrose has discontinued all product in jars, and that the only Penrose items currently being packaged are in snack-sized shrinkwrap.  She said the decision was made by ConAgra about 6 months ago, which is why it has become increasingly difficult for fans of the sausage to get their fix.

    If you're a fan of Penrose Hot Sausage and you miss your favorite snack, it certainly wouldn't hurt for you to call ConAgra and politely ask them to bring it back.  They might not listen, of course, but it never hurts to try.

    In the meantime, may I recommend you try Long Lake Pickled Foods' Hot Pickled Polish Sausage?  For fans of Penrose, it might not be the same, but you might find you like it on its own merits.
    .

    06 October, 2009

    Pickled Lamb's Tongues

    NOTE: THIS BLOG POST CONTAINS A RECIPE AND TUTORIAL TO HELP YOU MAKE YOUR OWN PICKLED LAMB'S TONGUES. IT IS NOT AN OFFER TO SELL OR SHIP PICKLED LAMB'S TONGUES TO YOU. NO, I DON'T SELL PICKLED LAMB'S TONGUES. NO, I WON'T SEND YOU ANY. READ THE POST AND MAKE YOUR OWN.      

    Some time ago, I used to buy jars of pickled lamb's tongues. Made by Rogers, a company that put up all sorts of pickled "tavern food" like pigs feet, ham hocks, pickled eggs, and sausages, they were tender, ready-to-eat, fully-cooked lamb's tongues, packed in a mild vinegar brine and sold in one of the local supermarkets from the chilly area right above the self-service meat case. They were delicious, but when the supermarket closed, I was no longer able to find pickled lamb tongues. I never stopped looking for them, but eventually I found that Rogers Company went out of business a few years back, a victim of changing tastes and the general decline in demand for "tavern food." Dave Fazer of Long Lake Foods believes that Rogers was the last commercial maker of pickled tongue, and my own searching leads me to agree. Apparently, the number of people who ask at their local stores and who email Mr. Fazer looking for lamb tongues just aren't enough to make commercial production viable.

    It's possible, however, to make your own.

    I have years of experience in canning, meat processing, and charcuterie. I make my own bacon, sausages, corned beef, patés, and more. But I had never put up any pickled meats, so I started by searching for some kind of recipe or written technique that I could study and use - or at least use as a starting point for my own recipe. I pored through my collection of vintage cookbooks and books on charcuterie and meat preservation, to no avail. And when I turned to the internet, the search was almost as frustrating - most Google hits for "pickled tongue" lead to message board postings by people trying to find the commercially prepared product.

    Finally, a search on the Chowhound message board found this thread, in which Chowhound user Porker shares his recipe for pickled pork tongue. Lamb's tongue is smaller, more tender, and cooks more quickly than pork tongue, so I made a few tweaks to the recipe - including scaling it to handle the ten-pound wholesaale box of lamb's tongues my neighborhood butcher obtained for me. But without Porker's help and the groundwork he did in developing his recipe, this recipe wouldn't have been such a success.


    So, follow along with this step-by-step photo tutorial.

    Step One: Curing

    Because the tongues are going to be canned for storage, they need to be cured to help prevent botulism (the combination of curing, the acidic vinegar pickle, and refrigeration keeps the pickled tongue safe to eat.) Normally, curing with Instacure #1 (formerly known as Prague Powder #1 or "pink salt") requires about 1 ounce for every 30 pounds of meat, but because we'll be using a simple overnight liquid brine, we need a stronger concentration.

    Make as much brine as needed to completely cover the tongues using this baseline:

    12 cups of water
    1 cup of pickling or kosher salt
    6 tablespoons Instacure #1

    For the ten-pound batch of tongues I prepared, I needed 3 batches of this brine (2½ gallons.)

    Mix the ingredients for the brine in a stainless steel (non-reactive) pot. Wash the tongues under cool running water. Place them in the pot, bring just to a boil on high heat, then remove from heat, allow to cool to room temperature, and store overnight in the liquid.

    Because I was processing ten pounds of meat I had to do this step in a 21-quart stockpot which would not fit in my fridge. So, when the tongues had cooled down enough to handle, I divided them between three one-gallon glass jars and filled the jars to the top with the still-warm curing brine. Then, off they went into the fridge for their overnight soak.


    Step Two: Cooking


    The next day, drain off the curing brine and discard it, and rinse the tongues.

    Make up a batch of cooking brine using this baseline:

    3 cups of water
    1 cup of vinegar
    1 tablespoon of salt
    1 tablespoon of pickling spice

    As before, make up as many batches as you will need to cover the tongues in the pot. Bring up to a boil, then turn down the heat and simmer the tongues gently for two hours, until they are fork-tender. Drain the cooked tongues and shock them under cold running water. You'll notice that the tongues are covered in a loose yet tough membrane "shell" - this is the skin of the tongue and it has to be removed. Peel off the skins, and use a sharp knife to remove any roots, veins, and fatty tissues under the tongue.

    The skinning process is very easy and although a little tedious will go quickly. When the skin cooks, it becomes hard and plastic-like, and most of the time will peel easily from the tongue. Once it's off, you can use the knife blade to scrape away any fatty bits under the tongue and especially under the thickest part, where you'll find fatty clumps and veins that you'll want to take out if only for appearances' sake.

    With the tongues cooked tender, skinned, and ready for the final processing, you're ready to can them.

    Step Three: Canning

    NOTE: The USDA recommends that meats be canned using a pressure-canning process. I believe that the hot water bath process used here is safe because of the nitrite in the Instacure #1 and the acidity of both the cooking and the canning brines. However, I DO NOT KEEP THESE CANNED TONGUES ON THE SHELF AT ROOM TEMPERATURE, I KEEP THEM IN THE REFRIGERATOR AND I RECOMMEND THAT YOU DO THE SAME. I assume no responsibility for your actions in your kitchen; this is simply a chronicle of my own actions in my kitchen.

    Wash your canning jars and prepare the canning brine: You won't need as much of the canning brine as you do cooking brine - only about eight cups or so. For this canning brine, you'll need:

    4 cups of water
    4 cups of vinegar
    2 tbsp salt
    2 tbsp of pickling spices if desired (I skipped this because I just wanted a nice clear brine.)

    Pack the tongues in your canning jars, leaving at least 1½ inches headspace (two inches is even better - the tongues swell during processing and if you don't leave lots of headspace the brine won't completely cover the meat.) Add brine to cover the tongues completely and within ½-inch of the top of the jar. Cap the jars and process them in a boiling water bath for 15 to 20 minutes. Cool to room temperature and refrigerate 3 to 4 days before eating.

    The ten pounds of tongues I process yielded eight 1½-pint widemouth jars of pickled snacks.


    Special thanks for the info and encouragement from Porker at Chowhound, and to Anthony Caronna, my neighborhood butcher at Caronna's Market in Thompsonville CT, who was happy to get the lamb's tongues for me on special order. Caronna's, located on Pearl Street right next door to the yellow-brick art deco Thompsonville Fire Department, has been in operation since 1918.

    PLEASE NOTE:  I know that many of you reading this blog post have been brought here by Google and Bing as you search for the commercially-produced lamb's tongues you or your family members once purchased at grocery stores.  Unfortunately, when the Rogers Company went out of business, pickled lamb's tongues became unavailable - they were the only company in the United States making them, and no one else has stepped forward to continue the tradition.


    Because I enjoy pickled tongues and wanted to enjoy them again, I developed  and published this recipe to help those who are interested in the product make their own, in their own home kitchen, the way I did.  I am not a commercial supplier, just a hobbyist who likes to fiddle around in the kitchen.


    If you decide to try making your own pickled tongues and have questions or want more information, please feel free to send me an email and I will do what I can for you to help make your job easier.  Canning anything is a little intimidating - canning and preserving meat products can seem overwhelming to someone who's never done it before.


    Please do not write asking to buy pickled lamb's tongues from me. I don't sell them and I won't send you any. I wrote this post to help you make your own, and the only way you're going to get any pickled lamb's tongue is if you get off your ass and get to work.  

    .

    03 September, 2009

    Bay View Pickled Pork Hocks

    Did you ever have a product that you really liked and enjoyed for years, and then suddenly one day you found a different brand of that product that was so much better you wondered how you could have been so hooked on the first one for so long?

    That happened to me yesterday.

    Just last week, I wrote about Hormel Pickled Pork Hocks and Pork Tidbits and how I still liked them even if they weren't quite as good as I remembered. But then yesterday, on a shelf above the meat case at the local P-Chops*, I found jars of Bay View Brand Pickled, Cured Pork Hocks. They were so...beautiful! Packed in a clear brine and not a cloudy greasy slurry, no huge masses of stringy fat but still ringed with delicious toothsome strips of soft-cooked pork skin. And so much meat! Hormel must scrape the bottom of the barrel for their pickled hocks, but Bay View obviously carefully chooses what goes into their jars. And finally: although Hormel's brine is straight vinegar, Bay View's is a mild water/vinegar brine.

    The idea of pickled pork hocks in a jar still makes my wife shudder and my daughter gag, but they have much less reason to than they once did. Goodbye, Hormel. Hello, Bay View.

    Link:

    Bayview Packing and Lakeside Foods - the manufacturer's website. They put up an amazing assortment of pickled meats and more - and if you love these old-fashioned treats as much as I do, but can't find them anywhere - they ship direct! This is reason #1337 why I love the internet.


    * - Price Chopper. Thanks, Mr. Dave.


    28 August, 2009

    Hormel Pickled Pork

    The very thought of pickled pork in a jar makes my wife shudder and my daughter gag, but I admit to having a certain fondness for this odd and somewhat out-of-place-in-these-health-conscious-times meaty condiment. Hormel cans several varieties of pickled pork, including pork hocks and "pork tidbits" (shown at left) and pig's feet (not pictured.)

    I bought a jar each of the hocks and tidbits, partly from nostalgia because I haven't seen them in stores around me since my hometown A&P closed many years ago. Although in some ways they're just like I remembered them, there are a few differences, and overall I think the quality is a little lower than it used to be.

    The pork hocks are boneless cross-sectional slices which include meat, cartilage, fat, and skin. They're cured, slow-cooked to render the cartilage deliciously soft, and packed in vinegar before the jars are sealed and processed. It's easy to fish out a whole slice and enjoy it meat, cartilage, and skin. The vinegar is unseasoned and strong, and it makes for a somewhat bland yet sharp and acidic flavor which almost overwhelms the porky taste but at the same time cuts the nastiest mouth effects of the fat and the flabby skin. That's a picture on the right of a typical slice of hock fresh from the jar. I admit that it looks pretty disgusting, but the taste isn't as bad as all that. I kind of enjoy them even though I don't remember them being as so strongly vinegared.

    The tidbits, though, are another story. I bought them because I recalled randomly-cut but decent-sized chunks of pork (both meat and skin) with an overall larger proportion of meat to fat and skin. That's not anything like what I ended up with. Tidbits these days are tiny pieces of porky debris, mostly fat and skin with occasional bits of cured pork, in the same very strong vinegar solution used for the hocks. they were rather disappointing. I'd buy the pork hocks again, but I think I'll take a pass on the tidbits from now on.
    .

    11 August, 2008

    Bread and Butter Pickles

    With fresh garden cucumbers in full swing, now is the time to make bread and butter pickles! These sweet lovelies have long been a favorite of everyone in our family, and Maryanne and I make several batches every summer so we have plenty to give as gifts over the holidays.


    I first posted the following recipe on the Fidonet National Cooking Echo back in 1997. Since then, it's been scraped and reposted on a number of recipe archive sites on the internet - sometimes leaving my name in the credits, sometimes not. Whether or not the credit line is in the recipe instructions, though, wherever you see this recipe on the 'net, it originated in our kitchen.


    Maryanne's Bread And Butter Pickles
    Yield: 1 Batch

    Ingredients

    4 qt medium cucumbers; sliced
    -but unpared
    6 md onions; sliced
    2 lg green peppers; sliced in
    -rings
    3 cl garlic
    1/3 c pickling salt; or kosher
    -salt
    5 c sugar
    3 c cider vinegar
    1 1/2 ts turmeric
    1 1/2 ts celery seed
    2 tb mustard seed

    Instructions

    Toss together cucumber, onion, green pepper, and garlic. Add salt; cover with cracked ice and mix thoroughly. Allow to stand for at least three hours.

    Drain vegetable mixture well and set aside. In a large kettle, combine the remaining ingredients. Stir in the vegetables and bring them to a boil in the brine.

    Fill hot jars to within half an inch from the top; adjust lids. Process in boiling water bath for five minutes (begin timing when the water returns to boiling) Makes about 8 pints.

    Notes: This is Maryanne's original recipe. We usually add another pepper or two, both for flavor and because the onions, peppers, and garlic are almost as popular as the cucumbers once they've been pickled.

    If you have the tool and the time, consider slicing the cucumbers with a zig-zag knife, to make "ridged" pickle chips. It's the soak in the supercooled ice that makes these pickles crispier even after they're cooked, and the increased surface area that the crinkle-cutter makes gives them an extra snap.

    Recipe by Maryanne Sacerdote MM format by Dave Sacerdote

    We usually set aside an afternoon for making a batch of pickles. Once we get everything sliced and iced, we wash some canning jars and get our "work station" in order, then kick back with some cold drinks and some TV until it's Canning Time.

    17 February, 2008

    Dill Wholes.

    vlasic dill.jpg

    Heh heh hehheh heh m heh...dillholes.