Showing posts with label smoking. Show all posts

15 September, 2014

Collaborative Bacon, Part 2

As you may remember from this post, Jess Watsky (Foodette) suddenly appeared last week bearing the two most important ingredients for making bacon:

  1. A pork belly
  2. A desire to make bacon
Curing the bacon took about four days, from Sunday afternoon until Thursday night when I removed it from the cryovac pouch in which it slept, gave the belly a rinse under cool running water and picked off any remaining spice bits. I set it on a few paper towels and patted it dry, and later I set it aside in the cool pantry  covered with a loose-knit cotton dishtowel. The idea was to age the belly, allowing more of the moisture to evaporate out of it before sending it to the smoker.


By the time Jess arrived on Saturday, the bacon was ready to go. The fat was dryer and waxy, and the lean had firmed and darkened in color.

For comparison's sake, I trimmed a few thin slices off of one end and fried them up crispy in a small skillet. Simple, unsmoked (or "green") bacon. The flavor was delicious: bacony to be sure, but with just a hint of the juniper berries and a slight sharp edge from the mustard seed. Jess' choices for seasoning were great. So I added a couple of meat hooks to the thick end, and we hung it in the smoker for a little quality time with some smouldering apple wood.

I set the fire in the smoker to low and started the chips. To prevent a big heat build-up around the meat, I set an heavy aluminum baker's tray above the burner. We kept the temperature very low (less than 200F) and left the side to hang and smoke for 3 hours.

After chilling the side for about half an hour in the freezer to firm it up a bit, I brought out my slicer and we cut it 18 slices to the pound. Because the side was on the small side, this was just right for moderately-thick slices. We made up 1-pound packages.

Jess was really happy with the end results. She's still got another side from that Berkshire pig. We're thinking maybe making some pancetta next.


24 November, 2010

Getting Ready for Thanksgiving

Thanksgiving Day is tomorrow, and like most Americans we'll be having a large dinner with family and friends.  In recent years, I've taken over the cooking and hosting duties from my mother, and as in years past we'll be enjoying a smoked turkey.

This time around, we're having more people in for dinner than usual.  In addition to family members, several friends are joining us.  I like to send everyone home with some leftovers, so when I started looking for a bird, I kept my eye open for something a little larger than our usual 16- to 18-pounder.

I wound up with a very decently-sized 23-pound turkey which was gifted to me by a friend.  Because it's a natural bird without any injected "solutions," I have it on the porch right now, brining in preparation for tomorrow's slow roast in the smoker.  I use a very simple brine for my turkey: to every gallon of water required, I add 1 cup of kosher salt, ½ cup of brown sugar, ¼ cup of mixed pickling spice, and 2 tablespoons of peppercorns.  This year's bird required three gallons of brine to cover it, and to make sure it brines evenly, I give the bird a turn each time I pass by the cooler.

But a complication arose:  I wanted to make sure that the bigger turkey would fit into my smoker, and when I tested it, I found that with the turkey in standard position on the rack, the door of the smoker won't close.  O NOES!!1!  WAT DO??

Photo by
Spectrum Diversified
I decided to stand the turkey on end for the roasting time, but wasn't quite sure about how to do it.  I keep a spool of heavy-gauge baling wire on hand to custom-make hanging hooks and racks for smoking, but I was worried about properly supporting the full weight of the bird hanging from a rack in the smoker.  Obviously, the best thing would be a vertical roasting rack , but I'm not sure anyone locally has them in stock and besides, the 30- to 40-dollar price tag of those contraptions rubbed my penny-pinching, broke-ass fur the wrong way.   But a company called Spectrum Diversified makes a simple and inexpensive nickel-plated paper towel holder of steel rod which they sell online and at Bed Bath & Beyond.  It is very sturdy, tall enough that the central loop passes all the way through from the base to the neck cavity of the dressed bird, and stable enough to keep the bird from tipping over during the cooking time.  I bought one last night at the local BB&B and tested it out, and it looks like that will do the trick.

I've had my smoker for several years now and I'm fairly happy with it.  Only in the past couple of years has it begun to seem a little small for my needs, but this kind of gave me the incentive to move up to a larger size.  Looks like I'll finally be doing something about it - I've got the design for a much bigger and more versatile smoker in my head, and if the weather holds up, I'll probably start working on it after the holiday.

10 November, 2010

Thanksgiving Turkey: To Brine or Not to Brine?

Thanksgiving Day is a couple of weeks away, and food writers everywhere - newspapers, magazines, blogs, TV and radio - are passing along their "essential tips" for making the perfect roasted turkey.  Over the past few years, it seems like the most common piece of advice everyone gives is:  Brine The Turkey!

Brining, as everyone from Alton Brown to About-dot-com will tell you, helps a roasted turkey stay juicy and delicious.  The salt in the brine causes the meat to absorb water (and any flavorings you may have added) while partially breaking down proteins in the meat.  With more water in the bird to start with, the meat can lose moisture during the long cooking time without becoming dry or stringy.

For the past ten or twelve years, my family has sat down to a turkey dinner featuring delicious smoked turkey.  I use a hot smoking process, keeping the smoker at about 250 degrees F over pleasant fruitwood smoke (apple or citrus) until a meat thermometer inserted in the thickest part of the thigh reaches about 160 degrees F or even a little less.  (That whole 180-degree thing?  Yeah, that's  a holdover from the "Let's Cook The Living Shit Out Of Everything We Eat" culinary school of the early 20th century, and it's way too high a temp  if you don't want severely overdone bird.)

Generally, I brine everything that goes into the smoker.  Brining is a great method for curing pork cuts, bacon, tongues, corned beef, and so on, and there's no doubt that meats held over the heat for a long time don't dry out if they're tanked up with water to begin with.  The first few turkeys I smoked were brined.

And then one Thanksgiving, in the hectic swirl of preparations, I forgot to brine the damn bird.  I didn't realize it until I actually went into the fridge to fetch the turkey and put it into the smoker.  There was no help for it - the turkey had to go in right then to be on time for our dinner guests and there was no time for the luxury of a soak in a seasoned saltwater bath.

The turkey came out perfect nonetheless, and I think I know why.

First, I held the smoker at a low temperature, and I kept a pan of water just over the heat source.  The "moist heat" environment kept the bird from losing too much moisture over the 5-hour-or-so cooking time.

Second - and this is probably equally important - the turkey was "pre-brined" by the processor.  Take a look at the label of most supermarket turkeys and you'll find a statement in very fine print that tells you that the turkey "contains up to n% solution" with n varying depending on the brand.  Really, if the processor is already adding a brine to the turkey before it gets to the store, there isn't much point to me adding additional brining to it.

Since then, if I'm smoking a commercially processed turkey for Thanksgiving dinner, I don't bother with the brine.  I still brine it if I'm using a free-range or backyard flock bird.  But my advice to you is read the labels carefully.  The label will always note if the bird has an added solution or if there is a percentage of retained water from processing (and you should know that even some poultry labeled "minimally processed" can still contain retained water.


07 October, 2010

A Tale of Two Beef Tongues - Corned, and Smoked

Tongue.  It's not a very popular cut of meat nowadays; this is perhaps because it is the one common cut of meat that most resembles a chunk of dead animal.  There aren't that many things that can be done to a whole tongue to make it look untonguely.

And it's expensive, too!  I was checking out prepared tongue at ShopRite last week.  Ready-to-eat corned tongue was going for $10.95 a pound, making even the smallest one in the meat case almost $24.  Damn.  Luckily though, Tony Impoco at Impoco Poultry Market in Springfield came to the rescue - he had fresh beef tongue in and selling for a delightful $2.00 a pound.  I bought two of them.

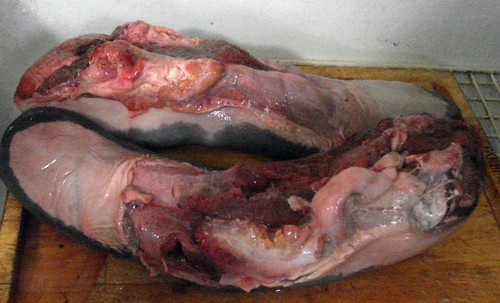
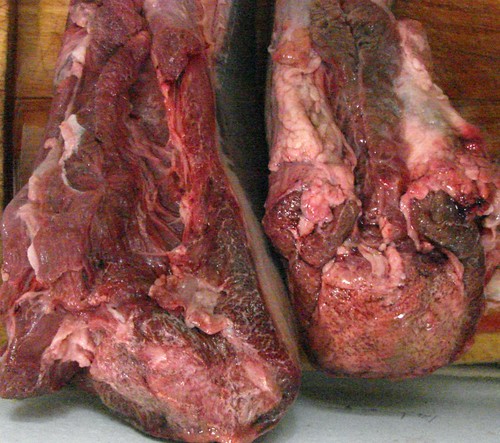
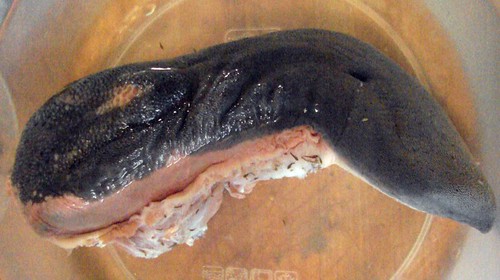
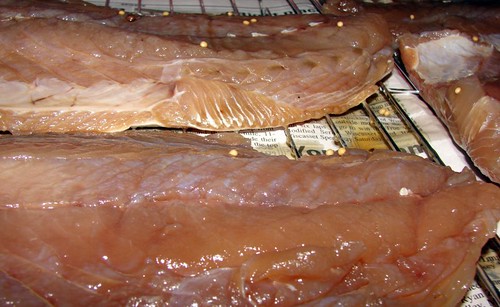
Fresh tongue is not a pretty sight, and takes some work to prepare properly.  It's covered with a  thick, rough skin and there are fatty sections and glands underneath near the base of the tongue before it can be used.  At left is a picture of the tongues as Ithey looked when I  got them home. 

The plan is to put both tongues into a curing brine for the better part of a week.  One of them will be slow-cooked for several hours as Corned Tongue, while the other one will be taken from the brine and with the application of smoke and time be turned into tasty Smoked Tongue.

Onto a cutting board and into the sink they went for cleaning and trimming.  I gave them a good scrubbing and trimmed off the unpleasant bits with a sharp boning knife.

The picture at right shows the difference between a "pared" tongue (on the left) with an "unpared" tongue (on the left.)  I usually remove the fatty sections on the right and left of the tongue's base along with any remaining bits of glands that might be there.  I also pare off the root of the tongue (about 1/2 inch in or so) to remove any dubious or bloody bits.  (If you'd like to see a larger version of that pic, just click on it)

With the tongue trimmed and rinsed, it was time to make the brine.
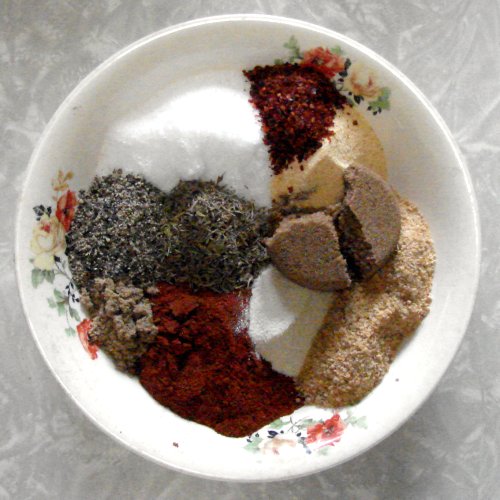
Corned Beef Brine
For Corned Beef or Tongue
Makes 1 Gallon

1 gallon water
1 cup Kosher salt
1/2 cup sugar
1 teaspoon InstaCure #1, aka "pink salt" (this is optional, but using it will keep the meat an attractive pink color. Without it, the tongues will turn grey during the curing process.)
6 garlic cloves, crushed
3 teaspoons whole peppercorns
1 teaspoon whole allspice berries
1 teaspoon juniper berries
1 tablespoon dried thyme
6 bay leaves
2 teaspoons whole mustard seed

Bring the water to a boil and stir in the remaining ingredients.  Simmer the brine until the salt and sugar is dissolved, then allow the brine to cool completely before using.

Corning the Tongues:

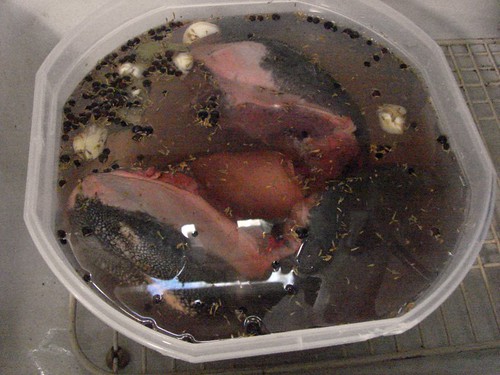
Pour the brine into a tightly-sealable container - a large Tupperware or Stearlite food storage tub is ideal - and add the tongues, submerging them as much as possible.  Most of the techniques I've read say that you should hold the meat under the surface of the brine using a heavy plate, but if you have something that closes with a leakproof seal, you can omit the plate since you can flip the container over periodically to make sure it brines evenly (which is what I did.)

Seal the container and put it into the fridge for about five days.  Twice a day, flip the container over - or open it up and turn the tongues over.

At the end of five days, the tongue is cured and ready to cook.

Cooking Corned Tongue:

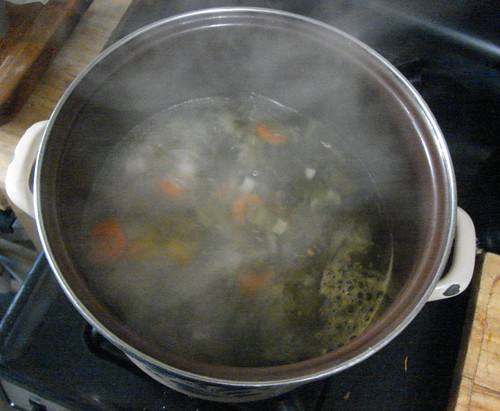
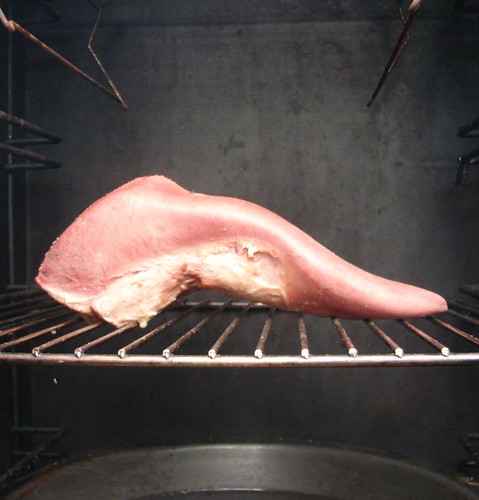
Prepare a flavorful vegetable stock by bringing about 6 quarts of water to a boil in a stock pot.  Add some sliced carrots, sliced parsnips, a couple of cut up fresh tomatoes, a few ribs of celery, a few onions,  some parsley, a couple of bay leaves, and a chopped up bell pepper.  Simmer the stock for about an hour, and then add the tongue to the pot.  Simmer the tongue for about four hours, until it's nice and tender.  When it's done, remove it from the pot to a cutting board and let it stand a few minutes to cool down a little - just enough for you to be able to handle it.

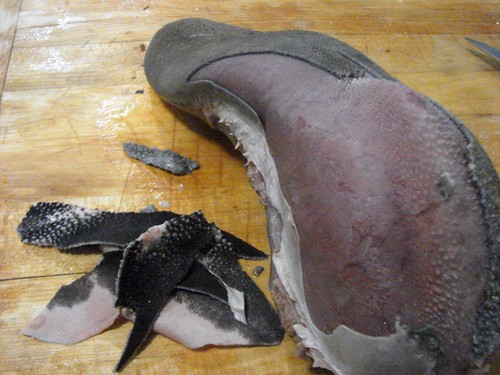
 The cooking time will have made the skin covering the tongue hard and plastic-like, as well as loosening it from the meat.  Use a sharp knife to carefully slit the skin at the base of the tongue and you will find it pretty easy to peel off the skin - it won't slip off all in one piece, but it won't offer much resistance as you peel it off in strips.

The skin is not widely considered to be edible - it's tough and not very pleasant to eat for people - but if you have dogs, you can give it to them as a treat.  Zim and Iris both loved the bits of tongue-skin that I gave them as Good Dog Cookies.

.Slice the tongue after peeling - warm and served with veggies if you want to serve it as an old-timey dinner, or chill it overnight and slice it thin for sandwiches.

Making Smoked Tongue:

The process for Smoked Tongue is similar, but there are some differences.  When you remove the tongue from the brine, rinse it off well and soak it in fresh water for an hour or so to draw out some of the excess salt.  This is necessary, because the tongue doesn't cook in liquid as long as boiled corned tongue. After the soaking period, simmer the tongue in vegetable broth just like for corned tongue - except don't fully cook it until tender.  Simmer it only for about an hour and a half to two hours - just long enough to loosen the skin - then peel it and place it into the smoker.

I put the par-cooked tongue on a rack in the center of my smoker, which was preheated to about 175 F.  There is some fat in the meat - mostly toward the base - but for the most part, you'll need to keep the heat on the low side to prevent it from drying out (some instructions on the web say your should cover the tongue with strips of bacon to keep it basting in the smoker, but I was going for a more traditional, all-beef approach.

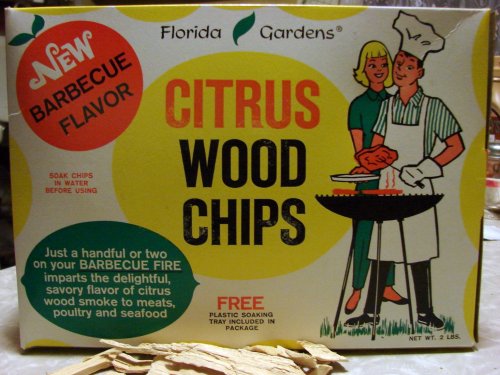
A boldly flavored smoke is best for tongue.  I used some awesome old citrus chips that have an exceptional flavor.  Keeping the heat below 200 F, I held the tongue over the smoke for about 2½ hours.

(Note:  You can put the tongue directly into the smoker from the freshwater soak if you want - skipping the initial simmering and peeling steps - but this makes the tongue a little harder to peel in the long run, and the skin really is nasty.  Also, if you don't simmer the tongue, increase the time in the smoker dramatically, by two or even three hours.)

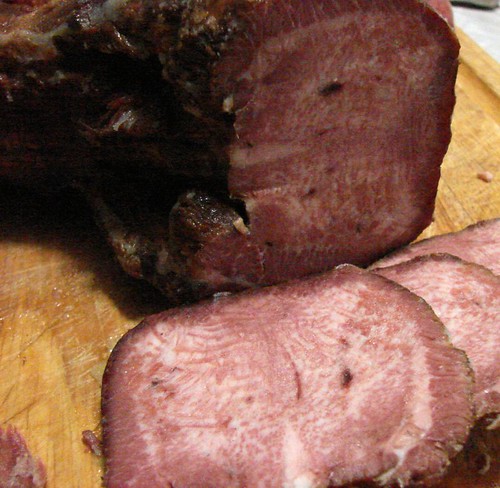
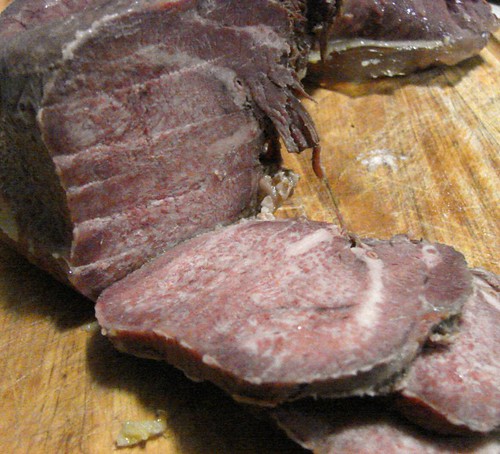
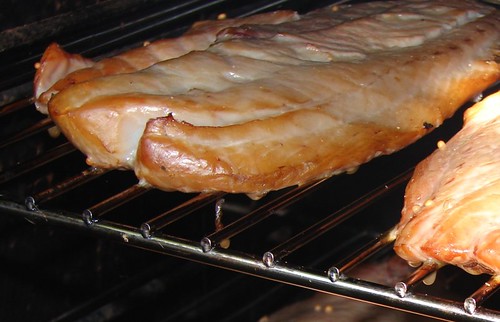
The tongue is done cooking when it can be easily pierced by a fork.  The outside will be a rich, dark brown from the smoke.  While it's still hot (but after taking a couple slices off for immediate OM NOM NOMming, of course) wrap the tongue tightly in aluminum foil and stash it in the fridge until it's chilled.  This will firm up the meat and make it much easier to get lovely wafer-thin slices later.

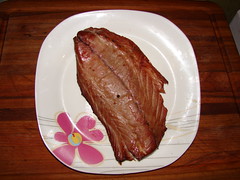
Notice in the photo how much darker the smoked version is than the simple corned version - the meat is less red and more of a mahogany brown.  The smoke adds another dimension of flavor as well.  Serve it on sandwiches, or slice thinly as part of a charcuterie plate with other delights like salami and capicola and various sharp cheeses.
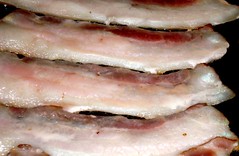
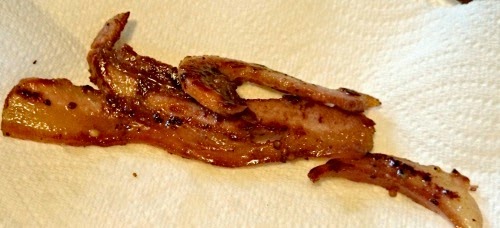


06 June, 2010

Smoked Guinea Fowl

Continuing on from where I left off earlier...I had a brace of guinea fowl which I bought at Impoco Poultry Market in Springfield, and I decided to smoke them.  This decision was made partly because I love smoked poultry, and partly because it was so uncomfortably hot and humid that I really didn't want to make the kitchen any less comfortable by running the stove.

The birds were plump enough and young enough that I decided not to brine them first.  Although not as fatty as common domestic chickens, some areas of the skin had thicker layers of subcutaneous fat, mostly at the joints (just like most birds.)  Guinea fowl also have much more dark meat on them - they haven't been selectively bred over the past 70 years to be mostly white meat and to pass their entire lives in tiny cages. I felt that the meat would be more resistant to drying out during the relatively short time and low temperature it would be in the smoker.

I mixed up a dry rub to use on the birds:

Dave's Poultry Rub

¼ cup brown sugar
¼ cup kosher salt
2 tablespoons coarsely ground black pepper
¼ cup sweet Hungarian paprika
2 teaspoons dried thyme
2 teaspoons onion powder
2 teaspoons garlic powder
1½ teaspoons Turkish Aleppo pepper (or use crushed red pepper) - optional
2 tablespoons coarsely ground mustard seed

Combine all ingredients in a bowl and mix thoroughly; this makes about 1½ cups of rub, which is enough for four or five chickens or fowl.  Keep leftovers in a tightly-covered container and they'll stay at full potency for a couple of months.  It's great on all poultry, not just guinea fowl.

Once I had the rub ready,  I cleaned and prepped the birds, removing the heads and feet (which I froze, reserving for later) and rinsing out the cavities.  That's when I found out that one of my "guinea hens" was a "guinea cock:" His nads were still inside, clinging to the backbone.

(Fun trivia:  When you get a whole broiler or roasting chicken and find two little yellow kidney-shaped things in the cavity, you've got a male bird.  Those aren't the kidneys, they're the testicles.  The kidneys in a bird are the dark brown livery bits tight up against the backbone, tucked in where the ribs and backbone meet.)

Anyway, I rinsed and dried the birds and spread some newspaper down on the kitchen table to make cleanup easier, and rubbed the fowl well with the spice mixture.  Then I put the birds, neck side up, on a pair of heavy-gauge wire hangers I made for hanging chickens in the smoker.

I always cover the work surface with newspapers before applying a barbecue
rub to meats.  The paper absorbs excess liquid from the meat and the paprika
and other spices stay off the table so they don't leave stains.
 This is the chicken hanger.  I have a roll of fence-tensioning wire that I use for general purposes - whenever I need a hook, a hanger, or metal loop I cut off a length and fashion what I need.

You can form the shape of the wire with a bending jig, a pair of fence pliers, or just any set of pliers you have on hand.

To use it, pass the hook through the cavity of the chicken, from the ventral opening up and out through the neck.  The small hook at the end is to hang from the rack in the top of the smoker.  The big round loop at the bottom stays outside the bird and supports it.

Here's a picture of the guinea fowl hanging in the smoker.  You can see how the top hooks of the hangers link up with the rack in the top of the smoker, and how the legs and tail of the birds fit inside the bottom hanger loop to support the poultry while it cooks.

They went into the smoker for about 2 hours at just under 300 degrees over apple and citruswood smoke.  I used a remote digital thermometer to monitor the temperature of the meat and took them out when the temp reached 160 F.

And here they are, beautifully browned and fresh from the smoker.
Sliced and ready to eat, the white meat of the guinea fowl came out juicy and meltingly tender from the slow cooking and low temperature.  The spice rub gave the meat a good spicy enhancement, but the smoke flavoring and the rich gamebird flavor of the fowl were the real stars.

.

26 March, 2009

Citrus-Smoked Bacon

I've found some pretty unusual things at estate sales. A month ago, for example, I found ten 2-pound boxes of citrus wood chips packed in the 1960s - new old stock - by a company called Florida Gardens. I scooped all ten boxes.

When I got everything to the car, I opened one of the shrinkwrapped boxes and grabbed out a handful of the chips. The wood was pale and yellowish; one or two chips had some bark, but it was pretty much mostly wood with very little bark or dust, all chips and no chunks. The wood was dry, as I expected it to be from the age, but it had been stored in the shrinkwrap, in a dark and dry basement. There was no mildew smell or discoloration.

I smouldered a chip against the car cigarette lighter, and the smoke smelled delicious. Not "spicy" like mesquite, but quietly aromatic and reminiscent of applewood. There was a citrusy backnote, and a sweet floral scent as well. Quite amazing. I immediately made plans to try it out with my next batch of bacon.

I used my default bacon cure to prepare a 13-pound pork belly, which I quartered and submerged in the brine for five days. After that, the brined pork spent two days on my cold front porch on racks to dry. Following the drying period, I put the belly over the citrus wood smoke for five hours at 100 F with a one-hour finish at 200 F.

The bacon came out amazing. Just as good as the best applewood bacon I've had. There was a good balance of salt and smoke. As I expected, the smoke flavor was similar to applewood, but with floral elements and a tangy citrusy backnote.

The flavor was good enough that, if I lived in Florida, I would be making this kind of a bacon as a "regional specialty" the same way I make apple- and maple-smoked bacon here using native New England trees for the smoking chips.

.

19 August, 2008

Smoked Bluefish

One of the best things about living in New England is the ready availability of bluefish. A cold-water Atlantic predator fish, they are a common sport and food fish here and are especially popular along the Connecticut coastline during the annual run that goes from mid-July through August.

Blues have dark and somewhat purple-bluish flesh which is oily and tends to be on the "fishy" side, similar to mackerel. If it's handled properly - iced immediately after catching, and kept cold - the flavor is no stronger than other oily fish like salmon or swordfish. People who prefer very mild white fish often don't care much for blue, however.

Personally, I love bluefish. It's great baked or grilled or to add a richer flavor to a fish chowder, and I also like cutting fillets into small bites and making "bluefish nuggets." But most of all, I love it smoked.

Smoking bluefish isn't complicated, but it does take some time. The process is similar to making homemade bacon with the biggest difference (besides the brine itself) being that the fish doesn't have to sit in a cure for a week.

Preparing the fish:

Start by making a brine. You can make as much as you'll need to completely cover the fish - I usually make it by the quart:

1 quart water
1/4 cup soy sauce
1/4 cup kosher or pickling salt
1/4 cup sugar
3 or 4 bay leaves, crushed
2 tablespoons mustard seed
1 tablespoon whole peppercorns

Combine the water and soy sauce. Add the salt and sugar and stir or shake to dissolve completely. Pour over the bluefish to cover in a shallow pan and add the bay leaves, mustard seed, and peppercorns. Cover and refrigerate while brining - a minimum of four hours.

Brining the bluefish is important. It adds to and enhances the flavor, of course, but it also helps the fish to retain moisture during the smoking process. You should leave the fish in the brine for at least four hours, but it's okay to let it go longer (even a couple of days if you're not going to get to it right away - the brine is a great preservative also.) Just remember that the longer you leave it in the brine, the saltier it may be.

Getting ready for the smoker:

Smoke doesn't like to stick to wet surfaces, and the heat of the smoker can drive moisture out of the fish. And so, the next step is as important as the brine. When you take the fish out of the brine, place the fillets on a metal rack set above a few layers of newspapers. Allow the fish to dry for several hours, until the surface of the fish is dry and feels a bit tacky to the touch. It will take at least three hours, but if it's a damp day it can take five hours or more. If you're squeamish about leaving the fish out that long, make room in the refrigerator for the racks and dry them in there.

That dry, sticky surface is called a "pellicle," and it is formed by proteins on the surface of the fish as they are exposed to air. The pellicle will give the smoke a good surface to adhere to and protect the fish from giving up too much moisture while it's in your smoker.

Smoking the fish:

When the fish is dry, transfer it to the racks of your smoker. Bring the temperature of the smoker up to about 200 F for the first hour of smoking, then drop it to 150 F for another two hours or so.

At the end of that time, average-sized fillets will be done - moist but firm, flaky, and dry, perfect for snacking or using as an ingredient in a dip or paté.

Larger, thicker fillets may need more time. Just extend the time at 150 F for as long as needed to get the firm texture you're looking for.


The delicious finished product will look something like this - a rich chestnut brown color, slightly darker around the edges, tender and moist but firm enough to pick up without falling totally apart. The flavor will be amazing: one of my friends described it as "fish bacon."


Smoke notes:

Bluefish has a strong flavor, so choose your smoking wood accordingly. You may want to go with an assertive smoke like mesquite, hickory, or even walnut or cherry to hold up to the taste of the fish rather than choosing a mild wood like maple or apple.

.