24 May, 2011

Happy Harvest Chili Style Diced Tomatoes

We use a lot of tomatoes in my kitchen.  Even though I put up as many pints of them as possible in the fall, I never seem to have enough to last me through the winter and into the next tomato season, so we end up buying cans of prepared diced tomatoes.  And because I've had mixed experiences with "no-name" and generic brands, I've tended to stay with brand names I've learned over the years to trust: Ro-Tel, Pine Cone, Del Monte, Hunt's.  And now I can add another brand to the list: Happy Harvest.

Happy Harvest isn't a real brand, actually - it's ALDI's "house brand" for some of their canned products.  The only reason I took a chance on them to begin with is because they're from ALDI, and for the most part I've been very happy with their stuff, and once again, I was not disappointed.

These "Chili Style" tomatoes are awesome.  They're in recipe-sized chunks packed in a thick tomato juice (or maybe it's a really thin tomato sauce. I can't tell.) They're seasoned with cumin and ancho pepper, and a bit of onion and garlic from what I can taste. Although they're mildly spicy, they're not at all hot (real chileheads might be disappointed, but I think the milder flavor makes them more versatile for all-round cooking for the family.)  Completely delicious, and - I know this sounds heretical - but far better than Ro-Tel, especially considering that the last few times I've bought Ro-Tel I could barely taste the green chiles that are supposed to be in there.

A Tale of Two Giardiniere

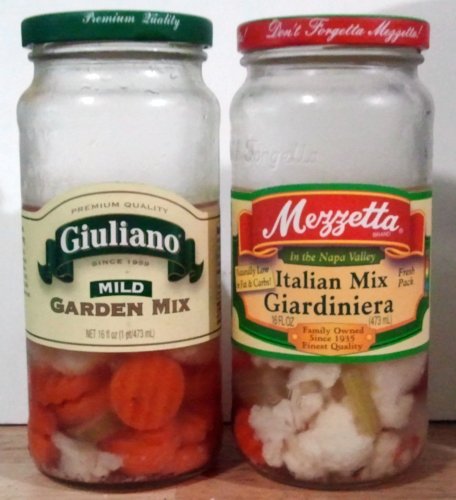
Here's a head-to-head comparison of Guiliano "Mild Garden Mix" and Mezzetta "Italian Mix Giardiniera."  I happened to have both of them in the pantry and decided to compare the two.  Guiliano's giardiniera is usually found at Ocean State Job Lot, so it's fairly inexpensive.  I buy Mezzetta's product at either Stop & Shop or Coronna's Market (my neighborhood corner store and butcher shop.)

Like many other Italian-Americans, I grew up eating giardiniera. It always has a place at family gatherings, and Maryanne and I put a jar of it on the table whenever we're serving a standard tossed salad, because there's nothing like a good giardiniera to wake up a boring bowl of leaves. And I hear that they use it as a sandwich topping in Chicago which really shouldn't surprise me given all the crap they pile onto hot dogs there, right?

My favorite part of the giardiniera is cauliflower. I don't have much use for cooked cauliflower as a veggie, but if it's pickled and still crunchy, I could nom the hell out of it all day. Both Giuliano and Mezzetta are mostly cauliflower. But Giuliano seems to cook the hell out of theirs while somehow, the Mezzetta cauliflower is crunchy and awesome.  Actually, these qualities come up so often I'm not even going to mention it again beyond saying that the veggies in the Giuliano version are universally cooked and soft, while those in the Mezzetta are crunchy and don't taste overprocessed.

Giuliano is also a hell of a lot sharper than Mezzetta. They use a stronger vinegar solution and it shows. Usually, I have to give the Giuliano "garden mix" a quick rinse under cold water to get rid of some of the highly acidic flavor.  Mezzetta giardiniera is a more tolerable strength, with a pleasant bite that doesn't threaten to kill your mouth.

I guess where you can see where this is leading. A good giardiniera is crispy pickled heaven, and a bad giardiniera is just face-collapsing vinegary pucker. Mezzetta is very good indeed.  Guiliano is not quite bad, but it is sub-optimal. Given the choice of the two, it's Mezzetta all the way.

21 May, 2011

Coronado Goat's Milk Lollipops

Goat's milk, I'm told, is an acquired taste. One of my esteemed culinary fellow travelers tells me that he can "taste the goat" with every sip. While I acknowledge that goat's milk does taste different from that of the cow, I don't find the flavor unpleasant.

And so it was that when I saw a long cellophane strip of these goat's milk lollipops at the local Price/Rite, I dropped them into my shopping cart. They were too interesting to leave behind.

And they are DELICIOUS. Beautiful smooth and creamy dulce de leche without any goatiness at all. They're totally awesome.

If you see them, buy them. You will not be disappointed.

Taco Bell's new Beefy Melt Burrito

I tried Taco Bell's new Beefy Melt Burrito last night and I have to say this is some seriously underwhelming stuff.

It sounds promising enough - seasoned beef, seasoned rice, three-cheese blend and sour cream rolled up in a flour tortilla - but it's so totally "meh."

Nothing looks as perfect as the publicity shots, so it's no surprise that burrito wasn't food-glamor-gorgeous. Taste is much more important here. Unfortunately, the Beefy Melt Burrito fails to deliver.

The overall taste is okay, in that familiar Taco Bell way, but there's nothing new or different here. No flavors really stand out (actually, the mildly-flavored sour cream got completely swallowed up and lost by the meat seasonings and cheese) and the texture added by the rice is kind of strange but not unpleasant.

So, there you have it.  Taco Bell's new menu addition will adequately postpone your next meal by temporarily quelling your hunger.  Yeah, that's the best I can do. I've had flavored oatmeal that was more exciting.

Oh, there is one more thing: Don't unroll it to check out what's inside unless you enjoy looking at things that appear to have been used for asswipery.

20 May, 2011

Blue Kool-Aid Bursts vs. Blue Mondo

You know what the most excellent part of the 1990's was?  Blue food.  There seemed to be an endless variety of blue stuff available, and it was everywhere.  Granted, they were mostly sweet things - sugary drinks and candies and frostings and like that - but it was also a lot easier for me to find blue cornmeal back then, too.

Anyway, blue food turned out to be a fad rather than a trend, and these days it's hard to find blue treats. This disappoints me, because the "blue raspberry" flavor commonly associated with the color has long been one of my favorites.  It started when I was a kid and my parents would take us to the local market for Italian ice.  There were only two flavors to choose from back then: lemon and what the guy behind the counter called "blue gelati." Blue ice in those days was just like it is today - brightly colored and vividly flavored with "blue raspberry" flavor.

One of the blue things still widely available is drink, and two of the most common blue drinks are Kool-Aid Bursts and Mondo. Both of them are delightfully blue in both color and taste, and both are completely devoid of any nutritional value save calories. And, while they are alike in these ways, they are ever so different indeed.

Kool-Aid Bursts have a strong blue flavor and is the darker-colored of the two. There is a hint of "body" to the liquid, just like you might find in other flavored beverages. It's sweet, even a bit too sweet, but there is an undefined tartness to the finish. Kool-Aid reminds me of the liquid that used to be inside those Nick'l Nips wax bottles when I was a kid.

Mondo is thinner in both texture and flavor; it's much more like colored water, and the color is almost identical to windshield washer fluid. The blue flavor is more diluted and the actual taste is as much sugarwater as it is blue razz. And taking a big drink all at once makes the back of my throat itch. 

Since both of these drinks are dirt cheap - usually about a dollar for a sixpack - I would choose the Kool-Aid.

18 May, 2011

USDA Inspection Marks: Find Out Where Your Food Was Made

The more you know about food labels and how to read them, the more you can make informed decisions about the products you buy. With that in mind, I'd like to show you an easy way you can discover where many of the canned, frozen, and otherwise processed foods you buy were manufactured.  This is especially useful in the case of generic foods, many of which are packed for private labels by large, well-known national brands.

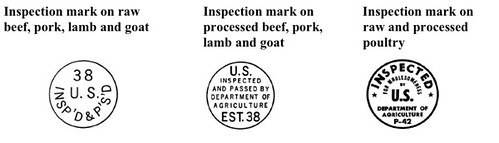
All processed foods containing meat for sale in interstate commerce are required to pass inspection by the USDA Food Safety and Inspection Service (FSIS). Companies producing the foods are assigned "Establishment Numbers"  which appears on the label along with the inspection mark. The type of mark varies depending upon the type of meat in the product:

The first inspection mark - for raw beef, pork, lamb, and goat - was once commonly stamped on the fat side of the meat in purple ink, and if you're an old guy like me, you might remember having seen those marks or their remnants on the side of your steak or pork chop.  Back in the days when meat was sold by the side and shipped whole to the butcher for cutting, those purple marks were very familiar to consumers. Nowadays, with meat pre-cut into primals and cryovac'd before shipping, the purple marks are rarer and the inspection marks often appear printed on the outside of the plastic wrap.

The second and third marks are commonly found on the labels and outer boxes of canned and frozen foods which contain meat and poultry. They are generally a standard size - about half an inch in diameter - and placed in an easy-to-find location on the label.

Remember how I mentioned that every processor has been assigned "Establishment Numbers?" Those numbers are the key to finding out which company processed the product, and at which plant it was done. The FSIS maintains directories in PDF and XLS format at this website. There are two files, one organized by establishment name, and the other by establishment number. I find the one sorted by number to be the most useful, since it's the number that appears on the mark. All you need to do is click on the link, bring up the file with Adobe Acrobat reader, and search by the number to find the name and address of the processor.  And  if you have a smartphone, it's even better: you can use your phone's browser to download the file of your choice and then use a PDF reader app to look up the establishment right there in the store.

Let me give you a couple of examples.

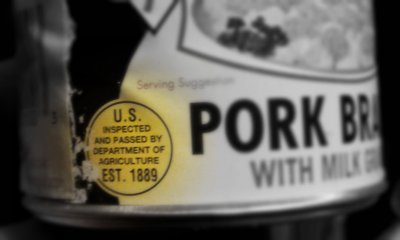
Here's the inspection mark on a can of Rose Pork Brains in Milk Gravy. The inspection mark says that this product was processed at Establishment 1889. Checking the FSIS directory, we find that Establishment 1889 is Bost Distributing Co. Inc, 2209 Boone Trail Rd., Sanford NC 27330, and that they own five labels, one of which is Foell Packing Company (the actual company listed on the Rose Pork Brains label.)  The directory also lists the primary phone number of the company. It doesn't take much imagination to realize how useful this kind of information can be to the consumer.

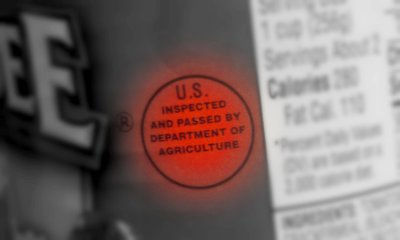
Sometimes, a product will have an inspection mark without an establishment number printed inside it, like this one from a can of Chef Boyardee Meat Ravioli. This is most common on stuff processed by huge companies (such as ConAgra, in this case) which have many processing plants across the country.

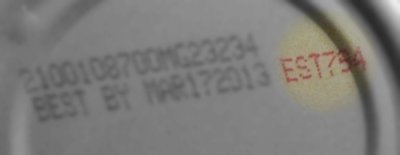
When you find an inspection mark like this, look at the ends of the can or box for the production codes, which will be either printed there or stamped into the packaging.  That's where you'll find the establishment number - in this case, Est. 794.  This can of Chef was processed by ConAgra at their plant located at 30 Marr Street in Milton, Pennsylvania.

Okay, so now I've shown you how to use the inspection marks to find out a bunch of information about where the stuff in your pantry and freezer is coming from. And that brings me to a hugely practical application of this info: Finding out who is really behind the store brands and generics that you might want to buy to save a few bucks on your grocery bill. You may remember this post from November 2010 reviewing ALDI's Kirkwood Brand frozen fried chicken.  I thought it tasted just like ConAgra's Banquet frozen fried chicken - and it turned out that it really was just like Banquet.  ConAgra processes Kirkwood chicken for ALDI at establishment P-7131 in Batesville Arkansas. The biggest difference between the two brands of chicken? The price, of course - Kirkwood sells for up to $2.00 a box less than Banquet.

Links and other useful information:

Click here to go directly to the download page for the USDA Food Safety and Inspection Service's Meat, Poultry and Egg Product Inspection Directory. The directories are downloadable from that page. The USDA periodically updates the directory, so if you choose to download it to your smartphone for mobile use, you may want to sign up for email notification of new files using the link provided there.

Click here for the home page of the USDA FSIS. There are tons of links there, with information available on food safety education, product recalls, Q&A board, and more.

16 May, 2011

Dan'l Boone Country Ham at Dollar Tree!


My fascination with Dollar Store Meat continues: I found 3-ounce packages of real, honest, genuine (and delicious) Country Ham (aka American Prosciutto) at Dollar Tree.  At a dollar a package, it works out to a little over $5 a pound, a fair price, and not bad if you consider how incredibly hard it is to find real Country Ham up here in New England.

The ham in the packages - Dan'l Boone Brand - are pre-sliced, and it is the real deal.  And I kind of like the small packs because I can pull out a slice to accent a cold cut grinder, or add some to a pot of greens, or use up the whole pack at breakfast time with delicious biscuits.  Like many other Dollar Tree items, this one probably won't be around long, so if you have a hankering for the taste of real Country Ham, hie thee to a Dollar Tree with a refrigerated food section and grab a packet or two. I promise it's good stuff.

Dan'l Boone Brand is one of the labels used by Goodnight Brothers of Boone, NC to sell their ham.  According to the information on their web page, Dan'l Boone is primarily packaged for grocery store chains and is distributed by Sysco.  They package their product under other labels for different distribution networks, and that includes a brand they call "Hardee's Country Ham" which is packaged exclusively for distribution to and by Hardee's fast food restaurants.

Also of interest:  Goodnight Brothers is on Facebook.  Check out their page's photo album for a close-up look at how country hams are prepped, cured, processed, and packed. It's fascinating.

15 May, 2011

WARNING: STUPID

Once upon a time, manufacturers didn't need to put obvious warnings on their products.

14 May, 2011

My Aunt Nellie's Pierogi

Back in the late 1980's, after I had been thoroughly adopted into my wife's family, her grandaunt Nellie handed me a small bundle of papers. "These are the family recipes," she told me. "I didn't want to give them to just anybody, but I know you'll make them so now they're yours."

I've made them many times since then, and I shared the recipe with my friends on the old Fidonet National Cooking Echo, an electronic message forum that predates the internet, in 1997.  Apparently, a lot of other people liked her recipe too, gathered into a large number of internet databases, freeware electronic cookbooks, and so on (often with my byline and attribution stripped out.)

Aunt Nellie's pierogis were always a family favorite.  She had learned how to make them from her mother, who had never written any recipes down on paper. Nellie, however, took notes so she wouldn't miss anything - especially with the dough.  She said that making the fillings was easy, but making the dough depended almost as much on "feel" as it did ingredients. The first time I made pierogies, she sat with me at the kitchen table and walked me through it. We made three batches of dough before it measured up to her standards.

It's hard to describe the proper texture of the dough. It should be almost silky to the fingertips, soft and yielding, yet firm and somewhat elastic - similar to egg noodle dough but not as dry. It's very much like the dough for scallion pancakes, which was once described to me this way: "It should feel like a young girl's arm."

Anyway, I'm going to get right to the recipes. This is going to be a long post.

Auntie Nellie's Pierogi Dough
Enough for 24-30 old-style small pierogi
2 cups sifted flour
1 large egg
1/2 cup warm water
1 teaspoon salt
2 tablespoons butter, melted

Mix all ingredients lightly and knead in the bowl.

Rest for an hour, covered. Then turn out onto a floured board and knead again until smooth.  The dough should be silky, firm and elastic.

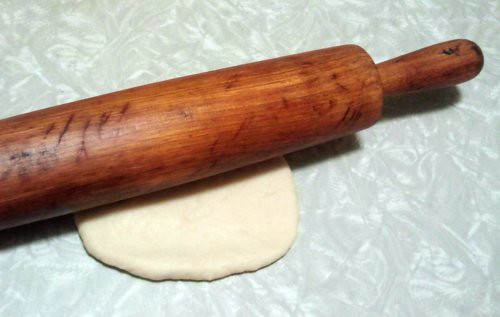
Roll out dough about 1/8-inch thick. I don't roll out the entire batch at once, but only enough for three or four pierogi. You can gather up scrpas, knead them briefly, and then roll them again - it won't make the dough tough.

Cut out circles with a coffee cup or medium biscuit cutter.  (Use a large biscuit cutter if you want pierogies the size of the ones you buy in the store these days. The coffee cup/medium biscuit cutter method produces the same kind of smaller pierogies that were common up through the 1950s.)

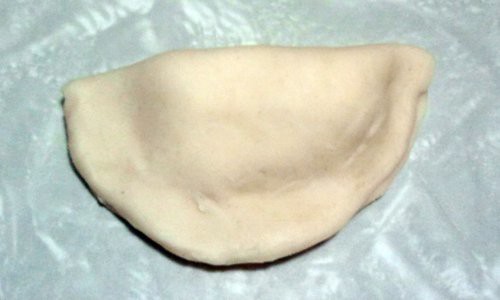
Put a small amount of your choice of filling in the center of each of the circles - about a teaspoon or so will be plenty - and then fold the circle in half with the filling in the center.  

Firmly pinch the outside edges together to seal the pierogi - they need to be well-sealed to keep them from opening up when you cook them.

To cook:  bring a pot of water up to a full rolling boil and drop the pierogi in. Turn the heat down a bit to a low boil to prevent them from opening back up.  Cook them for a few minutes after they rise to the top of the pot and float.  Serve with melted or browned butter, or you can saute them in a little butter with some sliced onions until they are slightly browned.

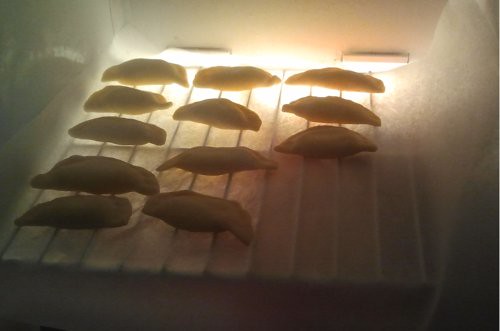
If you're making them way ahead of time - say, during Lent for eating at Easter breakfast - place them, separated, on a rack or a cookie sheet in your freezer.  They'll be frozen solid in about an hour, and then you can tip them into a plastic bag and pop them back into the freezer for longer-term storage.  Tip: Don't bag them before they are completely frozen, or they will stick together into an impossible-to-separate mass.

Okay, now you have a recipe for the dough and how to fill and cook them.  We'll follow up with a few recipes for fillings.  Over the years I've made a few adaptations; her original recipes were drastically underseasoned, and the quantity yield was strange - some filling recipes would make just the right amount for a single batch of dough and some would make insanely huge quantities that required three or four batches of dough to use up.  The recipes I'm giving here are still hers, they're just tweaked a little, and more accurately sized for a single batch of dough.

This mushroom filling is one of my family's favorites.  Auntie Nellie always made it with plain white mushrooms, but she told me that her grandparents used wild prawdziwek mushrooms from the forest (I found out later that prawdziwek is the Polish name for porcini shrooms, or cèpes. Unfortunately, cèpes are very rarely available fresh here in the US, so I try to use a mix of white, shiitake, and oyster mushrooms for a richer flavor.  Occasionally, I find cèpes canned in oil in the local Russian market. Not only are they awesome for stuff like this filling, but the oil is hugely flavorful for other culinary uses.

Auntie Nellie's Mushroom Pierogi Filling
Enough for one batch of Aunt Nellie's dough

Butter
1 medium onion, finely minced
1 cup mushrooms, finely minced
Celery salt and freshly ground black pepper to taste
2 large egg yolks

Melt butter (a couple of tablespoons to start) in a pan and saute onion until translucent and amber. Add the mushrooms and continue to cook until mushrooms are done. (Onions and mushrooms both take up the butter as they cook, so feel free to add more butter to the pan as you wish.)

Remove the pan from the fire and add seasonings to taste.  Add egg yolks and stir in well.

Allow to cool before filling pierogi.

This cheese filling is Lynnafred's favorite. Even though it's as much mashed potato as it is cheese, the filling becomes kind of "fluffy" and creamy when it cooks, kind of like the ricotta layer in a lasagna.  

Auntie Nellie's Cheese Pierogi Filling
Enough for one batch of Aunt Nellie's dough
1½ cups Farmer's Cheese
1 cup mashed potatoes (leftover is OK, instant is not.)
Celery salt and freshly ground black pepper to taste
½ teaspoon dried summer savory (optional)

In a bowl, whisk the farmer's cheese until light.  Add mashed potato and seasonings and stir thoroughly until combined.  Taste and adjust seasoning as needed before filling pierogi.

No matter how many varieties of pierogi I make for holidays, I have to make at least as much of the cabbage-filled ones as I do of all the others combined.  As much as everyone likes the mushroom and cheese pierogis, they seem to like the cabbage ones best of all. And it's a very flexible recipe as well.  It takes well to doubling or more, and it adapts well to other additions - Auntie Nellie would often make it with a couple of mashed potatoes added, or with a few finely-chopped mushrooms in the mix to liven up the flavor.  Originally, the recipe called for the sauerkraut to be simmered with the cabbage three times, changing the water between each parboiling. While that certainly made the cabbage tender, it also tended to draw off every bit of flavor from the sauerkraut.  I think the flavor is much better with a bit of the sauerkraut tang remaining, so I've eleminated two of the parboilings. Feel free to add them back if you desire.

Auntie Nellie's Cabbage Pierogi Filling
Approximately Enough for one batch of Aunt Nellie's dough
1½ cups sauerkraut
1½ cups finely shredded fresh cabbage
3 tablespoons butter
1 small onion, finely minced
Dash or two of Maggi Seasoning
Celery Salt to taste
Freshly ground black pepper to taste (see instructions)

Parboil the sauerkraut and cabbage in water to cover, simmering until the cabbage is tender. Pour off the water and finely chop the cabbage mixture.

Melt butter in a skillet and add the onion.  Cook until the onion is amber and translucent, then add a shake or two of Maggi along with the cabbage mixture and saute until the cabbage just starts to brown a bit. Season with celery salt and black pepper.  I usually use a heavy hand with the pepper because the cabbage mix takes well to the fruity aroma and spicy kick of robust black pepper seasoning. Allow to cool completely before filling pierogi.
Enjoy!

13 May, 2011

The Most Awesome Diner in Western Massachusetts


Charles Diner on Union Street in West Springfield, MA. The signboard out in front says, "NOW SHOWING 3 STOOGES ALL DAY."  Click on the photo for a full-sized view.