31 March, 2008

Jack Link's A1 Jerky

I kind of like A1 steak sauce - not as much as I used to, before Kraft bought the brand and bulldozed the flavor with their filthy high-fructose corn syrup, but enough that I still keep a bottle around for the occasional lousy cut of meat that needs a flavor kick. So when I saw that Jack Link had introduced a beef jerky variety flavored with A1, I knew I had to try it.

Guess what? It's good! As you'd expect from Jack Link, the beef is top-notch: real sliced beef, no chopped-and-formed garbage like some of the bargain-basement crap. Mostly bite-sized pieces with a sprinkling of larger and smaller chunks and only a little bit of crumbles in the bottom of the bag.

It was the flavor that really took me by surprise. The A1 is used sparingly, allowing the taste of the beef to come through, accented by the flavor notes of the steak sauce. The effect is very much like teriyaki - in fact, if you're a fan of teriyaki-flavor jerky, you'll probably enjoy the A1 flavor.

Links:

Jack Link Website
Jack Link's Messin' With Sasquatch commercials.

.

30 March, 2008

Damn Expensive Macaroni


Find a jobber who will turn out some macaroni for you in fun and funky shapes. Get a clever name for it, and price it at five times the going rate. Presto! Instant Gourmet Pasta! You don't even have to spell all the words on your label correctly.

.

25 March, 2008

It's Only The Real Thing Once A Year

In the early 1980's, Coca-Cola began sweetening Coke with a mixture of corn syrup and sugar. Thanks to high government tariffs on sugar and subsidies for corn, corn syrup (and especially High Fructose Corn Syrup, the bastard child of industry and agriculture) has ever since remained cheaper than sugar, and in 1985, after the New Coke flop, Coca-Cola Classic was permanently reformulated to use High Fructose Corn Syrup (HFCS) as the sweetener.

Casual Coke drinkers - and those who have never tasted anything else - don't seem to mind, but there are hundreds of thousands of people in the US who do mind. HFCS does taste differently than refined sugar, and the Coke we're drinking now is not the same Coke many of us grew up with.

However, you can still get The Real Thing - sugar-sweetened Coke - if you are fortunate enough to live in an area with a large Jewish population. Corn-sweetened beverages don't meet the strict Kosher requirements for Passover, and bottlers in that area, unwilling to alienate a large market segment, produce Kosher-for-Passover Coca-Cola for a few weeks every year. It uses the true original formula - the one using sugar instead of HFCS, and you can identify it by the cap bottlers use to distinguish it: bright yellow with Kosher L’Pesach printed in Hebrew on the top.

How to find it:

It's only available in the weeks leading up to Passover (you can look up the Gregorian-calendar dates for Passover here. ) Find a Kosher market or deli, or a supermarket which serves a local Jewish population and which is big enough to dedicate a few aisles to Kosher merchandise during the season. So far, I've only found the 2-liter size, but there are a couple of bottlers putting out 12-ounce cans also.

23 March, 2008

Porterhouse Steaks


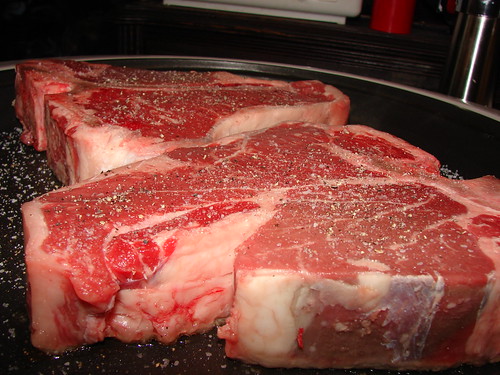
Salt. Pepper. Heat. That's all you ever need to cook an inch-and-a-half-thick porterhouse steak.


22 March, 2008

Easter Pizza

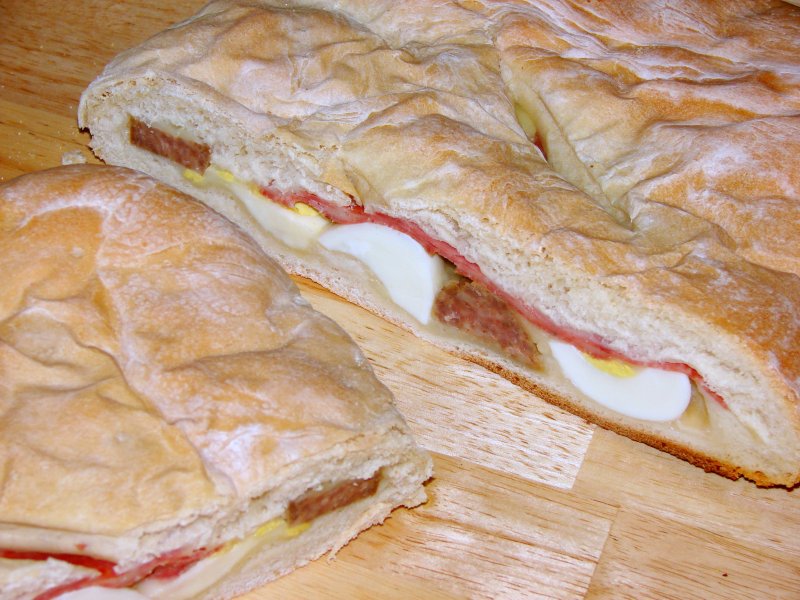
Every Easter when I was a kid, my Italian grandmother would make what the family called "Easter Pizza." She would stuff bread dough with layers of hard-boiled eggs, meats, and cheeses, and bake it in the oven until the bread was done. It was our favorite Easter treat.

What we always called "Easter Pizza" is known by many names and there are many different ways to make it. In Naples and Campania, Easter Pie is made with ricotta cheese, eggs, and whole grains of wheat. It's called pastiera, and the custard-like filling is often flavored with orange-blossom water. Sicilians make a different variety altogether: theirs has pasta, pork, cheese, and eggs. And in Calabria. pizza rustica is often made with ham, sausage, hard-boiled eggs, mozzarella, and ricotta.

Doing a quick Google search will show you that there are dozens of recipes for this traditional Easter favorite out there, and just about every one of them is different - after all, the ingredients not only vary from region to region within Italy, but even from family to family. My own recipe is as close to my grandmother's as I can recall, but she never wrote it down. Because she passed away so many years ago, when I started making it for my own family I had to reconstruct the recipe from memories of what it tasted like.

Easter Pizza

1 recipe bread dough - use your favorite recipe for medium-soft white bread, or you can buy a bag of "pizza dough" from your local supermarket.
1/2 pound sliced sharp Provolone cheese
1/2 pound thinly-sliced sopressata
1/2 pound thinly-sliced Genoa salami
1 pound Italian fennel sausage, cooked and sliced 1/4-inch thick
1 pound basket cheese (or fresh mozzarella)
5 hard-boiled eggs, halved

Punch down the dough after the first rising and divide in half. Line a baking sheet with parchment and sprinkle with cornmeal. Roll the first half of the dough out large enough to cover the baking sheet - the dough should be about a quarter of an inch thick.

Cover the dough with a layer of sliced Provolone cheese, going to within a quarter-inch of the edges. Next, lay down a layer of the fennel sausage. Crumble the basket cheese and sprinkle a little more than half of it on the sausage. Next, add the hard-boiled eggs. Cover this with slices of sopressata and finally with a generous layer of Genoa salami. Sprinkle this with the remaining basket cheese. If there is any Provolone cheese or salami left over, add them on top of all of this.

Roll out the second half of the dough large enough to cover the pizza and place it over the layers of filling; go around the edges of the pizza and seal it by turning the edges under and pressing with your fingers or a fork. Cut a few slashes in the top and allow the bread to rise for about 20 minutes.

Bake in a 350 F oven for about an hour, or until the crust is golden brown. The hardest part of this recipe is waiting for the pizza to cool slightly before cutting into it.

Notes:


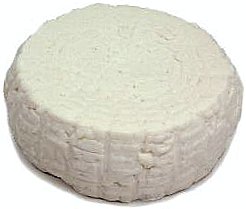
Basket cheese is a soft, fresh cheese that is formed by pressing curds gently in a basket. If you don't have an ethnic Italian population nearby, it can be hard to find. You can substitute soft, fresh mozzarella instead.

Feel free to add slices of prosciutto, capicola, or other Italian hams or sausages to your Easter Pizza. The recipe adapts well to modification.


Need a good, medium-soft white bread recipe to make your Easter Pizza? You can try the one I use:

3 tbsp sugar
1 tbsp yeast
2 1/4 cup warm water
1 tsp salt
2 tbsp shortening
6 1/2 cups flour

Dissolve the sugar and yeast in warm water and set aside to work and get foamy. Combine salt with 2 cups of the flour and cut in the shortening until the mixture is coarse and crumbly. Pour in the proofed yeast mixture and add another two cups of flour, mixing until you get a smooth and very sticky dough. Add another two cups of flour and knead well for 10 to 15 minutes, working in the remaining half cup of flour, until the dough is silky-smooth and elastic. Turn into an oiled bowl, cover with a damp cloth, and allow to rise for about an hour until doubled in bulk. Punch the dough down and divide in two; continue with the Easter Pizza recipe.


Links:

The basket cheese I buy - and many of the other Italian cheeses I use in my cooking - is made by a local company, Calabro Cheese Corporation. Their products are top-notch and all natural. Click here to visit their website and learn more about their extensive line of cheeses and where they are sold.

Temptation: Easter Pizza is What You Make of It, New York Times, 31 March 2004

.

21 March, 2008

Making Wontons

Ever since she was a toddler, my daughter has loved wonton soup. She never fails to order it when we eat at a Chinese restaurant. But there is no reason not to have it anytime. Wontons are time-consuming to make (all that stuffing and folding!) but fairly easy.

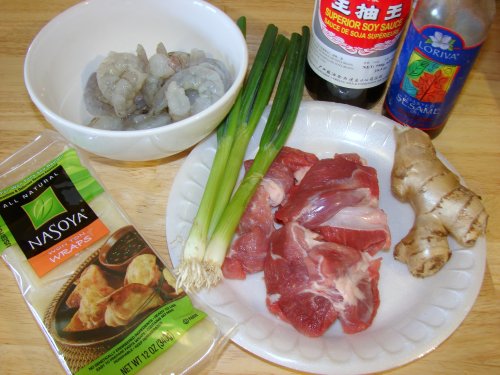
The ingredients are shown to the left. For a batch of 50 wontons, you'll need:

1/2 pound of pork (not too lean)
1/2 pound shrimp (peeled, deveined)
1/4 cup finely minced scallions
2 tbsp finely minced ginger
1 tbsp soy sauce
1 tbsp oyster sauce
A dash of sesame oil
1 tsp ground black pepper
1 package of 50 wonton wrappers

Pulse the pork and the shrimp separately in the food processor until each are finely minced, then combine them along with the scallions, ginger, soy sauce, oyster sauce, sesame oil, and black pepper until well-mixed. Cover the bowl and refrigerate for 2 hours to allow the flavors to combine.

Fill wonton skins with the mixture and either simmer them in broth or soup to cook them, or freeze them for later use.

You may want to have an extra package of wonton wrappers on hand. Depending on how big the wrappers are and how much filling you put into each one, you may have some of the pork/shrimp mixture left over after just one package.


How to Fill and Fold Wontons

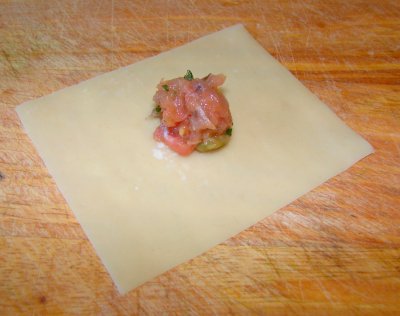
Place a single wonton wrapper down on a clean, dry surface. Put about half a teaspoon of filling in the center.


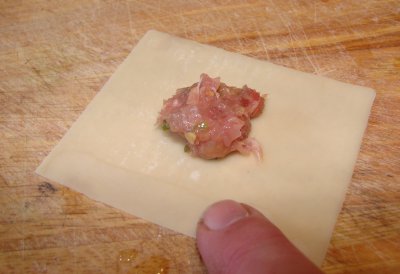
Moisten your finger with water and wet the edge borders of the wonton wrapper, all the way around.


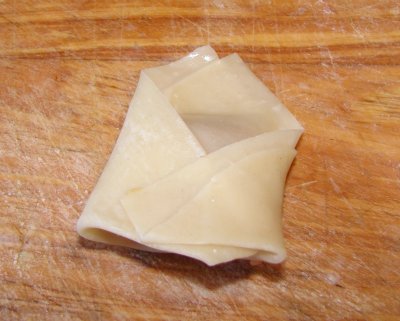
Fold the wonton wrapper corner-to-corner over the filling, and press down along the edges to seal them.


Now moisten the opposite corners with water and fold them towards each other. Press the tips together to seal them.

Repeat until you run out of filling or wonton wrappers. (No one ever seems to run out of both at the same time.)


Simple Wonton Soup

9 cups of pork broth or chicken broth (pork is best)
1/4 cup finely julienned pork loin (about 3 ounces)
25 wontons
3 scallions, sliced into fine rings
1/4 pound snow peas (or 1/4 cup of frozen sweet peas)
A large handful of baby spinach leaves

Bring broth to a simmer and add julienned pork and wontons; simmer, stirring occasionally, for two or three minutes. Add remaining ingredients and continue to simmer for a few minutes until snow peas are tender.

Makes a filling lunch for four.


12 March, 2008

The Worst Canned Tuna In The World

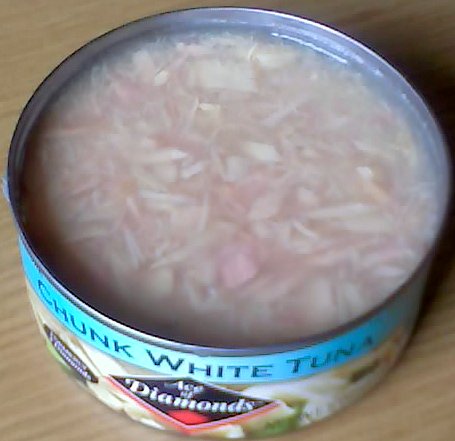
Ace of Diamonds brand Chunk White Tuna (Albacore) in Water is the most disgusting canned tuna I have ever tried.

Made up of tiny bits of tuna suspended in a thick, gummy, translucent liquid, it was impossible to properly drain. So thoroughly was the fish blended with the fluid that it could not even be squeezed out, leaving me with a wet, vomitous mass of tiny tuna-shreds in a vile gummy bolus.

Worse yet, I've got eight more cans of this slop in my pantry. I'll probably end up using it for tuna wiggle, or creamed tuna and peas on toast, or some other casserole-type thing where cutting down on the other liquids will compensate for the slop this garbage is packed in. But this nasty shit is completely useless for tuna salad.


.

11 March, 2008

The Tripe-Cooking Diary

In Which I Make Pickled Tripe.

I have a friend who dearly loves pickled tripe. Once upon a time, it was fairly common up here in New England. Pickled tripe was available (in jars) in almost every grocery store. Today, one can find fresh tripe - especially in towns with a sizable Hispanic population - but the pickled stuff is nearly impossible to find.

Adding to the mystery, pickled tripe is also mysteriously scarce on the internet. Although I was eventually able to find a recipe on several websites, it's the same recipe. And poring through my collection of vintage cookbooks was no help, either. Finding a recipe for pickling tripe was like trying to catch a unicorn.

So. Armed with my recipe and a pound-and-a-half of fresh honeycomb tripe from the local supermarket, I set off to make a jar of pickled tripe for my friend.


00:00
I unwrap the tripe in the sink and rinse it off. The tripe gives off a strangely nasty smell; it reminds me of formaldehyde and the chunks of organism we enjoyed dissecting in high school biology class. I checked the tripe over carefully, looking for random filthy bits, but was disapppointed (there weren't any.)

00:05
The tripe is naturally pocket-shaped, so I run the knife along the sides to separate it into two more-or-less flat portions, then cut each of the portions into pieces about three or four inches on a side. The pieces go into a dutch oven.

00:07
I cover the tripe with cold water and put it on the stove over a high flame to bring it quickly to a boil. While the water heats, I peel and chop the carrots and onions.

00:19
The tripe is at a full, rolling boil. Off to the sink to pour off the boiling water. A huge mushroom cloud of steam engulfs me in Tripe Stench. I fill the pot with fresh, cold water and bring it to the stove.

00:23
Back on the fire; I add the chopped vegetables and a bay leaf, sprinkle in a couple of teaspoons of salt and a small bunch of parsley. I leave the parsley whole to keep bits from hiding out in the honeycomb surface of the tripe. I thought about putting in some peppercorns for flavor as well, but I don't want them hiding in the honeycomb, either. So I just grind in a tablespoon or so.

01:00
I check on the tripe. It still smells. The kitchen is starting to smell, too.

01:45
The kitchen really smells.

02:15
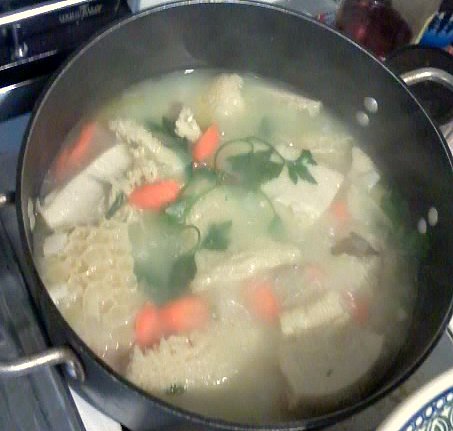
The smell in the kitchen has pretty much faded away, and the unpleasant odor of the tripe has lessened quite a bit, even when the lid of the pot is lifted. It still isn't very appetizing, though. The tripe has been cooking for nearly two hours now and according to the recipe it should be just about ready. I stab a chunk with a fork and discover that it pierces the meat easily, but when I cut a chunk off and taste it, it seems far too chewy to be ready. Surprisingly, the tripe has very little flavor (I guess I was expecting a much stronger taste based on the agressive smell.)

03:30
Checking on the tripe again, I find it much more tender than it was before, and I figure it is about time to come out of the pot. I cut off a small piece and, although a little chewy, it seems ready. It also has almost no flavor. I lift the cooked chunks of tripe to a refrigerator container with a slotted spoon (and I include some of the vegetables in the broth for flavor's sake.)

03:35
A cup of the broth combined with a cup of good cider vinegar is sufficient to cover the cooked tripe in the refrigerator container. The tripe goes into the fridge for later consumption, and the dirty pots and kitchenware go into the sink for washup.

Pickled Tripe

2 pounds honeycomb tripe, cut into 3- to 4-inch squares
2 carrots, peeled and chopped
1 yellow onion, peeled and chopped
1 bay leaf
Salt and pepper to taste
1 cup vinegar

Place tripe in a saucepan and cover with water. Bring to a boil and then drain. Rinse with cold water and cover with fresh water a second time. Add remaining ingredients except vinegar. Cover pan and simmer until tender, about 2 hours or longer.

Drain the cooked tripe, reserving 1 cup of broth. Combine the broth with the vinegar and pour over the tripe. Store in refrigerator until ready to use.


Donut Dip, West Springfield MA


Donut Dip on Riverdale Road in West Springfield MA is an amazing place: an old-fashioned donut-and-coffee shop that not only still makes their baked good from scratch right there on the premises, but has survived nearly unchanged for over half a century.

Just approaching the building is a refreshing change from the bland sameness of the big-chain coffee shops in the area: The distinctive late-50's design of the storefront and the neon signage is the same as it has been since opening day. Inside, the backlit glass menu boards are hand lettered by actual signpainters, not screen-printed in a mass-production factory. And when you take your donuts out the door, they leave in a real waxed-paper bag printed in pink and teal with Donut Dip's logo and menu selection.

Speaking of the donuts, they're well-known in New England as the best in Western Massachusetts, and it's no wonder. They're not made in a central processing plant or shipped to store frozen and ready to thaw. Every one of them is hand-made and hand-cut in the bakery on site. It's a difference that attracts people from as far south as New Haven CT and as far north as Vermont.

On a recent visit, we picked up half a dozen Hot Cross Donuts, an Eastertime specialty. Rich spice cake, studded with candied citron and raisins, glazed and decorated with an icing cross, these treats are mouthwateringly delicious and bold enough to stand up to a strong cup of coffee, and they're just one variety among many specialties here. If you consider yourself a connoisieur of donuts, forget about Krispy Kremes and Dunkies, and get to Donut Dip. You will not regret it a bit.

Directions: Interstate 91, Exit 13 A. Northbound lanes of US 5 (Riverdale Road), on the right just past the lights.

There is also another location in East Longmeadow on North Main Street. This Roadfood.com writeup gives them high marks, and includes loads of pictures.

Related Links:
Donut Dip Marks 50 Years - Springfield [MA] Republican, 30 January 2008
A review of Donut Dip on the blog Passionate Rations
Here's a night photo of Donut Dip's cool neon signs
Donut Dip as it appeared in the 1950's (at www.chronos-historical.org - scroll down the page for the photo.)

Unfortunately, Donut Dip doesn't maintain a website of their own.

10 March, 2008

Homemade English Muffins

Homemade English muffins are so good, I may never buy another package of them at the grocery store again. And they're easy as well, especially if you have a heavy-duty stand mixer like a KitchenAid to do the kneading for you.

English Muffins

1 cup milk
3 tablespoons butter
1 tablespoon (or one envelope) active dry yeast
2 tablespoons of sugar
1 cup warm water
1 large egg
2 teaspoons salt
5 cups flour (approximately - you might need more)
Cornmeal

In a small bowl, heat the milk and the butter until the butter melts. Set aside and allow to cool.

Combine warm (about 105 F / 40 C) water with sugar. Stir in the yeast and let sit until foamy.

Whisk the egg and salt into the cooled milk mixture, then combine with the yeast mixture in a bowl. Add about half the flour and mix until well-combined and evenly moistened; continue mixing for about five minutes. Add remaining flour and mix well. Dough will be sticky. (This step is where a stand mixer comes in handy.) Turn the dough into a large oiled bowl. Cover with a damp towel and allow to rise for an hour or until doubled.

Line a couple of cookie sheets with waxed paper or baking parchment, and dust the paper with a generous sprinkling of cornmeal.

Punch down the risen dough and pinch off a piece big enough to roll into a 2-inch ball. Flatten the ball to around half an inch thick, and use a 3-inch biscuit cutter to trim it into a uniform 3-inch round shape. Put the round onto the baking sheet. Repeat this process until all the dough has been formed into 3-inch rounds. Dust the tops of the muffins with cornmeal and cover once again with a damp towel. Allow to rise again until doubled (about half an hour.)

While the muffins are going through this second rising, put a heavy skillet on the fire and bring to moderate heat. An electric griddle is perfect for this - preheat it to about 325 - 350 F (160 - 175 C) and it will be just right. Do not grease the griddle - the cornmeal sticking to the muffin's top and bottom will prevent it fron sticking.

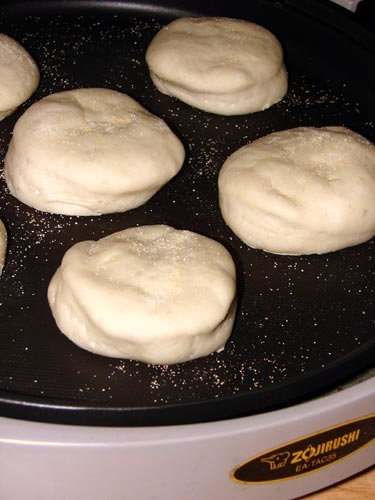
Using a spatula, carefully lift the muffins from the waxed paper to the hot griddle. Be gentle, because the dough is very soft. Grill the muffins for 5 or 6 minutes, or until golden brown. The picture on the right shows the muffins right after they were put on the griddle. In a few minutes, they will be puffed up and ready to turn.

When the bottoms are browned, slip the spatula under each muffin and turn them over to bake the other side. Once again, they will need about five or six minutes (you can pick them up after five minutes or so to see if they are ready to turn.)

When they're done on both sides, put them on the baking sheet or on a rack to cool completely. Enjoy them warm or cooled. I like to split them with a fork, toast them, and eat them warm with butter, Vegemite, or jam.


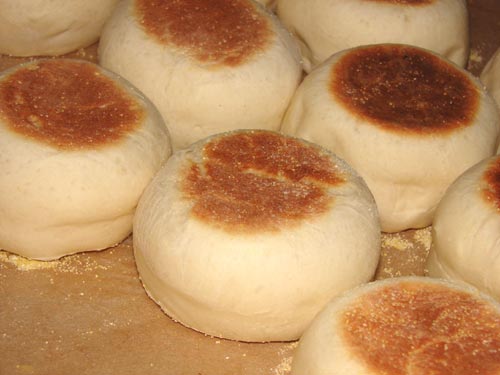
This picture shows a batch of muffins after the first side is baked, browning on the top side. They're round and puffy. Just left them rest on their top while they bake - don't press on them with the spatula.


Your homemade muffins should be light and airy, yet with a slightly dense and chewy interior. They won't have the huge air holes like commercial English muffins do, but they will have plenty of bubbled texture to hold melted butter.