
When Maryanne and I first moved to our current house - The Last House, we call it - she wanted a rain barrel. When she was a kid, her grandparents had an oak rain barrel at the corner of the house. She liked the looks of it, and she liked the idea of watering the garden without using city water. After we were more or less settled in, I found an old oak barrel in our barn. Well, it had been a barrel at one time, anyway - a collection of staves with a round bottom and a collection of rusty hoops. I took the pieces out and found that it could be reassembled - sort of like putting together a 3-dimensional jigsaw puzzle, but I figured it out and hammered the hoops down until the barrel would hold its shape, and then I put the hose in it and filled it with water, letting it soak until the staves swelled up and make the thing watertight.
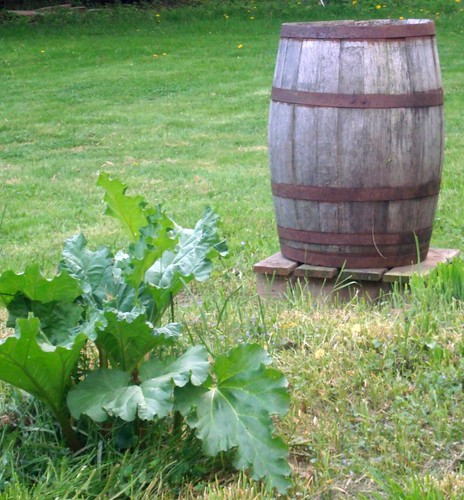 |
| Did you know you can grow about 40 pounds of potatoes in a barrel? |
We used it for two years, but eventually things "happened" with the barrel - it was loosening up, and leaked, and then the bung just kind of popped out and we couldn't keep more than half a barrel of water anymore. The barrel certainly had issues when we first started using it - it must have been in the barn for at least forty years - but it had served its purpose and it was time to retire. It's out in the garden now, close to the rhubarb, with a layer of seed potatoes in some soil on the bottom of it. Yep, it's our Potato Barrel now.
We both still wanted a rain barrel, though, so I started looking around for some alternatives. Rain barrels are pretty popular right now, and I noticed lots of retailers sellling purpose-designed rain collection "systems" for pretty steep prices - as much as $250 - way too rich for my blood. I decided to come up with a system on my own.
Much as we both liked our old oak rain barrel, it has certain disadvantages. For one thing, the open top allowed in too much junk - falling leaves, disgusting insects, tree pollen (last year was a particularly heavy year for tree pollen, and for a while the water in the barrel had a half-inch-thick cake of pollen floating on the top, no exaggeration.) For another thing, there's no good way to thread in a spigot in a wooden barrel, so we resorted to dipping a ladle or pan into the water, just the way Maryanne's grandparents did so many years ago. Not very convenient - it would have been much easier to just attach a hose to a faucet and then run out the hose to where it was needed. And then there were the mosquito larvae. I had to keep a supply of bacterial "cakes" on hand to inoculate the water and kill off the swarms of larvae that would otherwise infest it.
I found my answer in a pair of USDA-approved food-grade plastic 55-gallon drums that I bought from a seller on Craigslist. The construction took most of the day on Sunday, but it was well worth it.
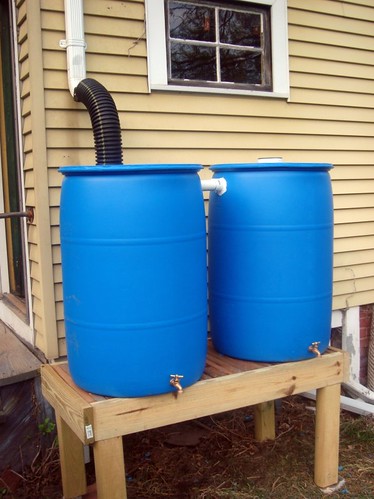
I started off by building a 2-foot-high platform for the barrels. I wanted them off the ground so we could access spigots set near the bottom, high enough to work comfortably with them and have a place below to stash watering cans, clay pots, and so on. I built the platform out of sistered 2x6 and 2x4 pressure treated lumber, held up by stout 3x5 landscape timber legs. The decking is 2x2 red cedar deck railing pickets salvaged from a friend's deck replacement. This construction should be able to hold the combined weight of the two filled barrels. We'll see, but the worst that can happen is they tip over into the yard and spill some water.
To fill the barrels, the downspout on the back of the house goes into a 4-inch black downspout extender which is fitted to the top of the first barrel. The hole and the diverter are the same diameter to prevent insects and other nasties from finding their way inside. A few inches below the lid of the barrel, I cut a 2-inch hole and fitted it with a PVC pipe that connects to a similar 2-inch hole in the second barrel. When the first fills up, the overflow will enter this second barrel. The second barrel also has an overflow hole, directly opposite the filler hole. When both barrels are filled to capacity, excess water will run out this overflow and travel down a 2-inch PVC pipe just as though it were coming directly off the roof.
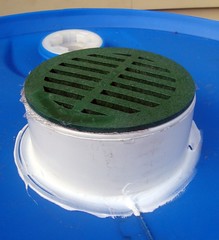
Because the fit is fairly tight on all of these connections (and, in fact, I sealed the connections with silicone caulk to keep them that way) there needs to be a vent to allow air out as water comes in. So in the center of the second barrel's lid, I cut a opening large enough to receive a standard 4-inch coupling. With that, I put a plastic grate with a fine-mesh aluminum screen behind it. The grate will keep out leaves and twigs and so on, while the screen will block the mosquitoes.
Finally, I used a spade bit to drill a 1-inch hole near the bottom of each of the drums - the perfect size to accept a threaded hose bibb. The brass bibbs screwed directly into the relatively soft plastic of the barrels, tapping the threads as they went and providing a spigot on each one without a lot of complicated plumbing work.
Because I had most of the tools for this job on hand and almost all the wood for the base was either salvaged or leftovers from other household projects (there's a lot to be said for being handy around the house) the job was quite affordable - $50 for the two barrels and about $20 for other materials - and I have double the rainwater storage that I once enjoyed.
No comments:
Post a Comment