
For the past couple of years, I've been making bacon at home. I don't do it to save money; by the time I've bought the pork belly, seasonings, cure ingredients, fuel and chips for the smoker, and so on, I really haven't saved all that much. No, I do it because I love the different flavors I can achieve with different cures and because I like the results better. Commercially-made bacons are often injected with their cure - pumped up with moisture and extra sugars that make for a wetter, sloppier product. You've probably cooked bacon like that. It leaves puddles of salty white water or sticky residue in your frying pan, but before now you didn't really know why.
Making bacon at home is a time-consuming process, but not a very hard one. The steps are simple:
- Cure the bacon
- Dry the meat off so the smoke will "take"
- Smoke the bacon
- Chill the bacon so it's easier to slice
- Enjoy!
I'll give you three separate recipes - you can choose whichever one that works best for you, or you can do what I did for this article and make a batch of all three. You'll notice that all the recipes include an optional ingredient called Morton TenderQuick. This product, made by the Morton Salt Company, is salt combined with a very small amounts of sodium nitrite and sodium nitrate. If you are concerned about nitrites and nitrates in your diet, you may leave them out when you make your bacon, but remember that they not only inhibit the growth of harmful bacterias, but they preserve the wonderful pink color of the lean parts of the bacon. In the tiny amounts used in the recipes, I believe them to be harmless, but you can make your own decisions about this.
First, my "default cure." I make a "hot smoked" bacon which turns out a ready-to-fry but fully cooked product very similar to Russian Bacon. Because of this, I have had a lot of success with a brine cure:
1/2 gallon water
1 cup of Kosher or pickling salt
1 tsp Morton TenderQuick curing salt (optional)
1/2 cup dark brown sugar
Combine all the ingredients in a container and stir vigorously until the salts and sugar has dissolved. You can add other flavoring ingredients to the brine, if you like - bay leaves, mustard seed, thyme, sliced ginger, sage (pretty much anything that tastes good with pork and smoke) - to vary the flavor. Immerse the pork belly into the brine - making sure the pork is completely submerged - and refrigerate for five to seven days.
 If you prefer a "dry rub" you can get excellent results with this honey cure. You'll need:
1 lb chunk of pork belly (or larger)
2 ounces honey
2 tablespoons (or more) coarsely ground black pepper
1 cup salt
1 tsp Morton TenderQuick (optional)
Pat the pork belly dry with paper towels, then rub it all over with the honey to form a thin but uniform coating on all sides. Next, roll the coated pork in the black pepper until all surfaces are covered with pepper. Finally, rub the entire surface well with salt to which the TenderQuick has been added. The pork belly should be covered with a nice thick layer of salt.
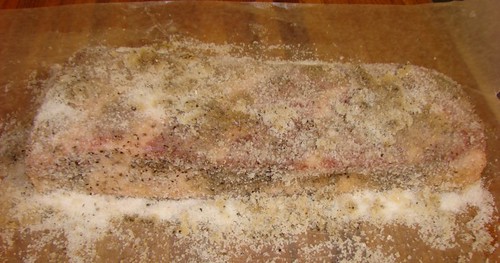 This is what the pork will look like when you have the cure properly packed around it. The pepper will be showing through the salt layer, and the honey will be seeping though a bit. If you have a vacuum sealer, put the bacon along with all the salt sticking to it (and whatever of the salt/honey/pepper mixture you can gather up with your hands from the cutting board) into a vacuum pouch and seal it tight. If you don't have a vacuum sealer, use a heavy-duty zipper-closing freezer bag. Try to press out as much of the air as possible from the bag as you seal it up. Refrigerate while curing for five to seven days.
Another dry-rub cure you can try is this "savory cure" using herbs for extra flavor:
1 teaspoon Morton TenderQuick
3 tablespoons Kosher salt
2 tablespoons dark brown sugar
2 tablespoons coarsely ground black pepper
4 bay leaves, crumbled
1 tablespoon dried thyme
Mix all ingredients well and rub into the pork belly on all surfaces. Seal in a vacuum pouch or a heavy freezer bag and refrigerate while curing for five to seven days. This recipe will make enough cure to do a five-pound slab of bacon, so if you only have a small one-or two-pound piece, don't feel that you have to use up the whole batch.
Curing Time
For brine-cured bacon, just leave the container with the submerged pork alone in the refrigerator for about a week. Check every now and then to be sure the brine is reaching every part of the meat. If you have more than one piece of pork in the brine, turn them every day or so to make sure the same parts of the pork aren't pressed up against each other all the time (the surfaces that are pressed against each other don't get exposed to the brine as well.)
 For dry-rub cured bacon, you will notice after a few hours that the rub has begun to draw moisture out of the pork and form a brine all its own in the bag. If you're using a loosely-fitting sealed zipper bag, you should turn it over twice a day to make sure all surfaces of the meat stay exposed to the salty brine evenly. As the days go by, more brine will form.
The picture at left shows the curing pork after about three days in the zipper bag.
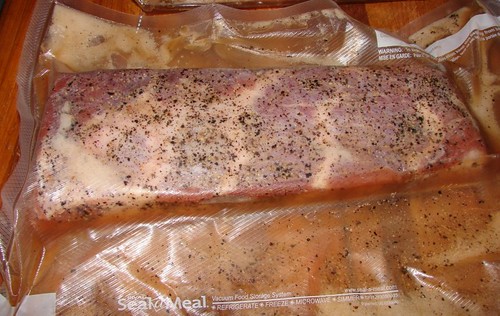
Brine will still form in a vacuum-sealed bag, but there's less room for it to move around. Once a day, take the sealed bag out of the refrigerator and gently massage the surfaces of the meat through the plastic. This helps ensure that the undissolved salt and other seasonings stay evenly distributed.
The picture at left shows the pork after a few days in the vacuum bag.
Finishing the Cure
 After about a week has passed, the bacon is cured and should be ready to smoke. Remove the bacon from the cure and rinse it under cool running water. You'll only need a light rinse with brined bacon, but if you used a dry salt cure you'll need to lightly rub the bacon under the water stream to remove all the brine and undissolved salt and bits of herb, etc. Ground pepper might still stick to the meat. You can leave that on if you like.
Pat the bacon dry with paper towels and put it on a wire rack, rind (skin) side down, to dry for a few hours. Smoke doesn't adhere well to wet meat, so the pork needs to air until the surface feels kind of dry and even a little sticky. This sticky surface is called a "pellicle" and is formed when surface proteins on the meat dry out and harden a little. This extra step not only gives the bacon a better texture, but also improves the ability of the smoke to flavor the meat. Don't skip it.
In the picture, I have three different cures drying in preparation for the smoker. At the top is the savory bacon. On the right you can see the honey-cured piece, and in front on the left is the brine-cured variety. Notice that the two pieces of bacon on the left still have the rib bones attached to them. We'll talk more about that later.
Smoking
 At left is the smoker, loaded and ready to go. You may not have the same type or model smoker as I do, but you should be familiar enough with your own equipment that I don't have to tell you how to perform this step. Just remember to keep the bacon spaced out enough so that the smoke can flow freely around the meat and expose the entire surface to the smoke.
From top to bottom in my smoker:
Racks holding the bacon, placed rind (skin) side up
A pan of water. This provides humidity in the smoker and also catches and cools any fat that might drip from the bacon as it smokes. Just allowing the fat to fall into the coals will not only cause hot flares, but the burning fat will leave an unpleasant flavor and color in the bacon.
Under the water pan is a shallow tray filled with lava rocks. It is made of stainless steel and perforated with big half-inch-diameter holes to let the flames from the burner through. It sits on a heavy steel rack holding it above the burner. When the lava rocks heat up, wood chips soaked in water are scattered upon them and smolder slowly, releasing their flavor.
Below the lava rocks, of course, is a bronze burner to provide heat.
I usually light the smoker about a half an hour before I'm ready to put in the meat. This gives the water and the lava rocks time to heat up. That way, I can load the meat in, throw on a handful of chips to start the smoke, and close the door.
Once the bacon is in the smoker and the smoke has started, keep the temperature inside the smoker at about 225 to 270 degrees F. The idea is to slowly cook the bacon without rendering out very much of the fat (a small amount will "sweat out" during the smoking process, but you will be surprised at how little it is!)
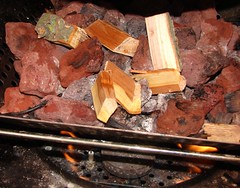 Keep an eye on the vents and when the smoke slows down, add more chips to keep a constant flow of smoke. You'll want to keep a small bucket of water handy with a handful or two of chips soaking so they are wet and ready when they need to be added to the lava rocks.
Smoke the bacon for about three hours. You'll know it's done when the skin has softened and pulled back from the edges of the meat and the bacon feels firm when pressed. The color should be a rich deep golden brown.
At left is the smoker, loaded and ready to go. You may not have the same type or model smoker as I do, but you should be familiar enough with your own equipment that I don't have to tell you how to perform this step. Just remember to keep the bacon spaced out enough so that the smoke can flow freely around the meat and expose the entire surface to the smoke.From top to bottom in my smoker:
Racks holding the bacon, placed rind (skin) side up
A pan of water. This provides humidity in the smoker and also catches and cools any fat that might drip from the bacon as it smokes. Just allowing the fat to fall into the coals will not only cause hot flares, but the burning fat will leave an unpleasant flavor and color in the bacon.
Under the water pan is a shallow tray filled with lava rocks. It is made of stainless steel and perforated with big half-inch-diameter holes to let the flames from the burner through. It sits on a heavy steel rack holding it above the burner. When the lava rocks heat up, wood chips soaked in water are scattered upon them and smolder slowly, releasing their flavor.
Below the lava rocks, of course, is a bronze burner to provide heat.
I usually light the smoker about a half an hour before I'm ready to put in the meat. This gives the water and the lava rocks time to heat up. That way, I can load the meat in, throw on a handful of chips to start the smoke, and close the door.
Once the bacon is in the smoker and the smoke has started, keep the temperature inside the smoker at about 225 to 270 degrees F. The idea is to slowly cook the bacon without rendering out very much of the fat (a small amount will "sweat out" during the smoking process, but you will be surprised at how little it is!)
Keep an eye on the vents and when the smoke slows down, add more chips to keep a constant flow of smoke. You'll want to keep a small bucket of water handy with a handful or two of chips soaking so they are wet and ready when they need to be added to the lava rocks.Smoke the bacon for about three hours. You'll know it's done when the skin has softened and pulled back from the edges of the meat and the bacon feels firm when pressed. The color should be a rich deep golden brown.
 Remove the bacon from the smoker and place on a wire rack over some absorbent paper to cool. When the bacon is at room temperature, wrap it tightly in butcher's paper, plastic, or aluminum foil and refrigerate until completely chilled. This will "set" the juices in the lean parts of the bacon and firm up the fat, making the bacon much easier to slice for frying.
Remember also that after smoking, the bacon is fully cooked. That means you can enjoy it like Russian bacon, thinly sliced cold without additional cooking. A friend of mine once said: "Uncooked hot-smoked bacon is one of the great decadences." I agree.
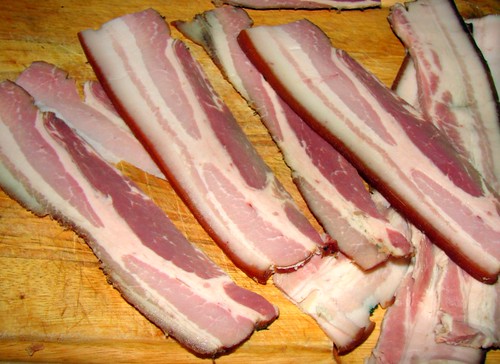 This moment is what makes it all worthwhile: Beautifully cured, perfectly smoked bacon, sliced and ready to fry or to just eat with some good black rye bread and sliced onion.
Useful Link:
Morton Salt's Meat Curing page - tons of great information about home meat cures and Morton curing products.
One last thing...

Remember those rib bones that were on the belly as it cured? Just before slicing the bacon, run a sharp knife under the bones and remove them from the bacon slab. Briefly fry, broil, or barbecue them and serve them just the way they are. Delicious, bacon-flavored spare ribs! Don't think of them as a by-product, think of them as an extra-special bonus treat.
.
23 comments:
That's some nice looking bacon! Have you ever tried making "buckboard bacon", which is made from a pork butt rather than belly? Different but very good.
Check it out here on my blog: http://texascookin.blogspot.com/2009/02/buckboard-bacon-at-home.html
I tried your wet cure method with some pork belly from a feral hog (nice fat 2 year old sow). Turned out nice but a bit too salty. Should have taken into account the slab being thinner than that of a domestic hog. Definitely worth the (not much)effort and will try it again. Thanks--nice website.
Looks great! I just started a couple batches of bacon too. A maple-cured style and a savory style with bay leaf, garlic and black pepper. Check it out at www.pickledpig.wordpress.com
John said...
All the way from New Zealand, came across this recipe. Giving it a go with N.Z pork. See if it is any good in a week.
Cheers
did the dry cure,great taste but it was very salty aswell.rinced it of many times,rubed etc.Is there a better way to remove the excess salt,soaking or something
If you find the cure too salty, reduce the amount of salt in the cure.
Amazing! Thanks for sharing!
do you have to keep temp at a certain range for the dry cure, if so how do you get your fridge to do it mine varies so much.
I just put it in the fridge. If your refrigerator can't hold a constant temp, you might want to have it looked at.
Hy Dave I was wondering if a fish smoker would be ok for smoking the belly.
As long as there is adequate room for the bacon in the smoker I think it should be okay
Smoking the bacon now after the brine. Will et you know how it turns out. Thanks for sharing this!
Thanks for the easy-to-follow directions, with photos! I've got 4 pigs worth of bacon brining now, some wet some dry. Any advice on cold smoking? We are fish smoking officianados here on Haida Gwaii, pork is uncharted territory... Thanks again, great site.
For cold smoking, anonymous, I would do it in a similar manner to fish; out of the brine, allow it to dry in a cool place until a pellicle forms, and then smoke. It's not too different.
Bacon cannot be cured without some nitrite, as in tender quick. Celery powder privides an inkown ammount of nitrate (banned in commercial bacon) that cures the bacon. If you dry and cold smoke the bacon rather than cooking it with hot smoke and do not use a real curing agent it can be a fatal decision.
aI wrapped my honey/peppered/salted pork bellie very tightly in plastic wrap, placed them one on top the other with a stone to add weight to them (I did this cause this is how I treat my salmon when making gravlax - the weight is important, perhaps helping to draw out the moistuer? Anyway. I used a lot more honey than suggested, it was hard to get it to stick to the surface. Did anyone else have this problem? Can't wait til smokin' time! alsib
i have 5- 12lb bellies in fridge right now. i can't make enough as my son and my neighbors rob me blind on bacon! had to start ordering bellies by the case as my butcher doesn't make his own and it's they only way he will order it for me.....sucks to me!! hehe
What amount of pork is the reciepe for the wet brine for? I am using a boneless loin with belly and skin attached to make English style bacon.
Thanks for your time.
JasonU - You need enough brine to completely submerge the pork. What I usually do is make up the brine in however many half-gallon batches I need until I have enough to cover however much pork I'm curing.
Dave - I found your blog while looking for information about a
slab of cured bacon which I bought
at a Place called Stan's (off of Inst. 65) in Columbia Tn. The bacon was hanging on a rack with a bunch of other slabs without any refrigeration, well wraped in butcher paper inside a mesh cloth bag.
So I am wondering how long this type of bacon can be hung up without being refrigerated? Does
your cured bacon need to be refrigerated?
Thanks - Den Bob, Canal Fulton Ohio
Bacon cured with nitrates can hang for a short time because the nitrates, salt, and sugar in the cure inhibit bacterial growth. They don't stop it entirely, though, which is why it shouldn't be left out too long without refrigeration. It's usually fine for a few days, or even up to a week if you're hanging it in a cool, airy place while some of the moisture evaporates off.
Hi there,
Your bacon looks amazing. I have 2 lots of bacon to be done - one belly and 1 lot of already sliced "green bacon". Do you have any recommendations as to which cure would work the best for each type? I was thinking the dry cure for the belly and the wet for the sliced, because it would be easier to submerge it. Thanks.
We have been using the "wet" method for over a year now with excellent results. Remember to rinse your belly well after brining it, and S L O W smoke it. Otherwise you won't get that delicious color you are looking for.
Post a Comment