Sorry about being so late with this update - this step takes some time, and we were at it for about four hours today.

Before the pork loins can be put into the casings for aging, the casings have to be prepared. I use natural beef casings which are about 30 inches long, about 3½ inches in diameter, and closed on one end. They come packed in salt, so they have to be cleaned and refreshed before using. First, rinse any clinging salt from the casings under cool running water; then, put them into a pot of cold water to soak about half an hour.
To thoroughly clean the casings, hold the open end of the casing over the faucet and fill it carefully with water - but not so much that it blows up like a water balloon and bursts! Turn the casing inside out and wash it well in running water. You'll notice a long line of fat running from the open end to the closed end of the casing. Take a sharp paring knife and carefully remove the fat - be especially careful to do it without putting any holes in the casing. Each casing will be enough to cover one whole pork loin (well, two halves, since we cut all the loins in half for ease of handling before we salted them.) Oh, I should probably mention that they're pretty smelly. It doesn't mean that they're spoiled. That's just the way they are.
With all the casings cleaned and the fat removed, put them in a bowl with just enough water to keep them supple and moist. When they're refreshed and wet like this, they're very soft, flexible, and stretchable. You'll have very little problem getting the loins into the casings as long as you keep them wet until ready to use. Set them aside and turn your attention back to the loins.
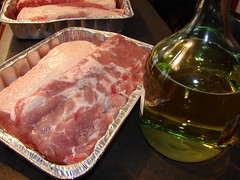
The pork loins have been sitting in salt and brine for two days, and the excess salt has to be removed before they can be aged. Put the loins into shallow aluminum pans and pour a cup or two of cheap white wine over them (the stuff they sell for six or seven bucks a gallon is perfect.) Bathe the loins well in the wine, wiping down the loins with the wine to be sure the salt is removed. After each couple of loins are cleaned, dump the salty wine down the drain and use fresh wine to clean the next pair.
With the casings prepped and the loins washed down, we're ready for the next step.

Sweet capicola is seasoned with coarsely-ground black pepper. Hot capicola is typically made with ground cayenne or hot red pepper. Other than the seasoning, the process is identical, so we'll go through the steps demonstrating sweet capicola.
Put the pork loin in a shallow pan and pour in some black pepper. Rub the pepper all over the pork, adding as much as you need to thoroughly and evenly cover the meat. Make sure you coat the cut ends as well.
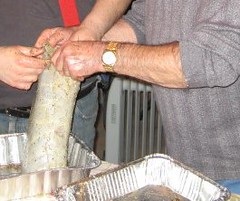
Putting the loins into the casings is easier with a helper. One of you can hold the end of the casing open while the other sort of squeezes the meat into a round shape and fits it into the opening. Carefully pull the casing over the meat (although the casing will stretch, it will tear if you're too rough with it, and the goal is not to have any large holes or rips - the pork should be completely enclosed. When the first loin half goes all the way to the bottom of the casing, use butcher's string or a hog ring to close off the casing just above the end of the meat inside. Then, an inch above that, tie it off again and use a pair of kitchen shears to cut between the ties. The empty part of the casing will now have a closed bottom, and you can put the next pork loin half into it. When that casing is stuffed as well, tie off the top and trim any excess casing (there may be as much as several inches excess.)
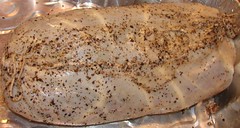
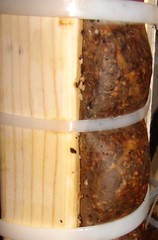
Once stuffed into the casing and tied at both ends, the capicola is ready for strapping and aging. It will look something like the one at right when you're done. It's kind of a messy process, and you shouldn't worry if you get some pepper on the outside of the capicola too.
At this point you're almost ready to start aging the capicola. Aging is a slow drying process during which the casing dries and stiffens and shrinks around the outside of the pork. Meanwhile, the pork loses much of its own moisture and transforms magically into dry aged ham. Compression helps the process along and greatly improves the texture of the finished product, which is very reminiscent of prosciutto. Traditionally, the compression is provided by tying the outside of the casing tightly with butcher's string. In Italy Michael Massa, the genteman who taught me how to make these, would put bamboo splints along the sides of the capicolas and tie them tightly with string. But string needs to be continually tightened and retied, and he always looked for an easier and more efficient way of doing it - and eventually he decided on using plastic cable ties, which could simply be pulled tighter every few days during the aging process.
Since I don't have ready access to bamboo, I use wooden splints instead. The loins average about 14 inches long each, so I start by cutting a common 2 x 4 into 14-inch lengths (use a plain 2 x 4, not a pressure-treated one.) Then I rip each 14-inch lengths into ¼-inch thick slats.
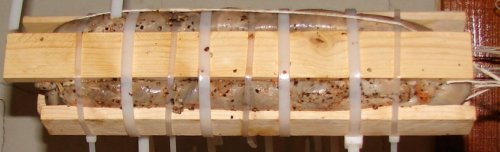
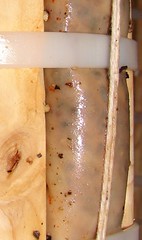
Enclose each capicola between four slats, and fasten the slats at each end with the long, wide 24-inch plastic cable ties. Once you have the end ones on, add a couple more between them, spacing them as evenly as possible. Pull them all as tightly as you possibly can to really squeeze the capicola - a pair of pliers is handy for that. You can then cut a few inches off the ends of the cable ties, but leave plenty of end sticking out - remember that as the weeks pass, you'll need to have enough "end" to grab onto with pliers and pull on to tighten the ties as the capicola shrinks. Once the large heavy ties are on and tight, I supplement them with the narrower, standard ties. Since the bulk of the compression is already done by the heavy ties, you can use shorter 14-inch ties between the big ones. When you're done strapping the capicola, it will look something like the picture above, and it is ready to hang to age.

To age the capicola properly, you need a cold, dry place to hang them. A cold attic is ideal. Tie butcher's string in a loop around the capicola from end to end, and leave plenty of loose string on the top. Use that loose string to hang the capicola from a bar or rod in your aging location (I have a closet in the center of my attic that is ideal.) Make sure you spread newspapers or put pans under the capicola when you hang it - under the compression, it will drip a little bit for at first.
And now, the waiting begins.
It takes 2 to 3 months for the capicola to age completely. A good guideline is generally to hang it in mid-January and cut it down on Easter weekend, but that's not always the right amount of time (it might be this year, though, because there's 90 days between now and Easter in 2009.)
We're done for now...periodically over the next three months we'll visit the capicola and tighten the cable ties and check the progress it's making. I'll post photos so you can follow along.
.

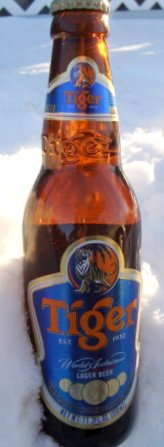 While at a party last week, I was looking for a beer and Tiger caught my eye - must have been the cool 1930's-style font on the label and embossed above the shoulder of the bottle, I'm a sucker for prewar graphic design.