
A few years ago, my brother-in-law's father taught me how to make home-cured capicola. Made from whole pork loins, it's cured briefly with salt, then seasoned and allowed to hang and age for about 60 days.
Winter is the perfect time to do this, because a cold attic is ideal for hanging the capicola (I have a small closet in the center of my attic that I use specifically for hanging and aging meats.) And so, every January, I get together with family and friends and a case of pork loins.
Today's post will show the first steps. As time goes on, I'll show the rest of the process as we go through. It's fairly straightforward - and I'll include a materials list now so if you want to try your hand at it, you can buy the stuff and make your own along with me.
Most of the actual activity takes place this first week. You'll need:
 2 whole pork loins
Kosher salt or sea salt
A gallon jug of cheap white wine
Coarsely ground black pepper
Hot paprika or cayenne pepper
Sausage casings - you'll need beef middles, about 3 inches in diameter
Wooden slats, about 14 inches long (these can be ripped on a table saw from a 1-inch thick pine board)
Long plastic wire ties (heavy 12-inch ones are best.)
Cotton butcher's twine
For today, all you'll need is the pork loins and the salt, but in a couple of days you'll need the rest.
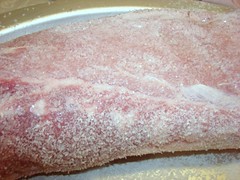 Start by cutting each of the pork loins in half and removing the plastic. You'll now have four shorter loin pieces. Coat each of these pieces with salt so they are completely covered. It doesn't have to be a thick crust, but there should be a good, even coating on all surfaces. The picture on the right shows about what it should look like. You'll need about a pound of salt to effectively coat all four chunks of pork.
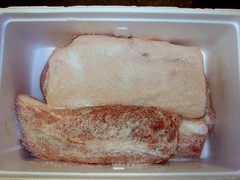
Now put the salted pork loins into a non-reactive container to cure for about 48 hours. A cheap Styrofoam cooler or a plastic cooler with a food-grade white plastic lining is great. Put the loins into the cooler, sprinkle in additional salt if your fingers have rubbed any spots bare, and then close the cooler and leave it in a cold but not freezing spot for two days. If you have room in your refrigerator, you can put the cooler in there. If not, you can leave the container on a cold enclosed porch, in your cold attic, or in the cellar on the bulkhead stairs where it usually stays cold in winter.
 Okay, so our pork loins are safely salted and stashed in a cold place. We're done for today. Tomorrow, we'll take a peek inside the cooler and see what's going on.
TOMORROW:
Checking the pork loins and turning them to ensure an even cure.
SUNDAY:
We prepare the cured loins for aging into capicola.
.
8 comments:
What is elastic netting or casing and where do you buy it? I see some on line and they have 3" 3.5" 4" ...
Which one works for copocolla?
Thanks
Anonymous: I buy elastic netting at http://www.sausagemaker.com
The #16 size is perfect for capicola.
How do you get a head or neck out of a loin.....
I know, I know "parts is parts", but when the name is for a specific part, fingers aren't eyeballs...
The name coppa is Italian for nape, while capicola comes from capo—head and collo—neck of a pig. The Neapolitan Italian spelling, "'Capocollo'", is derived from Latin, "caput collum". It is similar to the more widely known cured ham, Prosciutto, because they are both pork-derived cold-cuts that are used in similar dishes. However, the technical definition of ham is the thigh and buttocks of a pig (or boar) slaughtered for meat, whereas Capicola is solely meat from the shoulder or neck.
In Italy, where my in-laws raised a pig every year, they did use the collar of the animal to make capicola. When they immigrated to the States, they were no longer able to raise their own pig and had to rely on commercially available cuts of pork. They (and many other Italian immigrants) found that the loin was well suited to the method, and they've been doing it that way ever since. But thanks anyway for the history and etymology lesson, anonymous.
Hi Dave, I am trying to get the rest of the steps for making your capicola- I have the first page telling me what to day on day 1- I'm having trouble getting the rest of the steps required to complete the process. I was recently in Nova Scotia, Canada and one of the restaurants there put a recipe out using the capicola- I called around trying to find where I could buy it to no avail.They all knew what it was but no one could tell me where I could buy it- a friend reccommended your site and here I am. I also am from Ct and no one here has a clue. Help !!!!! I really enjoy your site and most of your recipes are fantastic. Thanx
Carol - send me an email through the "Contact Me" form and I'll help you out.
Hi Dave, I made capicola for the first time this year. Your website was very useful. I am now to the point of freezing or aging the capicola in olive oil. I have read that in order to keep the spices on, if aging in olive oil, you should keep the casing on. Do you think this would apply to the "socks" you buy at the butcher shop or only to actual sausage casings? have you aged any with the socks and elastic still on?
Thanks
Tim
I've never put the capicola up for storage with the casing still on. I'd be interested in hearing how it goes for you.
Post a Comment