Showing posts with label slow food. Show all posts

11 March, 2009

Capicola Update - Readers Share Their Methods

When I first wrote about making capicola using the method Mike and Nina Massa taught me, I had no idea how much interest it would stir. I've received quite a few emails and blog comments, and I'd like to share them with you today.


Lou M in New Jersey wrote:

For 60 years, my father-in-law made his own meats. He always made them the same way they made them back in Italy when he was a kid. They killed the pig, and used every scrap of it. They made head cheese, blood pudding, fried skin, pickled pigs feet, and even made deviled ham out of the scraps. And they also made all the good stuff, like capicola, sausage, pepperoni, bacon, ribs, sopressata, etc.

My father-in-law just passed away a couple months ago. Fortunately, before he went, I recorded him making the meats, so as to assure the tradition would not be lost to history. So this year, we made the meats in his honor, albeit a scaled down version. Since my mother-in-law is still around, she knew how it was done, so it didn't come out half bad.

The one step we do different than you is to smoke the meats. . . I admit, smoking is half art and half science, and I still haven't mastered is as well as my father-in-law, but I'm getting better.

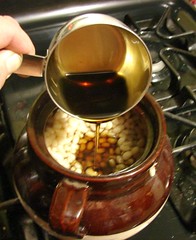
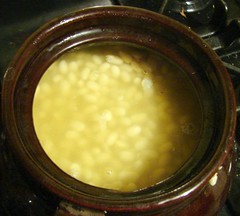
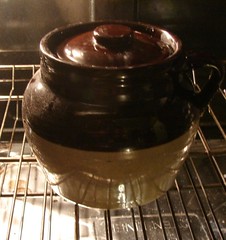
I salt the loins, put them in a clean covered crock and leave them in my cool enclosed porch for about 6 days. Then I pour wine over them, and leave them to soak for another day. Then I roll them in coarse pepper, shove them in the casings, put them in elastic netting, tie them up for good measure, and put them in the smoke house the same day. I also roll a couple in cayenne pepper for hot capicola. I don't use slats, although my father-in-law said he used to do it that way a long time ago. Between the strings and the netting, they keep their shape well enough. The problem with the slats is that you have to be careful that the meat immediately right behind the slats may not dry out well enough.

I have a barbecue grill with the legs cut off at the bottom of the smoke house. I put about a dozen charcoal briquettes, a little kindling and a couple logs in there. The idea is you don't want a lot of smoke, just a little bit. And you want just a little heat; enough so the meats won't freeze. I light the fire and put the meats in first thing in the morning, then I add a little more wood every few hours. No roaring fire, hot coals are better. At night time I bring the meats back inside the porch so they don't freeze. Otherwise I'd have to get up in the middle of the night to stoke the fire. I remember my father-in-law said if it's not going to freeze during the night, he'll just throw some more briquettes on the fire and leave the meats in there over night.

I smoke them for about three days, then cure them for about three months in my porch. My father-in-law used to cure them in his basement. He said that back in Italy they just had them hanging in the kitchen. I don't think that would work in a hot American house.

It takes some experimenting to get it right. If you have too much smoke, it ends up tasting like Lebanon bologna. And if there's too much heat, they dry up too much. But when it's done right, you'll think you died and went to Heaven when you eat them.


Another trick Lou shared was an easier way of getting the pork into the casings: He stretches the casings over a PVC tube, then slides the meat through the tube and into the casing. Mike had done much the same thing one year, using a 2-liter soda bottle with the ends cut off.

When Nina heard about Lou's method of smoking the capicola before aging it, she was horrified! "Smoke! That's not how you make capicola!" she said. But if there's one thing I've learned about chaucuterie over the past few years, it's that there is always more ways than one to make meat. Next season, you can bet that my smokehouse is going to have a few capicola hanging in it.


A few days ago, Tony in Ontario left a comment on the Seasoning and Casing The Pork blog entry:

My Father, as far as I can remember back never made anything but sausages. You know sausage is made one way and capicola a complete different way.

Ok, So as I got older I decided to take on the sausage as well with my Brothers and Sister. This is fine and is working out to this day. I tried a capicola long time ago, lets say I was the only one who seen the beauty in that. Was almost sure that I was the only one eating it also. . . that was then and this is now. With some guidance from a couple of close friends, and your website I too took on the challenge.
Tony is using pork butts for his capicola, but the process he's using is pretty much the same.


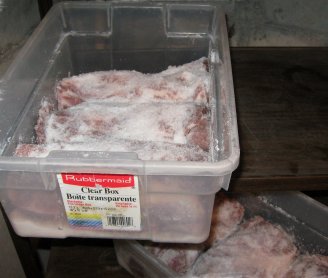
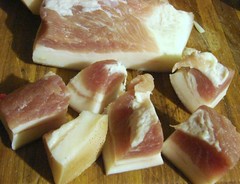
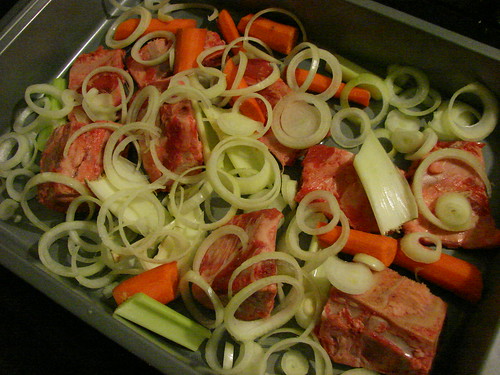
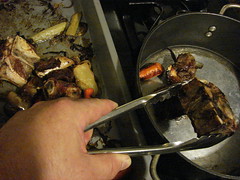
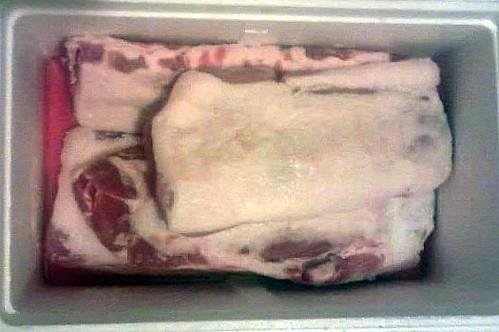
Above left: Tony and his friend Byron prepare the pork butts for salting. Above right: The salted pork is set aside in tubs for the initial cure.

In my original post, I noted that even though the casing is fairly tough and will stretch quite a bit as they're stuffed, they can still tear if you aren't careful. For small holes, Mike would take a small scrap of casing left over from trimming the excess and tuck it behind the hole like patching an inner tube. As the capicola ages and the casing shrinks, the hole is sealed up pretty well.

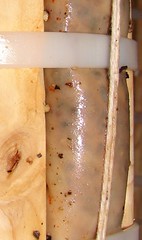
Tony found a different way to deal with holes, including the natural hole found on the side of the casing near the open end. He just took a needle and thread and stitched them up - a great idea that is so obvious that I slapped myself for not thinking of it on my own:

Now when somethng happens or you need to close that little hole towards the top of the casing. I used a needle and thread and sewed them up, It worked great. By now you've became very familar with them so this shouldn't be too gross now...lol.

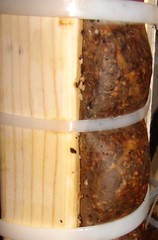
Tony also came up with a cool way to hang his cappy without having to worry about the butcher's string coming loose as the capicola shrinks - notice the nails sticking out of the top of the slats? Good idea. (For mine, I took my friend Roger's advice and drilled holes in the slats, then made wire hangers from old coathangers to suspend the capicola.)


Thank you to everyone who has emailed or left a comment for me here in the Cupboard. If you're making your own capicola this season - or any other kind of preserved meat, for that matter - I'd love to hear from you, too. My email address is in my profile, and feel free to include photos if you want - Gmail is pretty generous with attachments.

To Lou and Tony, my thanks for your permission to reprint your pictures and emails.

.

03 February, 2009

New England Baked Beans

Baked beans were a staple at my house when we were growing up. My mother never failed to have a couple of cans of B&M Baked Beans in the cupboard. They were cheap and easy, and they were, I have to admit, pretty good. It wasn't until I was in my 20's and out on my own that I tried to make my very own homemade baked beans. I'm glad I did - making beans is easy and, while not as inexpensive as buying a can at the supermarket - a lot better tasting.

You can make baked beans in a crock pot, but they really do come out better in a genuine beanpot. The design of the pot, with the wide shoulder and narrow mouth, is designed to limit the amount of moisture that escapes as the beans cook, holding them at the perfect temperature and humidity as they bake. Luckily, it's common to find bean pots in excellent condition at yard sales, church rummage sales, and estate sales for a very reasonable price - I've never paid more than $8.00 for any of mine, and most of the time they're $5 or under - and in excellent condition (check the pot out carefully before you buy it and don't buy one with any cracks or without a lid.)

My recipe, which follows, is one I have developed over the past 20 years. It calls for maple syrup as the sweetener, which makes it easy to get the flavor just right. You can substitute brown sugar, sugar and mollasses, or -- ::shudder:: -- corn syrup if you like.

Dave's New England Baked Beans
Makes about 2 quarts.

1 pound dry Navy or white pea beans
Water
1 medium onion, coarsely chopped
2 tsp dry mustard
1 tsp powdered ginger
1 dash of salt
1 dash of HOT Hungarian paprika or cayenne pepper (optional)
1/4 pound of lean salt pork brisket
10 to 12 ounces of maple syrup

Rinse and pick through the beans; cover deeply with plenty of water and bring to a full rolling boil. Boil hard for 1 minutes, the remove from the heat to set aside for 1 hour. This "quick soak" eliminates the need to allow the beans to soak overnight in water.

While the beans are soaking, prepare the bean pot. Chop the onions and put them on the bottom of the pot. Add the mustard, ginger, dash of salt, and optional dash of hot pepper. Cut the salt pork into chunks and add that to the pot as well.


After the beans have soaked for an hour, you'll notice that they're bigger and plumper-looking than they were before. They're still not ready to bake, though. First, they must be boiled yet again. Bring them quickly to a boil over high heat, then turn the heat down to a simmer and cook them for 10 - 15 minutes. You'll know that they're ready when you can take a spoonful of them from the pot, blow on them, and the skins will split and curl away.


Preheat the oven to 300 F. Drain the beans but reserve the hot water, and put the beans into the pot on top of the other ingredients. It's not necessary to stir.


Pour in a cup (8 ounces) of maple syrup into the pot, followed by a cup of the reserved hot water. Then, pour another 2 to 4 ounces of syrup in and follow that with enough additional reserved hot water to just cover the beans a little. The more syrup you put in, the sweeter the beans will come out. I've found that ten ounces total of syrup is "just right" to my taste, and 12 ounces total makes it noticeably sweeter.


Put the lid on the bean pot and place into your 300 F oven for 30 minutes, then turn the oven down to 250 F and bake the beans for 8 to 12 hours. I like to put them in the oven on a Saturday night around 7 or 8 PM. By the time I'm getting up on Sunday morning, the whole house smells like delicious baked beans, and I'll have a serving of them with breakfast.

23 January, 2009

Making Capicola Update: Mold

It's been two weeks since we hung the capicola up to age in the cold attic. I've already had to tighten the cable ties that bind them three times - the meat has shrunk by almost an inch in circumference, and the process is continuing nicely. Some changes we're looking for now as the aging goes along:
  • The meat is done dripping. If you have pans or newspapers under your capicola, you can remove them.
  • The casing's outer surface will no longer be tacky. It should feel cool, firm, and supple, and be almost - but not quite - transparent. You'll be able to see the dark red areas of meat and the creamy ivory areas of fat that were part of the pork loin.
  • With the casing dry, the small bits of peppercorns that were clinging to the outside will be falling off if they aren't all gone already. Usually, handling the capicola to pull the straps tight knocks most of the peppercorns off by the end of the first month.
  • A fine white mold will start to develop on the outside of the casing. It will first appear as tiny white spots, and you might mistake it for dried-out casing, but it will spread to larger patches. This mold may or may not end up covering the exposed areas of the casing. If you're making capicola "with me" and you're noticing this mold: RELAX. It's not harmful - in fact, it's expected. Slight variations in this mold are what give aged sausages their distinctive flavors, and why the capicola I'm aging in my attic will be subtly different than the ones my brother-in-law is hanging in his wine cellar.
.

15 January, 2009

Making Capicola Update - Visiting the Capicola

It's been four days since the pork loins were seasoned, cased, and hung in the attic to begin their journey toward becoming capicola. It's time to check on them and see how they're doing.

On the left is what the capicola looked like when we first hung them: the casing was opaque and very pale, and the salted pork loin was quite yielding to the touch. The outside of the casings always picks up some of the seasonings when you're stuffing them, so you can see little bits of the pepper clinging to the outside.

Although the capicola has only been hanging for a few days, the appearance has already changed. The difference is quite dramatic at this phase - from now on the changes will be much more subtle and hard to distinguish. Take a look at the picture on the left and you can see the difference: The casing has begun to dry and is now more transparent. Lean and fat areas of the pork inside can be clearly seen, and so can the pepper covering the surface of the meat. The meat is taking on a rich, chestnut brown color which will deepen and become more mellow over time. The casing is just slightly tacky to the touch, especially on the bottom bits from which meat juices had been dripping. The capicola feels more rigid when pressed - although it yields a bit, the meat has actually become quite firm, and this will also continue as time goes on.

By this time, the capicola is no longer actively dripping, but it is still losing moisture via evaporation. Many of the plastic cable ties are loose and it's time to tighten any that need it, using a pair of pliers. As I tightened the straps, I noticed that some of them pulled tighter by almost half an inch!

Once the tightening is done, I close the closet door, turn out the lights, and return to the warmth of the living room and the bright fire of the pellet stove. For at least this first month, I'll be stopping in to check on the capicola every few days. It will be time for another photo update in three or four weeks.

.

Making Capicola - A Short Q&A Post

On another online forum, Jim Weller of Yellowknife NWT had some questions related to the preparation and aging of my capicola. He's given me permission to reprint the questions and answers here.

Q:
. . .the excess salt has to be removed before they can be aged. . .
a cup or two of cheap white wine over them (the stuff they sell
for six or seven bucks a gallon is perfect.) Bathe the loins well
in the wine, wiping down the loins with the wine to be sure the
salt is removed. After each couple of loins are cleaned, dump the
salty wine down the drain and use fresh wine to clean the next pair.
As even cheap wine here is $12 per 750 ml bottle, can the used wine not be retained for cooking purposes? Would a mild (diluted) vinegar work?

A: Personally, I would not retain the wine. The salt is pretty concentrated, and it becomes fouled with pork blood that has been drawn out of the meat by the salt. When I was pouring the used stuff down the drain, it was a milky pink in color and pretty disgusting.

That being said, however, a full gallon of wine was sufficient for us to wash 10 whole pork loins. You'll need vastly less to do a single loin, or even two loins - just a couple of cups.

I don't see any reason why a diluted vinegar wouldn't work. To tell the truth, the wine doesn't add any flavor to the finished product. I have a feeling Mike learned to use wine in the old country because they used wine for everything - and produced their own, actually.


Q:
To age the capicola properly, you need a cold, dry place to hang them. A cold attic is ideal. . . It takes 2 to 3 months for the capicola to age completely. A good guideline is generally to hang it in mid-January and cut it down on Easter weekend . . .
How cold does it get in Connecticut in January? How warm in early April? How well is your attic insulated? Is it heated indirectly through the floor boards and does your capicola ever freeze? And does that harm it?

In other words what is the temperature range inside your attic?

A: According to climate data from the Connecticut State Climate Center, the mean temperatures at the official weather station closest to me are:

January - 25.4 F / -3.7 C
February - 28.7 F / -1.8 C
March - 37.7 F / 3.1 C
April - 49.0 F / 9.4 C

This doesn't take into account the frequent cold snaps we have in January and February - for example, the outdoor temperature here for the past few days (12 January - 15 January) has been about 15 F ( -9.5 C) with nighttime temps even lower (single digits.)

My attic is a "semi-finished" walk-up. There is no heat up there or electricity save a couple of pull-chain light fixtures, but there are two rooms with closets and lathe-and-plaster walls. Parts of the attic under the eaves are walled off as crawlspaces and have some insulation, but I have no reason to believe that there is any insulation between the ceilings in the attic rooms and the roof sheathing. It is heated only indirectly through the floorboards, and a bit up the stairway (but I keep the door closed.) It is generally cold enough up there to see your breath but not cold enough to freeze anything. Last night when I was up there tightening the straps on the cappie, I brought a thermometer up with me and it showed the temp to be about 36 F.

Even though the outside temperature will be on the rise over the coming months, my attic maintains a cool temperature until daytime temperatures start creeping over 60 F. Then, of course, in the summer it becomes unbearable up there, even with windows open. By that time, however, there aren't any more capicolas hanging. (And that's the reason why I've never tried making my own prosciutto - I don't have a spot that remains at the proper temperature for the 18 to 24 months that a proper prosciutto would take to age.)

.

12 January, 2009

How to Make Awesome Beef Stock

Good, flavorful stock is the foundation for so many wonderful things in the kitchen - gravies, soups, sauces - and can add rich, marvelous flavor to other things, like vegetables, as well. Although it can take some time to make, it's easy. If you're going to be home on a Sunday afternoon in January anyway, you might as well use the time to make a batch of beef stock. Then you'll not only be ready to make delicious French onion soup, but the kitchen will smell heavenly, too.

Start with a large, shallow roasting pan. Drizzle a small amount of olive oil onto the bottom of the pan. Add a couple of pounds of beef bones. Chop up some carrots, a few celery ribs, and a couple of onions and add them to the pan, too. Optionally, you can add a few quartered tomatoes and one or two sweet red peppers. Toss the ingredients around to coat them a bit in the oil, and then put them in the oven at 350 F to roast.

It'll take a couple of hours, but don't be in too much of a hurry. The secret to the flavor of a good stock is in the deep brown caramelization of the meat and veggies in the pan. Let heat and time work their magic, and don't try to rush things. Every half hour or so, pull the pan out and stir things around, turning them and flipping them so they brown evenly. Eventually, you'll see that everything is done.

Remove the nicely-browned bones and vegetables to a Dutch oven or stock pot. Add water to the pan and deglaze it thoroughly, then pour it off into the stock pot with enough additional water to cover the bones and veggies. Bring the pot to a simmer, and add a few peppercorns (whole or crushed as you desire,) a bay leaf or two, some parsley, and a bit of thyme. Cover the pot and let it cook.

In about an hour, you should start to smell the wonderful aroma of simmering stock. Check on the liquid level in the pot and add water now and again as needed.

In about four hours or so, any meat tidbits will be falling off the bone and the stock will be ready. Strain out the veggies, bones, and meat bits, and season to taste with salt, Vegeta, Maggi seasoning, or whatever secret ingredient your grandmother used to tell you about. You can skim the fat off the top of the stock now, but it will be easier if you chill it overnight - then you can just lift the solidified fat effortlessly from the top of the stock. (Leave a little bit of fat behind, though, for best flavor.)

There you have it - awesome homemade beef stock. An afternoon well-spent.
.

10 January, 2009

Making Capicola Update - Checking on the Pork Loin

It's Day Two for our future capicola, and time to take a look in the cooler and check on the pork.

It's still covered in salt, though the sparkly graininess is mostly gone. The salt has drawn quite a bit of moisture out of the meat, as you can see by looking at the brine on the bottom of the cooler.

We'll rotate the loins from top to bottom and turn them a bit to be sure they all have some exposure in the brine, and then cover them up again until tomorrow. By then, they'll be ready to rinse, season, and put into casings for the aging process.

TOMORROW:
Aging starts.

.