
Three months ago, I settled four whole boneless pork loins into a bed of salt, starting them on a journey to become capicola ham as made by my brother-in-law's parents, Mike and Nina Massa. After a two-day salt cure, the pork was rolled in cracked black pepper, stuffed into beef bung casings, strapped tightly with wood slats, and hung to age in my cold, dry attic. For the past week, I've gone back to checking on them every two or three days, sniffing them to check for spoilage, and squeezing them to feel for moisture content. When they're ready to open, they're very firm (but not hard) and slightly yielding. Over the weekend, I decided that it was just about time to open them up.
Today, we took the capicolas down from the attic to the kitchen.
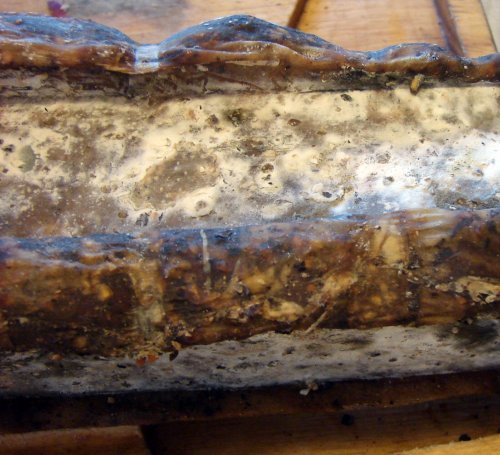 My friend Roger joined me - this has been a shared effort right along - and we started off by cutting the plastic cable ties off of the capicolas, then prying loose the wooden slats. Capicola right out of the splints is an ugly looking thing. The wood hides a bloom of mold which ranges in color from white to blue to green. It's better than harmless - it's actually beneficial and helps develop the flavor of the capicola - but damn, it's hideous.
The next step is removing the casing. This is best done by slipping a knife between the casing and the meat and using the blade to help loosen the casing from the capicola underneath. Once it's loose, it can be peeled off. It will have the stiff feel of rawhide.
Sometimes, when you take the casing off, you'll find more mold underneath. We did, on a few of our cappies. This is caused by trapped air that didn't get sufficiently bled off when we were packing the casings (even though I pricked the casings with a needle as needed, we missed enough of the air that we did get some mold.) Again, this isn't really a problem, as long as the mold is gren, blue, or white (red mold indicates genuinely toxic spoilage.) For the pieces with inside mold, we scrubbed them clean under cool running water.
 Once the capicola were peeled, we gave them another bath in white wine to prepare them for packaging. Using a heavy Chinese chef's knife, we cut each capicola into four more-or-less equal portions and sealed each portion into it's own little cryovac pouch with the vacuum packager.
It's my experience that, left unopened in the cryovac, the capicola chunks will be safe to eat for about a year, perhaps more. I plan to put most of my packages in the freezer just to be sure.
Today, we took the capicolas down from the attic to the kitchen.
My friend Roger joined me - this has been a shared effort right along - and we started off by cutting the plastic cable ties off of the capicolas, then prying loose the wooden slats. Capicola right out of the splints is an ugly looking thing. The wood hides a bloom of mold which ranges in color from white to blue to green. It's better than harmless - it's actually beneficial and helps develop the flavor of the capicola - but damn, it's hideous.The next step is removing the casing. This is best done by slipping a knife between the casing and the meat and using the blade to help loosen the casing from the capicola underneath. Once it's loose, it can be peeled off. It will have the stiff feel of rawhide.
Sometimes, when you take the casing off, you'll find more mold underneath. We did, on a few of our cappies. This is caused by trapped air that didn't get sufficiently bled off when we were packing the casings (even though I pricked the casings with a needle as needed, we missed enough of the air that we did get some mold.) Again, this isn't really a problem, as long as the mold is gren, blue, or white (red mold indicates genuinely toxic spoilage.) For the pieces with inside mold, we scrubbed them clean under cool running water.
Once the capicola were peeled, we gave them another bath in white wine to prepare them for packaging. Using a heavy Chinese chef's knife, we cut each capicola into four more-or-less equal portions and sealed each portion into it's own little cryovac pouch with the vacuum packager.It's my experience that, left unopened in the cryovac, the capicola chunks will be safe to eat for about a year, perhaps more. I plan to put most of my packages in the freezer just to be sure.
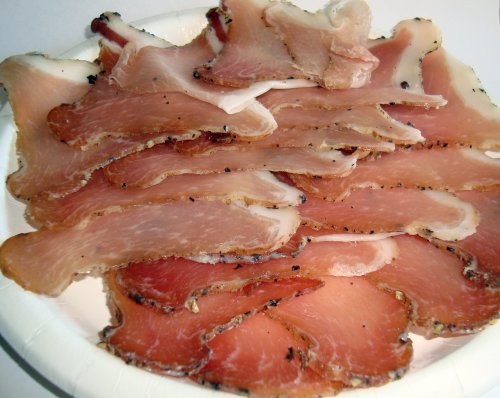 And, of course, we broke out the slicer and slivered one of the chunks so we could enjoy the fruits of our labor and our patience. The meat is a translucent dark rose color, tending to mahogany near the ends of the loins where the diameter was thinner and more moisture evaporated out, and the fat is creamy white and melts in your mouth. The capicola has an earthy, nut-like aroma and a rich, deep meaty flavor. The taste and texture is very similar to a Parma ham.
Success!
.
5 comments:
Oh my that looks so delicious. Save some for when I come home?
Very cool! Thanks for this "series", it was a lot of fun to see how capicola gets made.
Your capicola looks fabulous!! I'm sitting here eating a bowl of cheerios for breakfast and thinking how wonderful your capicola would be with some fresh Italian bread and sliced tomatoes. Dang it Dave!!!
Can anyone find an post a specific recipe for this with a list of ingredients and like step by step how I should cook it I wanna make it spicy
my name is my gmail
You would have laughed if you had seen the look on my face for the first photo, my first thought *is this guy nuts?* LOL
The second photo... incredible, i have never seen a more beautiful capicola. Great job!!!
Post a Comment