
Sorry about being so late with this update - this step takes some time, and we were at it for about four hours today.
 Before the pork loins can be put into the casings for aging, the casings have to be prepared. I use natural beef casings which are about 30 inches long, about 3½ inches in diameter, and closed on one end. They come packed in salt, so they have to be cleaned and refreshed before using. First, rinse any clinging salt from the casings under cool running water; then, put them into a pot of cold water to soak about half an hour.
To thoroughly clean the casings, hold the open end of the casing over the faucet and fill it carefully with water - but not so much that it blows up like a water balloon and bursts! Turn the casing inside out and wash it well in running water. You'll notice a long line of fat running from the open end to the closed end of the casing. Take a sharp paring knife and carefully remove the fat - be especially careful to do it without putting any holes in the casing. Each casing will be enough to cover one whole pork loin (well, two halves, since we cut all the loins in half for ease of handling before we salted them.) Oh, I should probably mention that they're pretty smelly. It doesn't mean that they're spoiled. That's just the way they are.
With all the casings cleaned and the fat removed, put them in a bowl with just enough water to keep them supple and moist. When they're refreshed and wet like this, they're very soft, flexible, and stretchable. You'll have very little problem getting the loins into the casings as long as you keep them wet until ready to use. Set them aside and turn your attention back to the loins.
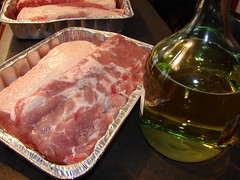 The pork loins have been sitting in salt and brine for two days, and the excess salt has to be removed before they can be aged. Put the loins into shallow aluminum pans and pour a cup or two of cheap white wine over them (the stuff they sell for six or seven bucks a gallon is perfect.) Bathe the loins well in the wine, wiping down the loins with the wine to be sure the salt is removed. After each couple of loins are cleaned, dump the salty wine down the drain and use fresh wine to clean the next pair.
With the casings prepped and the loins washed down, we're ready for the next step.
 Sweet capicola is seasoned with coarsely-ground black pepper. Hot capicola is typically made with ground cayenne or hot red pepper. Other than the seasoning, the process is identical, so we'll go through the steps demonstrating sweet capicola.
Put the pork loin in a shallow pan and pour in some black pepper. Rub the pepper all over the pork, adding as much as you need to thoroughly and evenly cover the meat. Make sure you coat the cut ends as well.
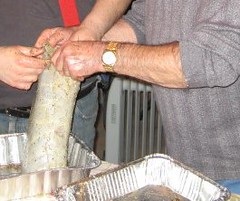 Putting the loins into the casings is easier with a helper. One of you can hold the end of the casing open while the other sort of squeezes the meat into a round shape and fits it into the opening. Carefully pull the casing over the meat (although the casing will stretch, it will tear if you're too rough with it, and the goal is not to have any large holes or rips - the pork should be completely enclosed. When the first loin half goes all the way to the bottom of the casing, use butcher's string or a hog ring to close off the casing just above the end of the meat inside. Then, an inch above that, tie it off again and use a pair of kitchen shears to cut between the ties. The empty part of the casing will now have a closed bottom, and you can put the next pork loin half into it. When that casing is stuffed as well, tie off the top and trim any excess casing (there may be as much as several inches excess.)
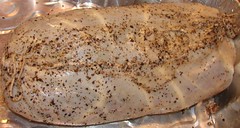 Once stuffed into the casing and tied at both ends, the capicola is ready for strapping and aging. It will look something like the one at right when you're done. It's kind of a messy process, and you shouldn't worry if you get some pepper on the outside of the capicola too.
At this point you're almost ready to start aging the capicola. Aging is a slow drying process during which the casing dries and stiffens and shrinks around the outside of the pork. Meanwhile, the pork loses much of its own moisture and transforms magically into dry aged ham. Compression helps the process along and greatly improves the texture of the finished product, which is very reminiscent of prosciutto. Traditionally, the compression is provided by tying the outside of the casing tightly with butcher's string. In Italy Michael Massa, the genteman who taught me how to make these, would put bamboo splints along the sides of the capicolas and tie them tightly with string. But string needs to be continually tightened and retied, and he always looked for an easier and more efficient way of doing it - and eventually he decided on using plastic cable ties, which could simply be pulled tighter every few days during the aging process.
Since I don't have ready access to bamboo, I use wooden splints instead. The loins average about 14 inches long each, so I start by cutting a common 2 x 4 into 14-inch lengths (use a plain 2 x 4, not a pressure-treated one.) Then I rip each 14-inch lengths into ¼-inch thick slats.
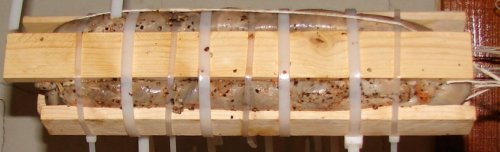 Enclose each capicola between four slats, and fasten the slats at each end with the long, wide 24-inch plastic cable ties. Once you have the end ones on, add a couple more between them, spacing them as evenly as possible. Pull them all as tightly as you possibly can to really squeeze the capicola - a pair of pliers is handy for that. You can then cut a few inches off the ends of the cable ties, but leave plenty of end sticking out - remember that as the weeks pass, you'll need to have enough "end" to grab onto with pliers and pull on to tighten the ties as the capicola shrinks. Once the large heavy ties are on and tight, I supplement them with the narrower, standard ties. Since the bulk of the compression is already done by the heavy ties, you can use shorter 14-inch ties between the big ones. When you're done strapping the capicola, it will look something like the picture above, and it is ready to hang to age.
 To age the capicola properly, you need a cold, dry place to hang them. A cold attic is ideal. Tie butcher's string in a loop around the capicola from end to end, and leave plenty of loose string on the top. Use that loose string to hang the capicola from a bar or rod in your aging location (I have a closet in the center of my attic that is ideal.) Make sure you spread newspapers or put pans under the capicola when you hang it - under the compression, it will drip a little bit for at first.
And now, the waiting begins.
It takes 2 to 3 months for the capicola to age completely. A good guideline is generally to hang it in mid-January and cut it down on Easter weekend, but that's not always the right amount of time (it might be this year, though, because there's 90 days between now and Easter in 2009.)
We're done for now...periodically over the next three months we'll visit the capicola and tighten the cable ties and check the progress it's making. I'll post photos so you can follow along.
.
31 comments:
Just wondering about the wine. Is this to add flavor or is it necessary for the curing process? My late father-in-law just to make capicola, prociutto etc. but unfortunately nobody paid much attention to the process at the time. I seem to remember him rinsing his capicola with water before hanging them for a month "as is" for a month. He then pressed them by applying heavy weights for 48 hours before hanging again for another 2 or 3 months.
In any event, I enjoy reading your posts, and your "It's capicola time" post inspired hubby and me to give it a try. Where I live you can purchase 10 capicola for $99.00, the curing process started for you, with their instructions for completing the process the same as my father-in-law's process. Doing it yourself probably isn't any cheaper, but much more satisfying.
We'll will be watching for your capicola updates and following along.
Thanks
I don't think there's any real flavor benefit to rinsing them with wine, because I've never been able to taste the wine in the final product. Mike, the man who taught me his process, grew up in a small Italian village and they used to wash the pork with wine they made themselves. He doesn't make his own wine now that he lives in the US, but he still washes the pork loins down with wine, and so that's how I do it. He did mention that the wine would "clean the pork" better than water, so maybe there's a disinfect action going on there.
Can't wait to see how this turns out. Best of luck with it.
Hi Dave, We ran into a bit of trouble-the butcher sold us casings that are too narrow. We are leaving the loins in the cooler one more night to find the correct casings. We live in Monmouth County NJ. Any suggestions on where we might find the Beef Middles you suggested? A different Italian butcher said it would take him a few days to get them.
Thanks, Jennifer
There are a few places online where you can get them, but the problem is they'll take just as long to get as your local Italian butcher.
Pour off any brine that accumulates in the cooler to keep the pork from sitting in it and reabsorbing the salt. Keep the pork cold and it shouldn't go bad while you're finding the casings.
I'm sorry I'm not familiar with Monmouth County, but you might want to try a Google search for Italian and German butchers in your area to see if any of them have the casings in stock.
Greetings from Mike's son Nick, (the Italian guy who taught Dave the process). Mom (Mike's wife) says the casing is optional. You can make capicola without the casing as long as you keep it tied tight with the electrical ties. She also says the white wine helps to kill any bacteria and the alchohol in the wine helps with the curing process. My parents have been doing this for 75 years, so who am I to ask questions... ;)
Hello,
I would first like to say what a great site. It is, what gave me the finial courage to take on this venture. You see, my family has been making sausage for ever. Probably all the way back to my papoo days. My Father, as far as I can rember back never made any thing but sausages. You no sausage is made one way and capicola a coplete diffrent way.
Ok, So as I got older I decided to take on the sausage as well with my Brother's and Sister. This is fine and is working out to this day. I tried a capicola long time ago, lets say I was the only one who seen the beauty in that. Was almost sure that I was the only ony eating it also...lol. ok that was then and this is now. With some gidence from a couple of close friends, and your web site I too took on the challenge.
I do have a couple of questions,
1. The cuts of meat that I used where from the Butts. Out of 14 Butts I removed 6 capicola's. The ones you could see staring right out at you. Is this going to be a problem?
2. Will the curing time change?
3. Do I need to press them? I do have them wrapped with the electrical ties 5-6 on each, pulling them tight every so often. This reveled a nother issue. The air pockets that have been formed inbetween the slats. Do I poke these with a pin to release the air? The same as you would with supersata.
I did take some pictures If you wish to see them my address is agost@tbaytel.net.
I can say a little about my experiance with the casing. This part of the prosses is, in my opinion one of the hardest parts. sometimes you need help, sometimes you should be by your self..lol with a small glass of wine. I use the wine alot when making them, the moister the cut of meat and casing are the easer it is. I all so rolled it down wile streching the casing, as if you were putting on a childs sock all the down and slowly squeezing it over the cut of pork, If you have long finger nails it is a bonus. Buy holding the meat with your thumbs, use just your nails pull a little casing at a time pulling all the way up, once you are over the meat you can stick your hole arm in there and push it all the way to the all ready sealed end.
Some times I've ripped them and not used them. Well you all probably now this all ready. Now when somethng happens or you need to close that little hole towards the top of the casing. I used a needle and thread and sowed them up, It worked great. By now you've became very familuer with them so this shouldn't be to gross now...lol.
Thanks, best regards Tony
ps good luck to all
Tony:
My father-in-law always used the pork loins, but I don't think there would be a problem with using the butts. It shouldn't affect the curing time, either - by about 90 days, they should be ready.
I don't think they need to be pressed. Pulling the ties tight every so often provides the compression it needs.
When I was putting the pork into the casing, I noticed air bubbles inside as we were first tightening them. I poked all the air bubbles with a pin to bleed out the air as we went along. So: I think you have the right idea with taking the air out as you find it.
The first year I made these, I was really clumsy and ripped a couple of the casings. If the rips were small, I was told to just take a scrap piece of casing and use it as a patch, so that's what I did. It worked out OK. If you're running short of casings, you can try that method. Stitching up the natural hole near the top of the bung is a good idea!
Thanks for posting a comment!
ive been making suprasaut and cap for years and i can say your method is so much more easy, im trying your way this year and i had a little bit of confusion.. when making the salt brine how much salt do you use?? i put in about half a cup and sprinkled some more on top of the loin as well? do you have any idea how much to use? and do you rotate the loin once a day or not?
morelli242: The amount of salt is not exact. What I do is rub the loins all over with the salt and make sure they are very well-crusted with it, then lay the loins into a styrofoam cooler. With the pork in the cooler, I sprinkle on a little more salt to make everything covered (but not smothered in salt, if you know what I mean.) The brine comes from the salt drawing the liquid out of the pork. I turn the loins frequently throughout the time they have to be salted, but I don't add any additional salt once they are are laid in for salting.
Hi Mike we have been making capicolli for many years now. We normally use the part of the pork that is between the head and shoulder that's where capicollo name came from . We rub corse salt around the capicollo I also add some whole garlic and if you like some dried leaves of basil let salt for 24 hours in between you can turn the capicolli. Then we wash them dry with paper towels, then we mix sweet paprica and a bit of hotcrushed chillies. To compress the capicolli we have bought at the butcher elastic casing their about 2" wide these casings stay until ready to eat, they slowly shrink the capicolli as they dry up. Before the elastic casing we use the animal casing bought at the butcher, I wash the capicolli same as you do. Also we have bought at ( Nella cutlery.com) a tool to insert the casings to the capicolli. Its looks like a bullet made of heavy plastic it has a base about 7"x10" under the base their is a whole about 5" wide thats where the capicollo slides in the tube is about 17" high with a round tip about 4" high looks like the bullet tip that piece is removable. The round tip is to used to insert the casings (animal/elastic) to strech the animal casing sometimes I use warm water this allows the casing to strech. We slide the casing with the round tip on the the cylender part then we remove the round tip and slide capicollo from the lower whole to the top then slide casing and capicollo together use same method for elastic casing. tie well both end and cure for 5/6 months or more until hard when squeezed, then I remove the elastic casing and I seal them and keep refrigerated. You may also use a 5 or 6 " plastic pipe to insert casings its harder because their is no round tip. I hope this method helps someone.
Thanks for checking in and sharing your method. We're using the elastic casing this year, too. Figure it will be a lot easier than the slats.
Hi Dave, I live in Barlett,Ill.
This is my second season of making capicola,the process is the same as yours. But asking question to some old Italian about the process of curing the meat, I found that 24HR of salt curing is good,but i wash mine in water and winegar mix,also first time i used a rope like sock and it worked perfect,
i did used the shims last seaason
I found that as the meat cures you need to retie all of the capicola againg,the sock will shrink with the meat you have a great web sight,thank you .P.S. first time that i made a pancetta if you know what it is dry cured italian bacon can wait to see how it drys and taste,thanks again for the web sight.
Thanks for sharing your method, Anonymous. We're using the elastic netting so we don't have to keep tightening the splints. It's the first time we've tried it.
Hope your pancetta comes out good! I was going to start one this week myself, but the market was out of pork bellies, so it'll have to wait a bit.
Hi Dave
I followed your basic instructions on making the capicola, I used the pork loin, it was not as large as I would have liked. I did this at the beginning of December 2010 and ended up un the hospital after that, I came home on January 9,2011. I immediately checked the meat and it was as hard as a rock ,its only been 35 days. What am Idoing wrong? It was hanging in the basement at 58-60*. I appreciate if you would help me with this. Thanks in advance. Anthony
Anthony -
Have you checked the humidity in the basement where you had the capicola hanging? Winters are usually pretty dry and if the humidity level drops below about 70% or so the cappy can get really hard, fast.
Also, surface drying isn't always a bad thing. Give your capicola a good squeeze and see if there's any give at all to it.
Did you buy whole loins or whole tenderloins?
Hi Dave
I enjoyed reading your posts on
capicola making. I cant wait to try this out,I do have one question
does the salt have to be plain.
Or can any type be used ?
Thanks
Zmack77
@Zmack77 - Use sea salt or Kosher salt.
Hi Dave,
I so enjoyed reading your post. My friend Vincenzo just showed me how to make sopressata. I have 9 hanging in my basement at about 55 degrees. Do you think that is cold enough? Also, I want to make capicola. Your site is a great resource. I will use whole loins and cut them to size. Should they be cut into halves or thirds? Finally, I wasn't going to use casings. Is the butcher netting sufficient?
Thanks, Frank
Dave I used your recipe to make capicola. This is the first time I've tried this. My question is I'm trying it in a refrig. I have in my garage and I'm wondering if it will be alright doing it that way. Also will the curing time stay the same. Joe
@Frank - 55 degrees is fine. Just remember that if the temperature starts going up - like if we get a thaw - you might have to move them to a fridge until the cellar cools down again.
I buy the whole loins and cut them in half - that seems to be just the right size for curing and aging.
Putting the capicola in casings helps prevent it from drying out too much in the air. I've never done it any other way, so I really don't have much useful advice for you there.
@Joe - It should be OK in the fridge, I've done a few that way when my attic was too warm for aging. It may take a little less time in the fridge, so check it often.
Dave, Thanks. I was really worried about doing it that way. Now I'am relieved. I'll keep you posted on how it comes out. Thanks again Joe
Dave,
This is the first year we're trying capicola. I have it hanging in my garage, How long does it take for the mold to start showing up on the meat. And if I don't get any mold should I be worried??
Hi Dave,
Well, About 100 days later and the raw meat we hung is now delicious capicola. We tried using casing for all of them, but some of the loins were just too big. Those, we simply salted, seasoned, and hung, using butchers netting. I cannot really tell the difference between those we cased and those we did not. Both are AMAZING. Thanks again for your post.
Frank
Hi there, Ray from Australia. It is winter time now in the Southern Hemisphere so we are doing the meat cures now. I have just hung my Capocollo using a 1kg piece of loin. In my method I use the 2 day salt cure in the fridge in a sealed bag. We say about 40 grams of salt per kilo of meat (loin or belly. After 2 days I washed with half a bottle of shiraz, (drank the rest), put about 2 tablespoons of chilli flakes and 2 tablespoons of finely ground pepper on the meat on all of the surfaces. We buy large flat sheets of collagen for wrapping the meat tightly, I dont wet it mut maybe I could try that in future and then twisting the ends and tying with string. Then the stretchy netting over it, much easier than any other method of keeping it tight. I put just a little salt, pepper and chilli on the outside I have hang it in the shed only 2 days ago, we will be waiting for at least 2 -3 months for it to go hard and then eat it. I hope it is good, this one will be fiery hot with that much chilli and pepper on it.
Thank you for the great website, if we dont talk about this and continue the traditions of the past it will be gone forever.
Hi Dave
I was wondering do you use pork loins, or pork tenderloins I do not even know if there is a difference for the capicola ? And also do you use boneless pork ?
Thanks
Zmack77
I use boneless whole pork loins. But you can make miniature ones by using pork tenderloins. Just don't hang them to age as long.
Hi Dave
I was wondering if you can use pork butts for the capicola , for stuffing purposes with a stuffer will smaller cuts of pork be ok. Or should I not use the machine and make larger pieces and stuff by hand . Any info will be greatly appreciated
Thanks
Zmack77
Use while pieces of meat. Do not grind them or cut them then stuff. Use only whole pieces. Pork butts are the typical piece of meat used to make capicola. It has the best marbling of fat and meat. The name capicola comes from the Italian word coppa, which means neck. Which is why the top of the butt ( just behind the neck of the pig) is used. Being Italian and making many different cured meats over the years I've never seen loins used, but I suppose they work well for you. Also the casing are 4-5" beef caps and not middles. Middles are 2.5" and are used for soppressata.
Also try putting rolled pancetta in the beef cap casing. Turns out Very nice! Best of luck to you all
try bringing in a Food Saver bag. I salt the pork butt then put it in the Food Saver bag. Pour the rest of the dry salt mixture in then vacuum seal it. Place the bag in the frig for a couple of days and turn every 12 hours. A brine will form as the water comes out of the pork. After 2 days remove the pork and wash it and dry it and proceed with the curing process.
try bringing in a Food Saver bag. I salt the pork butt then put it in the Food Saver bag. Pour the rest of the dry salt mixture in then vacuum seal it. Place the bag in the frig for a couple of days and turn every 12 hours. A brine will form as the water comes out of the pork. After 2 days remove the pork and wash it and dry it and proceed with the curing process.
Post a Comment